Cuddly Amigurumi Giraffe
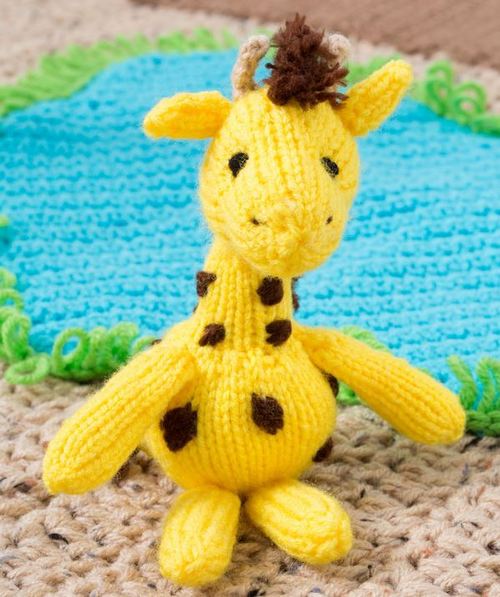
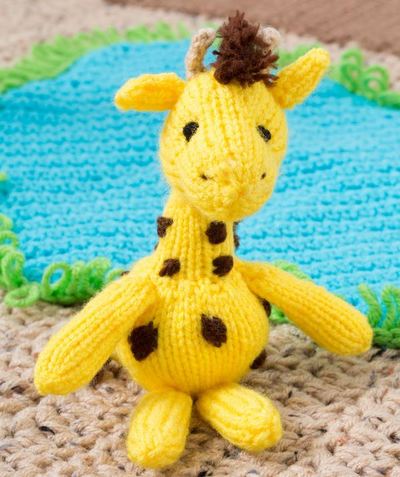
Giraffes are seriously underrated animals. Show your kids an early love for giraffes with their very own Cuddly Amigurumi Giraffe. We've never seen any free amigurumi patterns so cute (or with such long necks)! You can even make this adorable giraffe into a Christmas ornament if you want for that animal-loving kid of yours. Even those just beginning knitting can manage this giraffe as their first longer project, as it lacks more advanced knitting techniques. If you're feeling creative, try making the giraffe with different colors.

Knitting Needle Size5 or 3.75 mm, Double-Pointed Knitting Needles (DPNs)
Yarn Weight(4) Medium Weight/Worsted Weight and Aran (16-20 stitches to 4 inches)
Gauge1 stitches, 2 rows, 3 inches. stockinette stitch
Materials:
- RED HEART® Super Saver®
- A: 324 Bright Yellow - 1 skein
- B: 334 Buff - 10 yards
- C: 360 Cafe - 10 yards
- Susan Bates® Double Pointed Knitting Needles: - 3.75 mm [US 5]
- Susan Bates® Crochet Hook: - 3.75mm [F-5]
- Stitch marker
- yarn needle
- fiberfill
- black embroidery thread
- embroidery needle
Measurements: Finished Size 7½” (19 cm) tall.
Abbreviations:
K = knit
mm = millimeter
P = purl
st(s) = stitch(es)
tog = together
( ) = follow instructions in parentheses as indicated.
Gauge: 22 sts = 4”(10 cm), 20 rows = 4” (10 cm) in Stockinette Stitch. CHECK YOUR GAUGE. Use any size needles to obtain the gauge.
Special Stitches:
Increase – Knit into the front and the back of the next stitch (1 stitch increase).
Notes:
Body components are worked separately and are sewn together using cast on and bind off ends.
Instructions
Head
With A, cast on 6 sts, leaving a long end for sewing. Join, being careful that sts are not twisted, and begin working in the round. Place marker for beginning of round.
Round 1 (Right side): Work Increase around: 12 sts.
Round 2: (K1, work Increase) around: 18 sts.
Round 3: (K2, work Increase) around: 24 sts.
Round 4: (K3, work Increase) around: 30 sts.
Rounds 5-11: Knit around.
Round 12: (K3, K2tog) around: 24 sts.
Round 13: Knit around.
Round 14: (K2, K2tog) around: 18 sts.
Rounds 15-20: Knit around.
Begin stuffing Head firmly with fiberfill as Rounds 21-24 are worked.
Round 21: (K1, K2tog) around: 12 sts.
Round 22: Knit around.
Round 23: (K1, K2tog) around: 8 sts.
Round 24: K2tog around: 4 sts.
Cut yarn, leaving a 12” (30 cm) end. Thread yarn needle with the end and weave through remaining stitches, draw up firmly; fasten securely.
Body
With A, cast on 14 sts, leaving a long end for sewing. Join, being careful that sts are not twisted, and begin working in the round. Place marker for beginning of round.
Round 1 (Right side): Knit around.
Rounds 2-11: Knit around.
Round 12: Work Increase around: 28 sts.
Round 13: (K3, work Increase) around: 35 sts.
Rounds 14-26: Knit around.
Round 27: (K3, K2tog) around: 28 sts.
Begin stuffing Body firmly with fiberfill as Rounds 28-30 are worked.
Round 28: (K2, K2tog) around: 21 sts.
Round 29: (K1, K2tog) around: 14 sts.
Round 30: K2tog around: 7 sts.
Cut yarn, leaving a 12” (30 cm) end. Thread yarn needle with the end and weave through remaining stitches, draw up firmly; fasten securely.
Legs (Make 4)
With A, cast on 10 sts, leaving a long end for sewing. Join, being careful that sts are not twisted, and begin working in the round. Place marker for beginning of round.
Round 1 (Right side): Knit around.
Rounds 2-17: Knit around.
Begin stuffing Leg with fiberfill as Rounds 18 and 19 are worked.
Round 18: K1, (K2tog, K1) around: 7 sts.
Round 19: K1, (K2tog, K1) around: 5 sts.
Cut yarn, leaving a 10” (25 cm) end. Thread yarn needle with the end and weave through remaining stitches, draw up firmly; fasten securely.
Ears (Make 2)
With A, cast on 6 sts, leaving a long end for sewing. Join, being careful that sts are not twisted, and begin working in the round. Place marker for beginning of round.
Round 1 (Right side): Knit around.
Rounds 2-5: Knit around.
Round 6: K2tog, K2, K2tog: 4 sts.
Round 7: Knit around.
Cut yarn, leaving a 8” (20 cm) end. Thread yarn needle with the end and weave through remaining stitches, draw up firmly; fasten securely.
Tail
With A, cast on 2 sts.
Row 1 (Right side): Knit across, slide sts to opposite end of needle, do not turn.
Rows 2-5: Repeat Row 1.
Cut yarn, leaving a 8” (20 cm) end. Thread yarn needle with the end and weave through remaining stitches, draw up firmly; fasten securely.
Horns (Make 2)
With B, cast on 2 sts.
Row 1 (Right side): Knit across, slide sts to opposite end of needle, do not turn.
Rows 2-5: Repeat Row 1.
Cut yarn, leaving a 8” (20 cm) end. Thread yarn needle with the end and weave through remaining stitches, draw up firmly; fasten securely.
Mane
With C, cast on 22 sts.
Bind off all sts in knit, leaving a 10” (25 cm) end for sewing.
FINISHING
Using photo as a guide and threading yarn needle with long cast on and bind off ends, assemble Giraffe. Sew Head, Legs and Tail to Body. Sew Ears and Horns to Head.
Using crochet hook, weave 2, 4” (10 cm) lengths of C in end of Tail to form tassel.
Using crochet hook, weave 10, 4” (10 cm) lengths of C in down length of Mane.
Using photo as a guide and threading yarn needle with long cast on and bind off ends, sew Mane to Head.
Using photo as a guide and threading yarn needle with a 12” (30 cm) length of C or embroidery floss and embroidery needle, embroider spots on Body, and Eyes and Nose on Head.
Read NextKnit Monkey Toy
Your Recently Viewed Projects
kltinsley 1422993
May 08, 2015
I never paid much attention to giraffes before I had my daughter. On a trip to the zoo when she was a baby my husband bought her a stuffed giraffe and the love affair started. She's now almost 5 and still carries the giraffe everywhere and has to sleep with it every night. I've noticed over the last couple of years that giraffes have really become popular. It used to be that I could only find outfits with giraffes on them once in a blue moon, now they're everywhere, which is great for my giraffe girl )
Report Inappropriate Comment
Are you sure you would like to report this comment? It will be flagged for our moderators to take action.
Thank you for taking the time to improve the content on our site.

