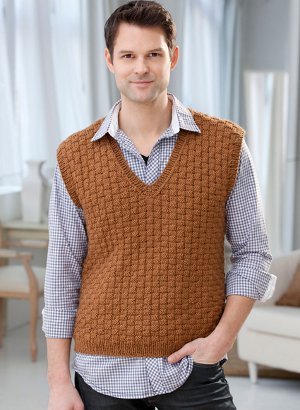
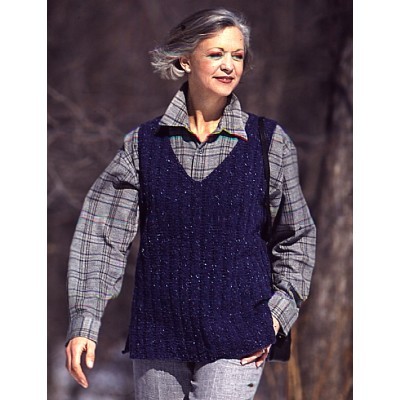
Easy V-Neck Vest

Simple yet fashionable, the Easy V-Neck Vest proves that style doesn't have to be complicated. This basic knit vest pattern features an attractive v-neck opening and a simple, slimming construction. The Easy V-Neck Vest is perfect for layering over t-shirts and button downs or pairing with blazers and jackets. You'll love coming back to this pattern time and time again.

Knitting Needle Size8 or 5 mm, 10 or 6 mm, Circular Knitting Needles
Yarn Weight(5) Bulky/Chunky (12-15 stitches for 4 inches)
Materials:
- RED HEART® “Artesano™”: 3 (4, 5, 6, 6) Balls 4373 Moonstruck
- Knitting Needles: 5mm [US 8] and 6mm [US 10] Circular Knitting Needles: 5mm [US 8] – 24”
- 2 Stitch markers
- Yarn needle
GAUGE: 13 sts = 4”; 20 rows= 4” in Reverse St st.
CHECK YOUR GAUGE. Use any size needles to obtain the gauge.
To Fit Chest: 34-36 (38-40, 42-44, 46-48, 50-52)”
Finished Chest: 36½ (40, 44½, 48, 52½)”
SPECIAL ABBREVIATION:
ssk (slip, slip, knit) = Slip next 2 sts knitwise, one at a time,
to right needle; insert point of left needle into the fronts of
these 2 sts and knit them together from this position.
Note: To avoid color pooling, join a second ball of yarn and alternate working 2 rows from each ball.
BACK
** With smaller needles, cast on 62 (66, 74, 78, 86) sts.
Work in ribbing as follows:
Row 1 (Right Side): P2, * K2, P2; repeat from * across.
Row 2: K2, * P2, K2; repeat from * across.
Repeat Rows 1 and 2 for ribbing for 3”, end by working Row 2. Change to larger needles and Reverse St st (P on right side rows; K on wrong side rows) until 17” from beginning, end K row. **
Shape Armholes
Bind off 4 (4, 5, 6, 6) sts at beginning of next 2 rows – 54 (58, 64, 66, 74) sts. Dec 1 st at each end of every P row 6 (7, 8, 8, 9) times – 42 (44, 48, 50, 56) sts. Work even until armhole measures 8 (9, 10, 10, 11)” end K row.
Shape Shoulders
Bind off 4 (5, 5, 5, 6) sts at the beginning of the next 2 rows, then 5 (5, 5, 6, 7) sts at the beginning of the next 2 rows. Bind off remaining 24 (24, 28, 28, 30) sts for back neck.
FRONT
Work same as Back from ** to **
Shape Armholes and V-neck
Bind off 4 (4, 5, 6, 6) sts, P26 (28, 31, 32, 36) including st on needle after bind-off, bind off center 2 sts, join another ball of yarn, P to end. Work both sides at once.
Next Row: Bind off 4 (4, 5, 6, 6) sts, work to end – 26 (28, 31, 32, 36) sts on each side. Still working both sides at once, dec 1 st at each armhole edge every P row 6 (7, 8, 8, 9) times AND AT THE SAME TIME dec 1 st at each neck edge every other row 5 (5, 7, 7, 7) times, then every other right side row 6 (6, 6, 6, 7) times – 9 (10, 10, 11, 13) sts each side. Work even on these sts until armholes
measure same as Back to shoulder, end K row.
Shape Shoulders: Work as for Back.
FINISHING
Neckband
Sew shoulder and side seams. With right side facing and circular needle, begin at left shoulder seam, pick up and K40 (44, 48, 52, 56) sts down left front neck edge, pick up and K1 st from bound-off center sts, place marker on needle, pick up and K a 2nd st from bound-off sts, pick up and K40 (44, 48, 52, 56) sts up right front neck edge and 26 (26, 30, 30, 30) sts across back neck edge – 108 (116, 128, 136, 144) sts. Place marker for beginning of round. Work in K2, P2 ribbing to 2 sts before front marker, K2tog, slip marker, ssk, P1, work in K2, P2 ribbing to end.
Working in established ribbing pattern, continue to work decreases before and after front marker every rnd 7 more times – 92 (100, 112, 120, 128) sts. Bind off in ribbing, removing markers.
Armbands
With right side facing and circular needle, pick up and K80 (92, 104, 104, 108) sts evenly around armhole edge. Work in K2, P2, ribbing for 6 rnds. Bind off in ribbing.

Read NextSun Struck Vest Knitting Pattern
Your Recently Viewed Projects
Thanks for your comment. Don't forget to share!
paver2
Jan 02, 2017
This one is a fairly classic vest, except for the bulky yarn. I suspect this would be quite warm and just the thing for early spring or late fall. I am trying to envision it in a solid color yarn and I'm not quite sure if it would look better or worse.
Report Inappropriate Comment
Are you sure you would like to report this comment? It will be flagged for our moderators to take action.
Thank you for taking the time to improve the content on our site.