Classic Men's Vest Knitting Pattern
This men's knit vest is great as a gift for that special man in your life!
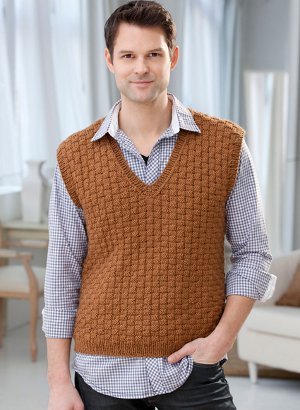
This honey-colored basketweave knit vest pattern is a handsome option for any number of different occasions. The Classic Men's Vest features an attractive color, texture, and slimming silhouette. Layer this stylish piece over a light button down or a casual t-shirt for a polished look. You cant go wrong with the Classic Men's Vest.
Knitting Needle Size7 or 4.5 mm, Circular Knitting Needles
Yarn Weight(4) Medium Weight/Worsted Weight and Aran (16-20 stitches to 4 inches)
Gauge20 sts = 4”; 28 rows = 4” in Basketweave Stitch pattern.
Materials List
- RED HEART® “Soft Yarn”: 3 (4, 4, 5, 5) balls 1882 Toast
- Knitting Needle: 4.5mm (US 7)
- Circular Knitting Needle: 4.5mm (US 7) – 16” length
- Yarn needle
- 1 stitch holder
- 4 stitch markers
Pattern
Directions are for size S; changes for sizes M, L, XL, and XXL are in parentheses.
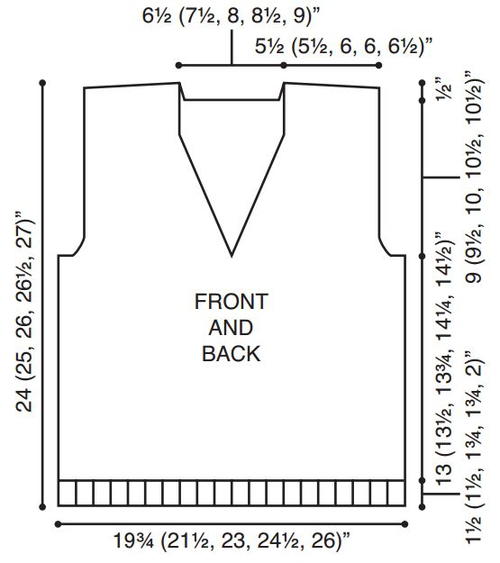
Finished Chest: 39½ (43, 46, 49, 52)”
Finished Length: 24 (25, 26, 26½, 27)”
VEST
Back
** Cast on 99 (107, 115, 123, 131) sts. Work in ribbing as follows:
Row 1 (Right Side): *K1, p1; repeat from * across, end k1.
Row 2: *P1, k1; repeat from * across, end p1.
Repeat Rows 1 and 2 for ribbing for 1½ (1½, 1¾, 1¾, 2)”, end by working Row 2.
Now work in Basketweave Stitch pattern as follows:
Row 1 (Right Side): Knit.
Row 2: K4, p3, *k5, p3; repeat from * across, end k4.
Row 3: P4, k3, *p5, k3; repeat from * across, end p4.
Row 4: Repeat Row 2.
Row 5: Knit.
Row 6: P3, *k5, p3; repeat from * across.
Row 7: K3, *p5, k3; repeat from * across.
Row 8: Repeat Row 6.
Repeat rows 1-8 for Basketweave Stitch pattern until 14½ (15, 15½, 16, 16½)” from beginning, end by working Row 2.**
Shape Armholes
Keeping continuity of pattern, bind off 2 (4, 4, 6, 6) sts at the beginning of the next 2 rows – 95 (99, 107, 111, 119) sts. Then decrease 2 sts at the beginning of the next 4 rows – 87 (91, 99, 103, 111) sts. Work until armhole peasures 9 (9½, 10, 10½, 10½)”. End by working a wrong side row.
Shape Back Neck and Shoulders
Keeping continuity of pattern across 28 (28, 30, 31, 33) sts, join another ball of yarn and bind off center 31 (35, 39, 41, 45) sts, continue to work in pattern across remaining 28 (28, 30, 31, 33) sts. Working both shoulders at once.
Work one row even.
Next Row: Dec 1 st at each neck edge – 27 (27, 29, 30, 32) sts each shoulder. Work one row even. Bind off 14 (14, 15, 15, 16) sts at the beginning of the next 2 rows. Bind off 13 (13, 14, 15, 16) sts at the beginning of the next 2 rows.
Front
Work same as Back from ** to **
Shape Armholes, V-Neck, and Shoulders
Work armhole shaping same as for Back, AND AT THE SAME TIME, on first row of armhole shaping, slip the center front st onto a holder, join another ball of yarn and continue to work in pattern to end. Work both sides at once.
Next Row: Bind off 1 st at each edge of V-neck every other row 6 (7, 8, 9, 11) times, then every 4th row 10 (11, 12, 12, 12) times – 27 (27, 29, 30, 32) sts each shoulder.
Work even until armhole measures same as Back, end by working a wrong side row.
FINISHING
Neckband
Sew shoulder and side seams.
With right side facing and circular needle, beginning at right shoulder seam, pick up and K37 (43, 45, 47, 51) sts across back neck edge, 44 (46, 48, 50, 50) sts down left front neck edge, place marker, 1 st from stitch holder, place marker, and 44 (46, 48, 50, 50) sts up right front neck edge – 126 (136, 142, 148, 152) sts. Place double markers for beginning of round.
Round 1: Work in K1, P1 ribbing to 2 sts before marker, P2tog, slip marker, K1, slip marker, P2tog, work K1, P1 to end of round.
Round 2: Working in established ribbing pattern until 2 sts before marker, ssk, slip marker, K1, slip marker, K2tog, work to end of round.
Repeat rounds 1 and 2, once more. Bind off in ribbing, remove markers.
Armbands
With right side facing and circular needle, pick up 108 (112, 116, 120, 120) sts evenly around armhole edge. Work in ribbing for 4 (4, 4, 5, 5) rounds.
Bind off in ribbing.
Read NextA Walk in the Country Sweater Vest
Your Recently Viewed Projects
MillieBear2017
Jul 03, 2017
HELP! Beginner knitter here and I don't know how to finish the front of this. How should I shape the shoulders. The pattern doesn't say and I'm unsure how to proceed. Thanks in anticipation.
Lisa
Jan 04, 2021
All the instructions to do that are included in the pattern, as it is shown on this page, this is an intermediate pattern so as a beginner you may not be as practiced at reading and interpreting a pattern at this level. For reference, this website does not own any of the patterns they host, so if you are having difficulty with a pattern you can always go to the source for assistance, this is a red heart pattern that can be found here- https//www.yarnspirations.com/on/demandware.static == /-/Sites-master-catalog-spinrite/default/dwad01f2a == d/PDF/RHK0432-022540M.pdf
jdscott 2942525
Jan 17, 2017
I knitted this for my brother for his birthday and he loved it! This is such a great canvas to add a breastpocket of any type if you want to. I had to rip back the armholes the first time I did it because I didn't split the pick up and knits evenly between the two sides, so one side looked lopsided. Otherwise, loved this knit!
MillieBear2017
Jul 03, 2017
Hi, how did you shape the shoulders on the front? The pattern doesn't tell you how to finish.
drollocpa 8806934
Dec 22, 2014
I just finished this worked beautifully, with a few exceptions. First, the front shoulder bind-offs were not mentioned at the end of the directions for the front. I'm a very experienced knitter, so I knew what to do, but everyone won't. Second, the number of stitches the directions called to be picked up were too many. I followed the directions, and the armholes "flared". I ripped out, and used what I thought would be right (98 stitches for large instead of 116) and it worked great. I would ake this again.
CCUK 2272297
Jun 25, 2014
I assume this can be adapted to fit the ladies and with a basketwear pattern not need blocking? Being careful with the figures it could fit a size 14 UK approximately 35-636" with 2" ease so it is not baggy to fit over a thin top. A C.
Report Inappropriate Comment
Are you sure you would like to report this comment? It will be flagged for our moderators to take action.
Thank you for taking the time to improve the content on our site.

