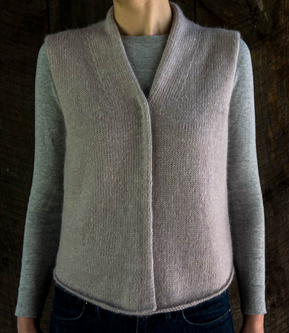
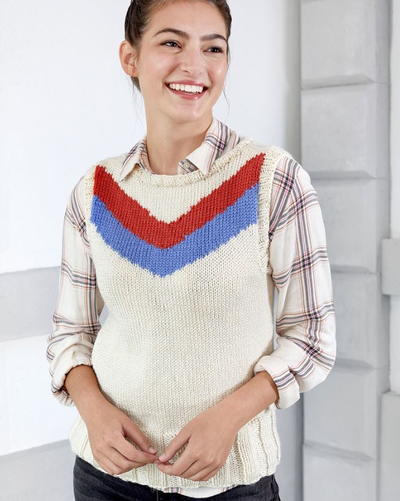
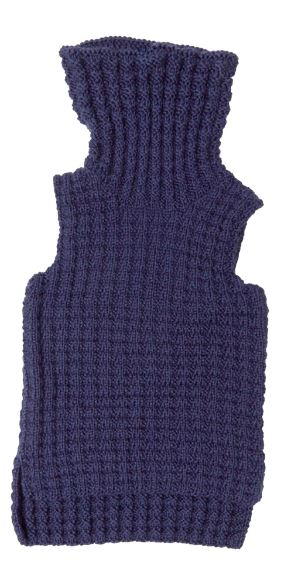
Cozy Waffle Stitch Vest
This easy knit vest pattern is perfect for new knitters to try!

Stay warm and stylish this winter when you make this Cozy Waffle Stitch Vest! The easy knitting pattern is a great way to add a fun layer to almost any outfit. Cozy as can be, the knit vest incorporates the waffle stitch in a fun and unique way. With its sleeveless design and chunky knit turtleneck, this top will likely see plenty of use when the cold weather returns. You can easily wear this knit top over a long-sleeved T-shirt or a blouse, and you'll be as warm as can be. It's also appropriate to wear in most work settings and is sure to give you plenty of compliments!

Knitting Needle Size10 or 6 mm, 11 or 8 mm
Yarn Weight(5) Bulky/Chunky (12-15 stitches for 4 inches)
Gauge14½ sts = 4" [10 cm]; 19½ rows = 4" [10 cm] in Waffle Stitch using smallest needles. CHECK YOUR GAUGE. Use any size needles to obtain the gauge.
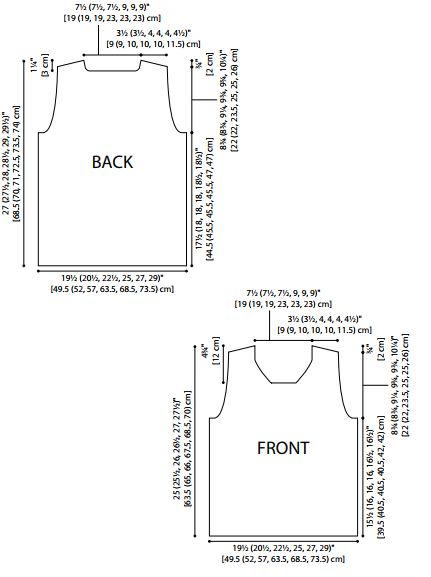
Finished SizeFinished Chest: 39 (41, 45, 50, 54, 58)" [99 (104, 114, 126, 137, 147.5) cm] Finished Front Length: 25 (25½, 26, 26½, 27, 27½)" [63.5 (65, 66, 67.5, 68.5, 70) cm] Finished Back Length: 27 (27½, 28, 28½, 29, 29½)" [68.5 (70, 71, 72.5, 73.5, 75) cm]
Materials List
- RED HEART® Soft Essentials™: 5 (5, 6, 6, 7, 8) balls 7851 Navy
- Susan Bates® Knitting Needles: 6mm [US 10], 6.5mm [US 10½], and 8mm [US 11]
- Removable stitch markers
- Stitch holders
- Yarn needle
You can never have too many easy knitting patterns at your fingertips! You'll discover additional projects to try when you take a look at our free eBook 8 Designs for Knitting: Free Patterns for Beginners and Easy Knitting Stashbusters free eBook
Instructions
Notes
-
Directions are for size Small. Changes for sizes Medium, Large, X-Large, 2X-Large, and 3X-Large are in parentheses.
-
Vest is made from two pieces: Back and front.
-
Each piece is worked from the lower edge upwards in Waffle Stitch.
-
Front is shorter than the back.
-
Turtleneck is worked starting with Row 1 on the wrong side of the garment so that when folded over, the right side faces out.
Special Stitch
ssk (slip, slip, knit) = Slip next 2 stitches, one at a time, as if to knit to right needle, insert point of left needle through front of stitches, knit these sts together through back loop—1 st decreased.
Waffle Stitch
(Multiple of 4 sts + 2 additional sts)
-
Row 1 (right side): K2, *p2, k2; repeat from * to end.
-
Row 2: P2, *k2, p2; repeat from * to end.
-
Row 3: Knit.
-
Row 4: Purl.
-
Repeat Rows 1–4 for Waffle Stitch.
Back
With smallest needles, cast on 70 (74, 82, 90, 98, 106) sts.
Work in Waffle Stitch until piece measures about 17½ 18, 18, 18, 18½, 18½)" [44.5 (45.5, 45.5, 45.5, 47, 47) cm] from beginning, ending with a wrong side row.
-
Shape Armholes
Note: When instructed to work in pattern "as established" work the next row of the pattern and line up the stitches as in previous rows.
Next 2 (2, 4, 4, 4, 4) Rows: Bind off 4 (4, 4, 4, 6, 6) sts, continue in Waffle Stitch as established to end of row—62 (66, 66, 74, 74, 82) sts.
Next 4 (6, 4, 6, 6, 4) Rows: Bind off 2 (2, 2, 2, 2, 4) sts, continue in Waffle Stitch as established to end of row—54 (54, 58, 62, 62, 66) sts.
Work even in Waffle Stitch as established until armholes measure about 8¼ (8¼, 8¾, 9¼, 9¼, 9¾)" [21 (21, 22, 23.5, 23.5, 25) cm], ending with a wrong side row. -
Shape Back Neck and Shoulders
Row 1 (right side): Work in Waffle Stitch as established over first 14 (14, 16, 16, 16, 18) sts for right side, place center 26 (26, 26, 30. 30, 30) sts on holder for back neck, join a 2nd ball of yarn and work in Waffle Stitch as established to end of row for left side—14 (14, 16, 16, 16, 18) sts for each side of neck.
Row 2: Work even in Waffle Stitch as established across all left side sts; with other ball of yarn, work even in Waffle Stitch as established across all right side sts.
Row 3: Bind off 6 (6, 7, 7, 7, 8) sts then work in Waffle Stitch as established to last 3 sts of right side, k2tog, k1; with other ball of yarn, k1, ssk, work in Waffle Stitch as established to end of left side— 13 (13, 15, 15, 15, 17) sts for left side and 7 (7, 8, 8, 8, 9) sts for right side.
Row 4: Bind off 6 (6, 7, 7, 7, 8) sts then work in Waffle Stitch as established to end of left side; with other ball of yarn, work in Waffle Stitch as established to end of right side—7 (7, 8, 8, 8, 9) sts for each side of neck.
Row 5: Bind off all remaining sts of right side; work in Waffle Stitch as established to end of left side.
Row 6: Bind of all remaining sts of left side.
Front
With smallest needles, cast on 70 (74, 82, 90, 98, 106) sts.
Work in Waffle Stitch until piece measures about 3½" [7.5 cm] from beginning, place a marker at each end of last row.
Continue in Waffle Stitch until piece measures about about 15½ (16, 16, 16, 16½, 16½)" [39.5 (40.5, 40.5, 40.5, 42, 42) cm] from beginning, ending with a wrong side row.
-
Shape Armholes
Note: When instructed to work in pattern "as established" work the next row of the pattern and line up the stitches as in previous rows.
Next 2 (2, 4, 4, 4, 4) Rows: Bind off 4 (4, 4, 4, 6, 6) sts, continue in Waffle Stitch as established to end of row—62 (66, 66, 74, 74, 82) sts.
Next 4 (6, 4, 6, 6, 4) Rows: Bind off 2 (2, 2, 2, 2, 4) sts, continue in Waffle Stitch as established to end of row—54 (54, 58, 62, 62, 66) sts.
Work even in Waffle Stitch as established until armholes measure about 4¾ (4¾, 5¼, 5¾, 5¾, 6¼)" [12 (12, 13.5, 14.5, 14.5, 16) cm], ending with a wrong side row. -
Shape Front Neck
Row 1 (right side): Work in Waffle Stitch as established over first 20 (20, 22, 22, 22, 24) sts for left side, place center 14 (14, 14, 18, 18, 18) sts on holder for front neck, join a 2nd ball of yarn and work in Waffle Stitch as established to end of row for right side—20 (20, 22, 22, 22, 24) sts for each side of neck.
Row 2: Work even in Waffle Stitch as established across all right side sts; with other ball of yarn, work even in Waffle Stitch as established across all left side sts.
Row 3 (neck decrease row): Work in Waffle Stitch as established to last 3 sts of left side, k2tog, k1; with other ball of yarn, k1, ssk, work in Waffle Stitch as established to end of right side—19 (19, 21, 21, 21, 23) sts for each side of neck.
Rows 4–15: Repeat Rows 2 and 3 for 6 more times—13 (13, 15, 15, 15, 17) sts remain for each side of neck.
Work even in Waffle Stitch as established, on both sides of neck using separate balls of yarn, until armholes measure about 8¾ (8¾, 9¼, 9¾, 9¾, 10¼)" [22 (22, 23.5, 25, 25, 26) cm], ending with a wrong side row. -
Shape Shoulders
Row 1 (right side): Bind off 6 (6, 7, 7, 7, 8) sts then work in Waffle Stitch as established to end of left side; with other ball of yarn, work in Waffle Stitch as established to end of right side—13 (13, 15, 15, 15, 17) sts for right side and 7 (7, 8, 8, 8, 9) sts for left side.
Row 2: Bind off 6 (6, 7, 7, 7, 8) sts then work in Waffle Stitch as established to end of right side; with other ball of yarn, work in Waffle Stitch as established to end of left side—7 (7, 8, 8, 8, 9) sts for each side of neck.
Row 3: Bind off all remaining sts of left side; work in Waffle Stitch as established to end of right side.
Row 4: Bind of all remaining sts of right side.
Finishing
-
Sew right shoulder seam.
-
Turtleneck
With right side facing and smallest needles, beginning at left shoulder, pick up and k17 sts along left front neck, k14 (14, 14, 18, 18, 18) front neck sts from holder, pick up and k17 sts along right front neck, 4 sts along right back neck, k26 (26, 26, 30, 30, 30) back neck sts from holder, pick up and k4 sts along left back neck—82 (82, 82, 90, 90, 90) sts.
Beginning with Row 1 (see Note #4 above) of pattern, work in Waffle Stitch for 8 rows.
Change to medium needles and work in Waffle Stitch for 12 rows.
Change to largest needles and work in Waffle Stitch for 23 (23, 23, 23, 27, 27) rows, ending with a Row 3 of pattern.
Bind off loosely. -
Sew left shoulder seam and turtleneck seam.
-
Sew side seam from armhole to markers, leaving lower portion unsewn for side slit.
-
Weave in ends.
-
Click here for a larger version of the photo below.
-
Click here for a larger version of the diagram below.
Abbreviations
- k
- knit
- k2tog
- knit 2 stitches together
- p
- purl
- st(s)
- stitch(es)
- *
- repeat whatever follows the * as indicated
Read NextAutumn Sweater Vest