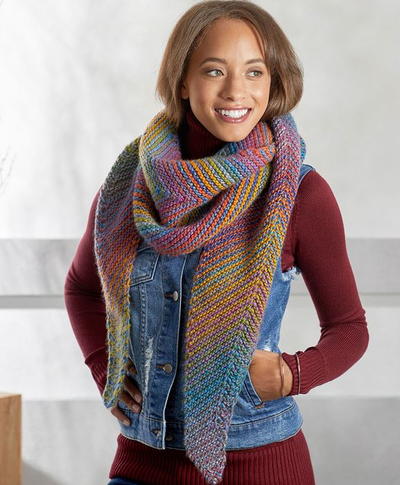
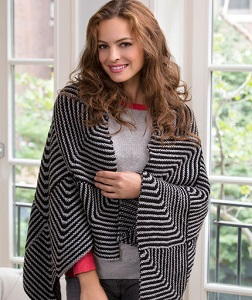
Cityscape Knit Shawl Pattern
This fun and funky knit wrap is a gorgeous statement piece for anyone!

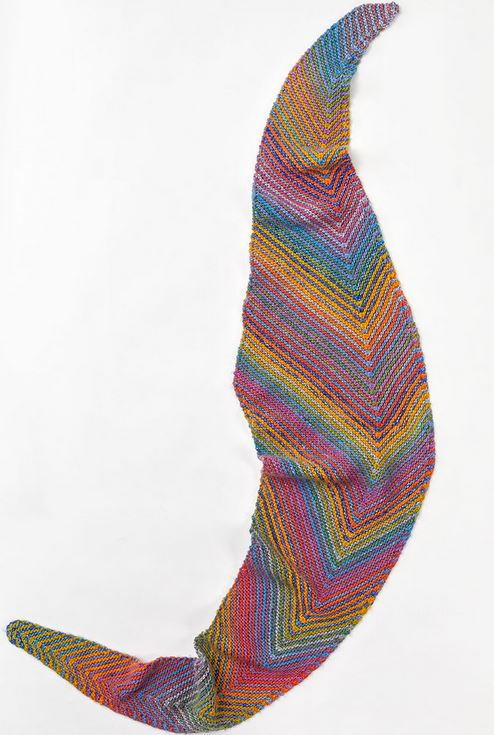
If there is any knitted accessory that'll make you feel pretty in the city, it's this Cityscape Knit Shawl Pattern. This colorful knitted shawl wrap is perfect for free spirits who love to show their true colors. The long, triangular construction makes it possible to wear this as either a shoulder shawl or wrapped around your neck like a kerchief scarf, and the easy pattern of increases and decreases gives the stripes their unique chevron shape. This is the perfect first project for someone just trying out colorwork since all you do is alternate colors every two rows.

Knitting Needle Size10 or 6 mm
Yarn Weight(4) Medium Weight/Worsted Weight and Aran (16-20 stitches to 4 inches)
Gauge14 sts = 4" [10 cm]; 20 rows = 4" [10 cm] in Garter stitch before blocking.CHECK YOUR GAUGE. Use any size needles to obtain the gauge; however, exact gauge is not required for this project.
Finished Size92" [233.5 cm] long x 12" [30.5 cm] wide (at deepest point) after blocking
Materials List
- RED HEART® Colorscape yarn: 2 balls each 6512 Sydney (A) and 9356 Acapulco (B)
- Susan Bates® Knitting Needles: 6 mm [US 10] needle
- Optional removable marker (see Notes)
- Yarn needle
Shawl
Notes
-
To line up the CDD’s and create a shawl ‘spine’, work to 1 stitch before the completed CDD of the previous right side row by looking for the passed stitch (it looks like a left leaning slash), then work the next CDD.
-
For ease in locating 1 stitch before CDD, a removable marker may be used. Place marker before CDD on Row 9 of the Setup section. After completing Row 9, move marker 1 stitch to the right. On Right Sides of Increase and Decrease sections, *work pattern as established to marker, slip marker, make CDD, finish row as written and then move marker 1 stitch to the right. Repeat from * to end of Decrease section.
Special Stitches
-
CDD (centered double decrease) = Slip next 2 sts as if to k2tog, k1, p2sso to decrease 2 sts.
-
kfb (knit into the front and back of next stitch) = Knit the next stitch on the left hand needle and before taking it off the needle, insert the tip of your working needle into the backside of the same stitch and knit it through the back loop. Then transfer the 2 stitches to the right hand needle – 1 st increased.
-
ssk (slip, slip, knit) = Slip next 2 stitches, one at a time, as if to knit to right needle, insert point of left needle through front of stitches, knit these sts together through back loop – 1 st decreased.
-
k2tog = Knit 2 stitches together – 1 st decreased.
Shawl
This shawl is worked alternating 2 rows of color A and then 2 rows of color B. Carry yarn not used loosely up edge, twisting it to avoid loops.
-
Setup
With A, cast on 3 sts.
Row 1 (Right Side): Continuing with A, kfb, k1, kfb - 5 sts.
Row 2: Knit.
Row 3: With B, k1, kfb, k1, kfb, k1 – 7 sts.
Row 4: Knit.
Row 5: With A, k1, kfb, knit to 2 sts before end of row, kfb, k1 - 9 sts.
Row 6: Knit.
Row 7: With B, k1, kfb, knit to 2 sts before end of row, kfb, k1 - 11 sts.
Row 8: Knit.
Row 9: With A, k1, kfb, k1, CDD, knit to 2 sts before end of row, kfb, k1.
Row 10: Knit. -
Increase Section
See note above regarding CDD placement.
Row 1 (Right Side): With B, k1, kfb, knit to 1 st before previous CDD, CDD, knit to 2 sts before end of row, kfb, k1.
Row 2: K1, kfb, knit to 2 sts before end of row, kfb, k1 – 2 sts increased.
Row 3: With A, k1, kfb, knit to 1 st before previous CDD, CDD, knit to 2 sts before end of row, kfb, k1.
Row 4: Knit.
Row 5: Same as Row 1.
Row 6: K1, kfb, knit to end of row – 1 st increased.
Row 7: Same as Row 3.Row 8: Knit.
Repeat Increase Rows 1-8, 24 more times – 86 sts. -
Decrease Section
Row 1 (Right Side): With B, knit to 1 st before previous CDD, CDD, knit to end - 2 sts decreased.
Row 2: Knit.
Row 3: With A, k1, kfb, knit to 1 st before previous CDD, CDD, knit to 2 sts before end of row, kfb, k1.
Row 4: Knit.
Row 5: With B, k1, kfb, knit to 1 st before previous CDD, CDD, knit to end of row - 1 st decreased.
Row 6: Knit.
Row 7: Same as Row 3.
Row 8: Knit.
Repeat Decrease Rows 1-8, 23 more times – 14 sts. -
Final Section
Row 1 (Right Side): With B, knit to 1 stitch before previous CDD, CDD, knit to end of row - 12 sts.
Row 2: Knit.
Rows 3 and 4: With A, knit.
Row 5: With B, k1, ssk, k to end of row - 11 sts.
Row 6: Knit.
Rows 7 and 8: With A, knit.
Row 9: With B, k1, ssk, knit to 3 sts before end of row, k2 tog, k1 - 9 sts.
Row 10: Knit.
Rows 11 and 12: With A, knit.
Row 13: With B, k1, ssk, knit to 3 sts before end of row, k2tog, k1 - 7 sts.
Row 14: Knit.
Rows 15 and 16: With A, knit.
Row 17: With B, k1, ssk, k1, k2tog, k1 - 5 sts.
Row 18: Knit.
Rows 19 and 20: With A, knit.
Row 21: With B, k1, ssk, k2tog - 3 sts.
Bind off.
Finishing
Weave in ends and block piece to measurements.
Abbreviations
- A & B
- Colors A and B
- cm
- centimeters
- k
- knit
- mm
- millimeters
- p2sso
- pass 2 slipped sts over
- st(s)
- stitch(es)
- *
- repeat whatever follows the * as indicated
Read NextTristan Eyelet Lace Shawl