Pink Fairy Scarf

Lightweight yarn and a pretty pastel shade pink work together in this knitted scarf pattern to create a summer friendly accessory worthy of any fair lady. Part of what makes the Pink Fairy Scarf special is its construction. Knit in two separate pieces, the scarf is sewn together at the end of the pattern so that each piece can feature an attractive, scalloped edge. No matter what color you choose to make your scarf in, this pattern will become a treasured project for years to come.

Knitting Needle Size2 or 2.75 mm
Yarn Weight(1) Super Fine (27-32 stitches to 4 inches)
Materials
- AUNT LYDIA’S® “Bamboo”, Size 10: 2 balls 0705 Pure Pink.
- Knitting Needles: 2.75mm [US 2.
- Stitch holder
- Tapestry needle.
Size: Scarf measures 5” x 50”.
Gauge/Tension: GAUGE: 40 sts = 4” in pattern stitch blocked.
Special Abbreviations
S2kp2 (slip 2, k1, p2sso) = Slip next 2 sts together knitwise to right needle; knit next st, pass the 2 slipped sts
over knit st and off right needle.
ssk (slip, slip, knit) = Slip next 2 sts one at a time knitwise to right needle; insert point of left needle into
the fronts of these 2 sts and knit them together from this position.
ABBREVIATIONS:
k = kni
mm = millimeters
st(s) = stitch(es)
tog = together
yo = yarn over;
* or ** = repeat whatever follows the * or ** as indicated.
NOTE:This stitch pattern creates a fabric that is scalloped only at the cast on edge. Therefore, the scarf is made in
two pieces, then joined to allow for scalloped edges on both ends.
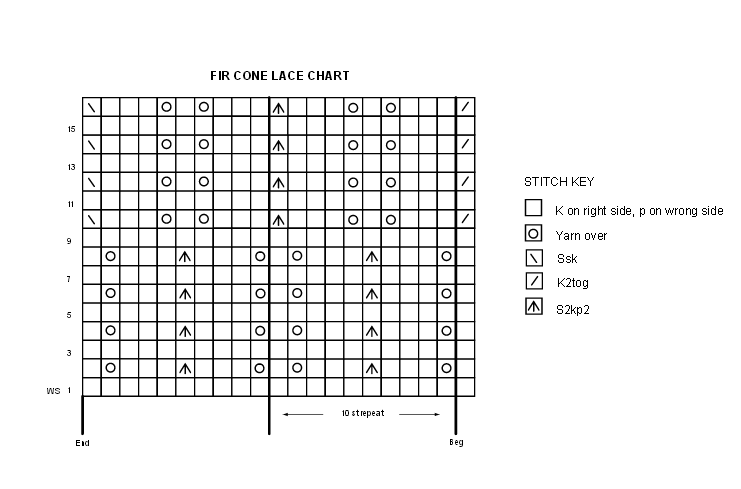
Fir Cone Lace Pattern (multiple of 10 sts + 1)
Row 1 (Wrong Side) and all wrong side rows: Purl.
Rows 2, 4, 6, and 8: K1, * yo, k3, s2kp2, k3, yo, k1; repeat from * across.
Rows 10, 12, 14, and 16: K2tog, * k3, yo, k1, yo, k3, s2kp2; repeat from * ending last repeat k3, yo, k1, yo, k3, ssk.
Repeat Rows 1 – 16 for pattern.
FIRST HALF SCARF
Cast on 49 sts.
Work 4 rows in Garter st, ending with a right side row.
Next Row: K4, work Row 1 of Lace pattern across row to last 4 sts, k4.
Keeping first and last 6 sts in Garter st and center sts in
Lace pattern, repeat Rows 1 – 16 until piece measures 25” from beginning, ending with Row 8 of pattern. Place sts on a holder.
SECOND HALF SCARF
Work same as for first half of scarf until piece measures
25½”, ending with Row 16 of pattern.
FINISHING
Place first half on a knitting needle. Thread tapestry needle with long length of yarn. Hold the two knitting needles in the left hand with wrong sides together. Keeping the yarn needle and yarn under the points of the knitting needles, graft the stitches together as follows:
1. Insert yarn needle through first st of front needle as if to knit and slip the st off.
2. Insert needle through 2nd st of front needle as if to purl, but leave the st on the needle.
3. Insert yarn through first st on back needle as if to purl and slip the st off.
4. Insert yarn through 2nd stitch on back needle as if to knit, but leave st on needle. Repeat from * until all the
sts are joined. Take care to draw yarn up so that gauge of grafting equals gauge of knitting. Fasten off. Weave in ends on wrong side.
Read NextAsymmetrical Stripey Scarf
Your Recently Viewed Projects

Thanks for your comment. Don't forget to share!
Lisa
Jun 07, 2018
I'm making this right now, the only thing I would change is to use a 3 needle bind off for the two halves.
Tricia108
Oct 06, 2017
When I first read the pattern I was wondering why two parts. Upon reading it again it makes sense. Keeping the first part on a spare needle also makes sense so when you finish the second half you can just graft the two sides together. I like working with small needles. This will make a nice lacey pattern which you can wear year round. If you use a nice metallic shimmery yarn it would be a beautiful addition to a dressy outfit. The stitch pattern is not difficult. Thank you.
Report Inappropriate Comment
Are you sure you would like to report this comment? It will be flagged for our moderators to take action.
Thank you for taking the time to improve the content on our site.


