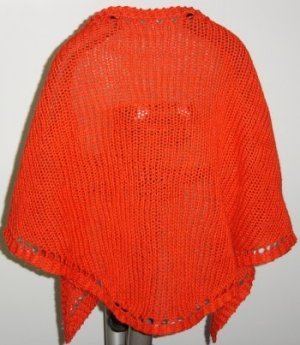
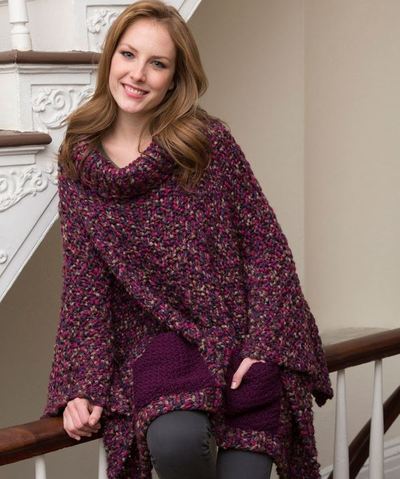
Honeycomb Knit Poncho Pattern

The Honeycomb Knit Poncho Pattern is a great addition to your wardrobe. You'll love having this cozy poncho, because it's casual enough for jeans but has a hint of metallic sparkle making it nice for an evening out on the town. The simple pattern stitch and jumbo yarn make this a quick knit ideal for those looking for an easy design. This easy knitted poncho also makes a great gift. Since the size fits most women, you won't need to worry about the mechanics of sizing. A simple garter lace pattern produces an eye-catching design you are sure to love. Plus, the color of the poncho is neutral enough to please almost anyone.
NotesPoncho fits most women.

Knitting Needle Size15 or 10 mm
Yarn Weight(7) Jumbo
Gauge8½ sts = 4” (10 cm); 16 rows = 4” (10 cm) in Simple Garter Lace Pattern. CHECK YOUR GAUGE. Use any size needles to obtain the gauge.
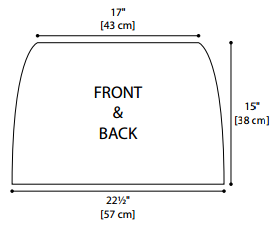
Finished SizeFinished Measurements: Neck: 34” (86 cm) Hem: 45” (114 cm) Length: 15” (38 cm)
Materials List
- RED HEART® Boutique Twilight™: 5 balls 9959 Mercury
- Susan Bates® Knitting Needles: 10 mm [US 15]
- Yarn Needle, stitch marker
For even more easy knitting patterns, be sure to check out our
Instructions
Poncho is worked in rows. The 2 pieces (Front and Back) are sew together. When casting on, leave a 25” (64 cm) tail for seaming. When joining Front and Back pieces together, use the “edge st” for seaming.
SPECIAL STITCHES
P2tog = Purl 2 Stitches Together. Purl 2 sts together (decrease).
Yfrn = Yarn Forward Round Needle. Bring yarn forward and wrap around needle. It’s worked as a yarn over when worked between a knit stitch and a purl stitch (increase).
Pattern Stitch
Simple Garter Lace Pattern
(multiple of 4 sts + 2)
All Rows: K2, *yfrn, p2tog, k2; repeat from * to end of row.
Repeat every row.
Poncho
Front and Back (make 2 pieces)
Cast on 48 sts.
Knit 1 row on Wrong Side.
Next Row (Right Side): K1 (edge st), work across row in Simple Garter Lace Pattern to last st, k1 (edge st).
Place stitch marker to mark Right Side of work.
Keeping first and last sts in Stockinette St for edge stitches, and center 46 sts in Simple Garter Lace Pattern, continue until piece measures 14½” (37 cm) from cast on edge, ending with a Wrong Side row.
Next Row (Right Side): Knit across row decreasing 12 sts evenly spaced—36 sts.
Next Row (Wrong Side): Knit all sts.
Next Row (Right Side): Bind off all sts leaving a 25” (64 cm) tail to sew side seam.
Finishing
Join Front and Back pieces together using yarn needle and Mattress St. Sew the “edge sts” together creating a flat, invisible seam. Weave in ends.
-
Click image to enlarge
Abbreviations
- cm
- centimeters
- k
- knit
- k2tog
- knit 2 sts together
- p
- purl
- st(s)
- stitch(es)
- St st
- Stockinette stitch
- yfrn
- yarn forward around needle
- * or **
- repeat whatever follows the * or ** as indicated
Read NextNeon Accent Cape
Your Recently Viewed Projects
Thanks for your comment. Don't forget to share!
Adenyin 4181021
Apr 03, 2017
Hello, thanks for sharing. I feel really confused with the direction to Knit this poncho. Will appreciate if you can make it more detailed. After knitting all the first row, will I do the rest in garter stitch starting the edge with k2 and ending with k2? And I also don't understand the row with gradual decreasing to 36? Don't understand that at all. Thanks
Lisa
Feb 02, 2018
If you read the pattern carefully all is explained. After knitting the first row, you also knit the second row, after that it actually states to keep the edge stitches in stocking stitch while using garter stitch on the rest of the row, the third to last row explains how to reduce it to the number of stitches to bind off. I don't like the pattern simply for the stockinette stitch edge stitches, they will curl making it difficult to sew together later. I have done it entirely in garter stitch and it worked well. I've also done it in the round in stockinette stitch without any seams.
lisajane71 6700799
Feb 03, 2018
I think the instructions are not in detail, meant for beginners, it is very hard and I usually understand things
Lisa
Feb 19, 2018
This pattern is rated "easy" not beginner. I agree with you I don't think a beginner would be able to complete it without assistance, it requires some experience both in working from a pattern reading a pattern. If you are interested in making it, I could write it out for you in a long form, that I'm sure would be suitable for a beginner.
Liontamer
Nov 13, 2016
Since this is knit in two pieces, would it be alright to Double the cast-on stitches and knit it in the round?
paver2
Dec 21, 2016
I can see some problems knitting this in the round unless you're experienced at adjusting patterns. Since part of it is done in garter stitch, you'd have to adjust for that, since knitting in the round automatically makes a stockinette stitch. It might be more workable to knit it in one piece, working back and forth over a circular needle. That way you wouldn't have to make as many changes and you'd only have one seam to sew.
Report Inappropriate Comment
Are you sure you would like to report this comment? It will be flagged for our moderators to take action.
Thank you for taking the time to improve the content on our site.