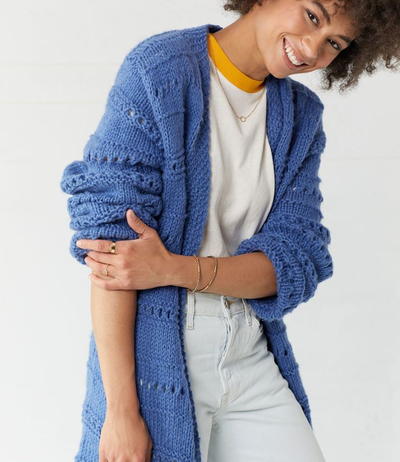
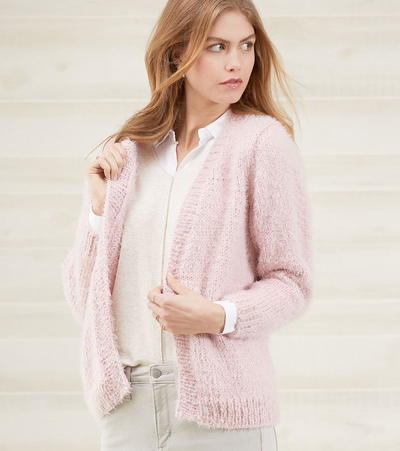
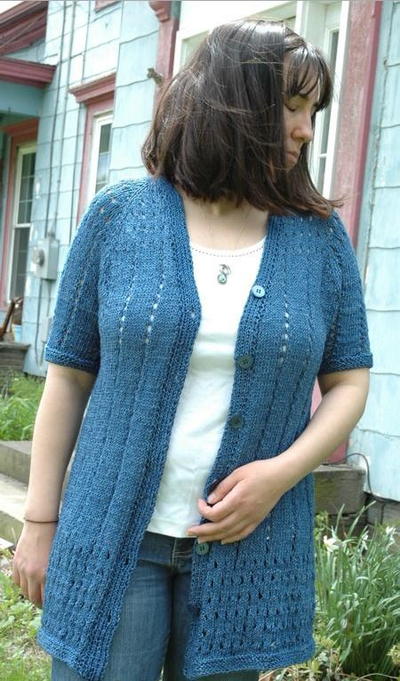
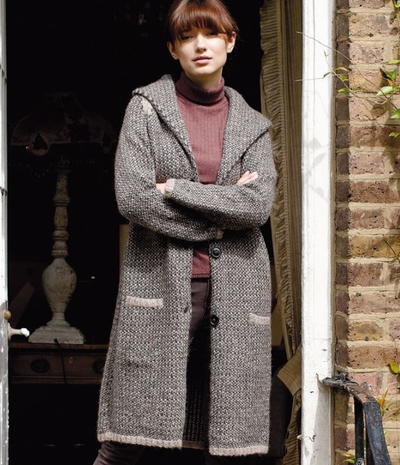
London Morning Knit Cardigan Pattern

To stay chic and warm on chilly spring mornings, the London Morning Knit Cardigan Pattern is an excellent choice. Sweater patterns like these are once in a lifetime. The unique texture comes from a slip stitch pattern that's both fun to knit and simple to achieve. Classic knit cardigans like this never go out of style, so don't be surprised if you find yourself reaching for this cardigan all year-round. It would look exceptionally cute paired with a warm turtleneck or a light camisole.

Knitting Needle Size10 or 6 mm, 7 or 4.5 mm
Yarn Weight(4) Medium Weight/Worsted Weight and Aran (16-20 stitches to 4 inches)
Gauge17 sts and 28 rows to 10 cm measured over patt using 6mm (US 10) needles.
Finished SizeTo fit bust: SM: 81-86 M: 91-97 L: 102-107 XL: 112-117 XXL: 122-127 cm; SM: 32-34 M: 36-38 L: 40-42 XL: 44-45 XXL: 48-50 in
Materials List
-
Soffili Yak yarn
A Desert 001 - 6, 7, 7, 8, 9 balls
B Iron 005 - 6, 6, 7, 7, 8 balls
- 1 pair 4½ mm (no 7) (US 7) needles
- 1 pair 6mm (no 4) (US 10) needles
- 3 x 28mm buttons
- 17 sts and 28 rows to 10 cm measured over patt using 6mm (US 10) needles.
Instructions
BACK
Using 4½mm (US 7) needles and yarn A cast on 95 [104: 113: 125: 137] sts.
Row 1 (RS): P2, *K1, P2, rep from * to end.
Row 2: K2, *P1, K2, rep from * to end.
These 2 rows form rib.
Work in rib for a further 3 rows, inc [-: inc: dec: dec] 1 [-: 1: 1: 1] st at end of last row and ending with WS facing for next row. 96 [104: 114: 124: 136] sts.
Change to 6mm (US 10) needles.
Now work in patt as folls:
Row 1 (WS): Using yarn A, purl. Join in yarn B.
Row 2: Using yarn B, K1, *sl 1 wyaf, K1, rep from * to last st, K1.
Row 3: Using yarn B, purl.
Row 4: Using yarn A, K1, *K1, sl 1 wyaf, rep from * to last st, K1.
These 4 rows form patt.
Cont in patt until back meas 74 [75: 76: 77: 78] cm, ending with RS facing for next row.
-
Shape raglan armholes
Keeping patt correct, cast off 3 sts at beg of next 2 rows. 90 [98: 108: 118: 130] sts.
Next row (RS): Using yarn A K2, sl 1, K1, psso, patt to last 4 sts, using yarn A K2tog, K2.
Next row: Using yarn A P2, P2tog, patt to last 4 sts, using yarn A P2tog tbl, P2.
Rep last 2 rows 2 [4: 8: 11: 15] times more. 78 [78: 72: 70: 66] sts.
Next row (RS): Using yarn A K2, sl 1, K1, psso, patt to last 4 sts, using yarn A K2tog, K2.
Next row: Using yarn A P3, patt to last 3 sts, using yarn A P3.
Rep last 2 rows 24 [24: 21: 20: 17] times more, ending with RS facing for next row. 28 [28: 28: 28: 30] sts.
Cast off.
POCKET LININGS (make 2)
Using 6mm (US 10) needles and yarn A cast on 20 [20: 22: 22: 24] sts.
Beg with patt row 1, work in patt as given for back for 45 [45: 47: 47: 49] rows, ending after 2 rows using yarn A [A: B: B: A] and with RS facing for next row.
Break yarn and leave sts on a holder.
LEFT FRONT
Using 4½mm (US 7) needles and yarn A cast on 61 [64: 70: 73: 79] sts.
Row 1 (RS): *P2, K1, rep from * to last st, K1.
Row 2: K1, *P1, K2, rep from * to end.
These 2 rows form rib.
Work in rib for a further 3 rows, dec [-: dec: inc: inc] 1 [-: 1: 1: 1] st at beg of last row and ending with WS facing for next row. 60 [64: 69: 74: 80] sts.
Change to 6mm (US 10) needles.
Now work in patt as folls:
Row 1 (WS): Using yarn A, K1, P to end. Join in yarn B.
Row 2: Using yarn B, K1, *sl 1 wyaf, K1, rep from * to last 1 [1: 2: 1: 1] st, K1 [1: 2: 1: 1].
Row 3: Using yarn B, K1, P to end.
Row 4:Using yarn A, K1, *K1, sl 1 wyaf, rep from * to last 1 [1: 2:1: 1] st, K1 [1: 2: 1: 1].
These 4 rows form patt.
Cont in patt for a further 93 [93: 95: 95: 97] rows, ending after 2 rows using yarn A [A: B: B: A] and with RS facing for next row.
-
Place pocket
Next row (RS): Patt 12 [12: 14: 14: 16] sts, slip next 20 [20: 22: 22: 24] sts onto a holder and, in their place, patt across 20 [20: 22: 22: 24] sts of first pocket lining, patt rem 28 [32: 33: 38: 40] sts.
Cont straight until 11 rows less have been worked than on back to beg of raglan armhole shaping, ending with WS facing for next row. -
Shape for collar and front slope
Next row (WS): Patt 16 sts and slip these 16 sts onto a holder (for collar), patt to end. 44 [48: 53: 58: 64] sts.
Keeping patt correct and working all front slope shaping on WS rows, cont as folls:
Dec 1 st at front slope edge of 2nd and 2 [2: 2: 1: 2] foll 4th rows. 41 [45: 50: 56: 61] sts.
Work 0 [0: 0: 4: 0] rows, ending with RS facing for next row -
Shape raglan armhole
Keeping patt correct, cast off 3 sts at beg of next row. 38 [42: 47: 53: 58] sts.
Work 1 row, dec 0 [0: 0: 1: 0] st at front slope edge. 38 [42: 47: 52: 58] sts.
Working all raglan armhole decreases as given for back, dec 1 st at raglan armhole edge of next 7 [11: 19: 25: 33] rows, then on foll 19 [19: 16: 15: 12] alt rows and at same time dec 1 st at front slope edge on 2nd [2nd: 2nd: 6th: 2nd] and 3 [1: 0: 0: 0] foll 4th rows, then on 5 [7: 8: 8: 9] foll 6th rows. 3 sts.
Break off yarn B and cont using yarn A only.
Work 1 row, ending with RS facing for next row.
Next row (RS): K1, sl 1, K1, psso. 2 sts.
Next row: P2.
Next row: K2tog and fasten off.
Mark positions for 3 buttons along left front opening edge – first button to come level with row 99, last button to come just below beg of front slope and collar shaping, and rem button halfway between.
RIGHT FRONT
Using 4½mm (US 7) needles and yarn A cast on 61 [64: 70: 73: 79] sts.
Row 1 (RS): K1, *K1, P2, rep from * to end.
Row 2: *K2, P1, rep from * to last st, K1.
These 2 rows form rib.
Work in rib for a further 3 rows, dec [-: dec: inc: inc] 1 [-: 1: 1: 1] st at end of last row and ending with WS facing for next row. 60 [64: 69: 74: 80] sts.
Change to 6mm (US 10) needles.
Now work in patt as folls:
Row 1 (WS): Using yarn A, P to last st, K1. Join in yarn B.
Row 2: Using yarn B, K1 [1: 2: 1: 1], *sl 1 wyaf, K1, rep from * to last st, K1.
Row 3: Using yarn B, P to last st, K1.
Row 4: Using yarn A, K1 [1: 2: 1: 1], *K1, sl 1 wyaf, rep from * to last st, K1.
These 4 rows form patt.
Cont in patt for a further 89 rows, ending after 2 rows using yarn A and with RS facing for next row.
Next row (buttonhole row) (RS): Patt 3 sts, cast off next 2 sts (to make buttonhole in front facing – cast on 2 sts over these cast-off sts on next row), patt until there are 6 sts on right needle after cast-off, cast off next 2 sts (to make buttonhole in front – cast on 2 sts over these cast-off sts on next row), patt to end.
Making a further 2 pairs of buttonholes in this way to correspond with positions marked for buttons on left front and noting that no further reference will be made to buttonholes, cont as folls:
Cont in patt for a further 3 [3: 5: 5: 7] rows, ending after 2 rows using yarn A [A: B: B: A] and with RS facing for next row.
-
Place pocket
Next row (RS): Patt 28 [32: 33: 38: 40] sts, slip next 20 [20: 22: 22: 24] sts onto a holder and, in their place, patt across 20 [20: 22: 22: 24] sts of second pocket lining, patt rem 12 [12: 14: 14: 16] sts.
Cont straight until 11 rows less have been worked than on back to beg of raglan armhole shaping, ending with WS facing for next row. -
Shape for collar and front slope
Next row (WS): Patt to last 16 sts and turn, leaving rem 16 sts on a holder (for collar). 44 [48: 53: 58: 64] sts.
Keeping patt correct and working all front slope shaping on WS rows, cont as folls:
Dec 1 st at front slope edge of 2nd and 2 [2: 2: 1: 2] foll 4th rows. 41 [45: 50: 56: 61] sts.
Work 1 [1: 1: 5: 1] rows, ending with WS facing for next row. -
Shape raglan armhole
Keeping patt correct, cast off 3 sts at beg and dec 0 [0: 0: 1: 0] st at end of next row. 38 [42: 47: 52: 58] sts.
Working all raglan armhole decreases as given for back, complete to match left front, reversing shapings.
SLEEVES
Using 4½mm (US 7) needles and yarn A cast on 44 [47: 47: 47: 50] sts.
Work in rib as given for back for 5 rows, - [dec: inc: inc: -] – [1: 1: 1: -] st at end of last row and ending with WS facing for next row. 44 [46: 48: 48: 50] sts.
Change to 6mm (US 10) needles.
Beg with patt row 1, work in patt as given for back, shaping sides by inc 1 st at each end of 6th and every foll 6th row to 48 [54: 54: 70: 72] sts, then on every foll 8th row until there are 70 [74: 76: 80: 82] sts, taking inc sts into patt.
Cont straight until sleeve meas approx 43 [44: 45: 45: 45] cm, ending after same patt row as on back to beg of raglan armhole shaping and with RS facing for next row.
-
Shape raglan
Keeping patt correct, cast off 3 sts at beg of next 2 rows. 64 [68: 70: 74: 76] sts.
Working all raglan decreases in same way as back raglan armhole decreases, dec 1 st at each end of next and every foll alt row until 16 sts rem.
Work 1 row, ending with RS facing for next row.
Keeping raglan decreases correct as set, cont as folls:
Left sleeve only
Dec 1 st at each end of next row, then cast off 2 sts at beg of foll row. 12 sts.
Dec 1 st at beg of next row, then cast off 2 sts at beg of foll row. 9 sts.
Right sleeve only
Cast off 3 sts at beg and dec 1 st at end of next row. 12 sts.
Work 1 row.
Cast off 2 sts at beg and dec 1 st at end of next row. 9 sts.
Work 1 row.
Both sleeves
Rep last 2 rows twice more.
Cast off rem 3 sts.
MAKING UP
Press. Join all raglan armhole seams using back stitch, or mattress stitch if preferred.
-
Left collar
Slip 16 sts on left front holder onto 6mm (US 10) needles and rejoin appropriate yarn with RS facing.
Keeping patt correct, work 1 row, ending with WS facing for next row. **Place marker between centre 2 sts of last row.
Next row (WS): Patt to within 1 st of marker, inc in next st, slip marker onto right needle, inc in next st, patt to end.
Working all collar shaping on WS rows as set by last row and keeping patt correct at each side of marker, cont as folls:
Inc 1 st at each side of marker on 2nd and every foll alt row until there are 76 sts, then on 2 foll 4th rows, taking inc sts into patt. 80 sts. Cont straight until collar, unstretched, fits up left front slope, across top of left sleeve and across to centre back neck, ending with RS facing for next row.
Cast off 8 sts at beg of next 8 rows.
Cast off rem 16 sts. -
Right collar
Slip 16 sts on right front holder onto 6mm (US 10) needles and rejoin appropriate yarn with WS facing.
Keeping patt correct, work 2 rows, ending with WS facing for next row.
Complete to match left collar from **.
Join shaped cast-off ends of collar sections, then sew one edge of collar in place to front slope, sleeve top and back neck edges. Fold collar in half so that free row-end edge matches seam just sewn and neatly sew this edge in place. Fold 8 sts to inside along front opening edges below collar and neatly sew in place. Once this facing is sewn in place, pairs of buttonholes in right front should match – neatly sew around buttonholes to hold both layers together. -
Pocket tops (both alike)
Slip 20 [20: 22: 22: 24] sts on pocket holder onto 4½mm (US 7) needles and rejoin yarn A with RS facing.
Knit 1 row, inc 1 [1: 2: 2: 3] sts evenly across row. 21 [21: 24: 24: 27] sts.
Next row (WS): K1, *P1, K2, rep from * to last 2 sts, P1, K1.
Next row: K2, *P2, K1, rep from * to last st, K1.
Rep last 2 rows once more, then first of these 2 rows again, ending with RS facing for next row.
Cast off in rib.
Abbreviations
- sl 1 wyaf
- Slip one stitch with yarn at front (RS) of work.
- k
- knit
- p
- purl
- k2tog
- knit next 2 stitches together
- p2together
- purl next 2 stitches together
- tbl
- through the back loop
- patt
- pattern
- inc
- increase
- rs
- right side
- ws
- wrong side
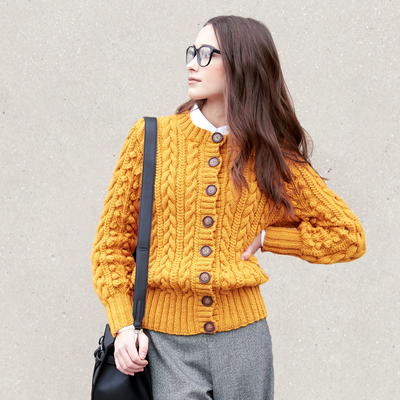
Read NextCabled Mustard Knit Cardigan Pattern
Your Recently Viewed Projects
Thanks for your comment. Don't forget to share!
rossate 7513355
May 22, 2022
I am confused on the pockets, after knitting the ribbing, do you sew/tack it down onto the front? Are the inside pocket linings loose or are they attached to the inside of the sweater? If attached to the inside,how?
jackieorioli 33864 41
Nov 28, 2018
On the back, shape raglan armholes, and it calls for the first 4 stitches and the last 4 stitches to be done in colour A and the middle to be done in colour B. The pattern calls for 4 rows which is 2 in A and 2 in B. On the A rows, I carry the wool across and I can do my decrease in A and I can do it back in A. When I do B I can do the start in A and go across in my B, how do get wool A to end on the B and to bring it back on the B?
Lisa
Sep 13, 2021
You will need to cut and rejoin the yarn in this case, to move it to the correct position to continue working.
jackieorioli 33864 41
Nov 06, 2018
Hi, could you please give me the yardage for a medium? Also, do you have any back views of this? Thank you.
Kristina K
Nov 12, 2018
Hi jackieorioli, this cardigan uses around 1,264 yards of Rowan Soffili Yak Yarn in Desert 001, and 1,083 yards of Soffili Yak Yarn in Iron 005 for a size medium. Unfortunately, no back view of this cardigan was provided on the KnitRowan.com website. We recommend contacting them directly to see if they perhaps have a back view of this piece in their records for you. We hope this helps! Happy knitting! -Editors of AllFreeKnitting
Valjeansomolli
Sep 03, 2018
I cannot find the diagram indicating the button positions after the first. I might add the instructions provided here are the hardest I have encountered in an intermediate pattern.
Kristina K
Sep 04, 2018
Hi Valjeansomolli, a link to the diagram is provided at the very end of the pattern, just before the 'abbreviations' section. We hope this helps! Happy knitting! -Editors of AllFreeKnitting
lcarr
Apr 27, 2018
This looks like a warm and cozy sweater. I like that it is made with worsted or aran weight yarn. Most sweaters like this seem to be made with bulky yarn. I am a petite person, so I would need to adjust mine to be shorter. It looks like that will be easy enough to do.
bitsplice 8844250
Feb 26, 2018
I have been working on this sweater. In the section shape raglan armholes, I am having trouble with with directions. is that whole section done with yarn A what about yarn B and what pattern to you follow?
Lisa
Mar 03, 2018
No, that section is done with yarn B, because right after you finish the instructions say to cut B and use A yarn in its place.
laneyemn 9141129
Feb 12, 2018
I really like the look of this sweater and started working on it as soon as I saw the pattern. Quick question... Working on the raglan back and it says repeat the dec 24 more times (M), that is a dec total of 50 sts. Last line says end with 28 sts. Is that a typo? I have 48 stitches
Lisa
Mar 03, 2018
It's probably not a typo, in order to achieve the shawl collar at the front, you will need to narrow the back of the sweater.
Ladene
Jan 17, 2018
I really like the classic look of this sweeter. However, in looking at the instructions, it does not say to cast on using double yards (one of each color) or to just use one yarn. Please clarify. Thank you for your assistance.
Lisa
Mar 03, 2018
Actually, it does. It says with yarn A cast on .......stiches according to the size you are making. This pattern is worked single strand throughout, changing yarns as instructed to do so.
Linda
Dec 25, 2017
I am planning on making this but have a question re the instructions. What do the instruction for the back mean when they say - 1 1 ? I don't understand this. The rest is clear. thanks in advance
maliniseshadri 906 9443
Dec 27, 2017
increase 1 for smallest size, then nothing for next size up, inc 1 /dec 1/dec 1 for next 2 sizes. key in total number of stitches at the end
Lisa
Mar 03, 2018
Instructions in the brackets reference the other sizes, so you should only follow the directions for the size you are making.
The Designing Peng uin
May 12, 2017
I really like the lines and the look of this sweater - it has that certain flair I look for in clothing. This is a jacket style that I wish to knit for myself, no gift ideas this time and then I shall forget where to find the pattern. The question is all about colour - not sure if I can find this yarn within easy distance, so have to think about a yarn that matches in weight and colours. The jacket looks as if the colours were chosen to catch my eye -- and they did
Lisa
Mar 03, 2018
I can't obtain this yarn either, so I found 2 shades of grey yarn with the same weight and similar gauge to make it with.
Report Inappropriate Comment
Are you sure you would like to report this comment? It will be flagged for our moderators to take action.
Thank you for taking the time to improve the content on our site.