Lacy Cardi Shrug
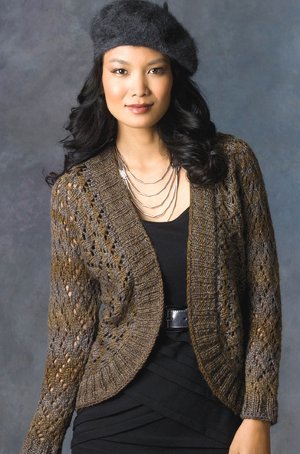
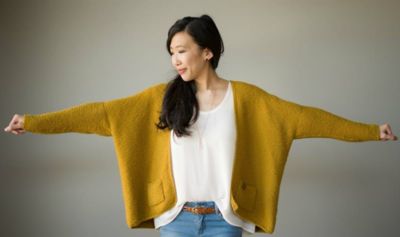
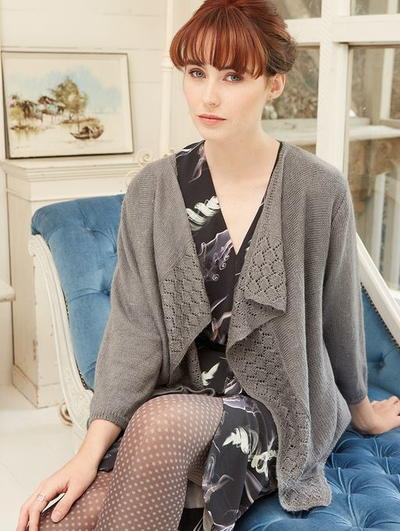
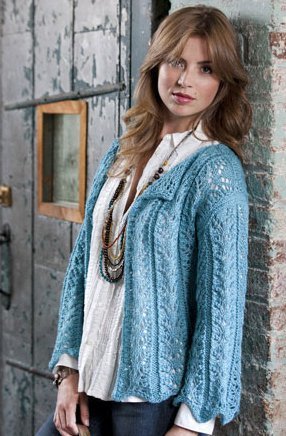
This intermediate knitting pattern is sure to become the gem of your autumn (and year-round) wardrobe. The Lacy Cardi Shrug is half knit cardigan pattern, half shrug pattern, and all-around beautiful. This versatile lace pattern is perfect for covering your shoulders for a modest finishing touch or adding another layer to your outfit for visual interest. The Lacy Cardi Shrug is a pattern you'll continue to receive compliments on years after you've casted it off your needles.

Knitting Needle Size9 or 5.5 mm, Circular Knitting Needles
Yarn Weight(4) Medium Weight/Worsted Weight and Aran (16-20 stitches to 4 inches)
Gauge12 sts = 4”; 20 rows = 4” in Zigzag Lace pattern. CHECK YOUR GAUGE. Use any size needle to obtain the gauge.
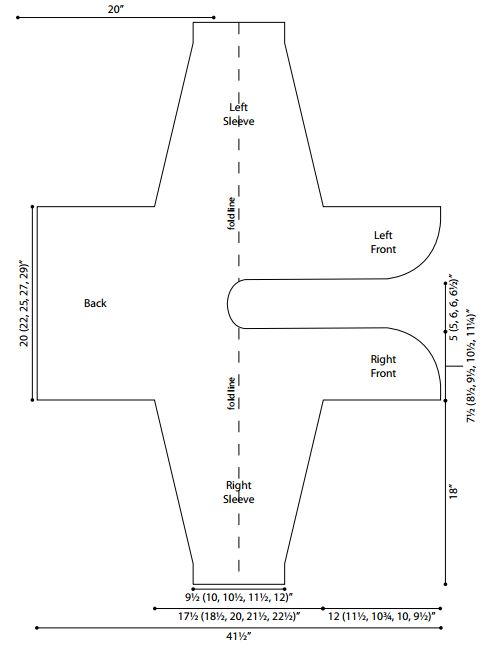
Finished SizeTo Fit Bust - 34 (38, 42, 46, 50)”; Finished Bust - 40 (44, 50, 54, 58)”, not including bands; Finished Length - 20”, from back neck, not including bands.
Materials List
- RED HEART® Boutique™ Midnight™ (Art. E786, Available in 2.5 oz (70g), 153 yd (140m) balls): 5 (6, 6, 7, 7) balls 1939 Whisper.
- Knitting Needles: 5.5mm [US 9] circular needle, 29” or longer
- Stitch markers
- Yarn needle
Instructions
Notes
- Shrug is worked back and forth in rows on circular needle, as if working on straight needles.
- Shrug is knit sideways, from cuff to cuff.
- Stitches are picked up across outer edges to work ribbed band.
- Size of shrug can be customized, to create longer or shorter sleeves. Work more or fewer rows of the pattern, taking care to end with a Row 6 or Row 12 of pattern.
Pattern Stitches
-
2 x 2 Rib (multiple of 4 sts)
Row 1: *K2, p2; repeat from * across.
Row 2: Knit the knit sts and purl the purl sts across.
Repeat Row 2 for 2x2 Rib. -
Zigzag Lace (multiple of 4 sts)
Row 1 (Right Side): *Yo, ssk, k2; repeat from * across.
Row 2 and all Wrong Side rows: Purl.
Row 3: *K1, yo, ssk, k1; repeat from * across.
Row 5: *K2, yo, ssk; repeat from * across.
Row 7: *K2, k2tog, yo; repeat from * across.
Row 9: *K1, k2tog, yo, k1; repeat from * across.
Row 11: *K2tog, yo, k2; repeat from * across.
Row 12: Purl.
Repeat Rows 1–12 for Zigzag Lace.
SHRUG
-
Right Sleeve
Beginning at right cuff, cast on 28 (30, 32, 34, 36) sts.
Work in 2x2 Rib for 10 rows. Note: For sizes Medium and 1X, the first row of ribbing will begin and end with K2.
Next Row (WS): Purl.
Shape Sleeve
Row 1 (Right Side): K2 (1, 2, 1, 2), place marker, work Row 1 of Zigzag Lace to last 2 (1, 2, 1, 2) sts, place marker, k2 (1, 2, 1, 2).
Keeping 2 (1, 2, 1, 2) sts at each end in Garter st (knit every row), work in Zigzag Lace for 5 (4, 4, 3, 3) rows.
Next Row (Increase): K1, M1, knit to marker, slip marker, work next row of Zigzag Lace across to marker, slip marker, knit to last st, M1, k1—30 (32, 34, 36, 38) sts.
Repeat last 6 (5, 5, 4, 4) rows 11 (12, 13, 14, 15) more times, move the markers back to 2 (1, 2, 1, 2) sts from each end every time 4 increase rows have been completed, to incorporate the increased sts into the ZigZag Lace pattern—52 (56, 60, 64, 68) sts.
Work even in pattern as established until sleeve measures about 18” from beginning; end with a Right Side row. -
Body
Row 1 (Wrong Side): Knit to marker, slip marker, work next row of Zigzag Lace to next marker, remove marker, knit to end of row, cast on 36 (34, 32, 30, 28) sts (for right front)—88 (90, 92, 94, 96) sts.
Note: Designer recommends backward loop or cable cast on. Ensure that Zigzag Lace pattern lines up as previously.
Row 2: K2 (4, 4, 2, 2), place marker, work next row of Zigzag Lace to next marker, remove marker, knit to end of row, cast on 36 (34, 32, 30, 28) sts (for back)—124 sts.
Row 3: K2 (4, 4, 2, 2), place marker, work next row of Zigzag Lace to next marker, slip marker, knit to end of row.
Work even in pattern as established until body measures 2 (3, 4, 5, 5½)” from body cast-on; end with a Wrong Side row. Remove markers when working last row. From here on, maintain Zigzag Lace as established keeping at least 1 st at each edge in Garter st throughout. -
Shape Right Front
Row 1 (Decrease Row – Right Side): K1, k2tog, work in pattern as established to end of row—123 sts. Place marker at beginning of this row for right hand edge.
Continue in pattern as established, and AT THE SAME TIME decrease 1 st at right hand edge every 3rd row 2 times, every other row 6 times, and then every row 9 times—106 sts.
Row 29: Bind off 44 sts, work in pattern as established—62 sts. -
Shape Right Neck
Row 1 (Wrong Side): Work in pattern as established.
Row 2: K1, k2tog, work in pattern as established to end of row—61 sts.
Rows 3–6: Repeat last 2 rows twice—59 sts. Work even in pattern as established for 14 (14, 18, 18, 20) rows. -
Shape Left Neck
Row 1 (Wrong Side): Work in pattern as established to last st, M1, work last st—60 sts.
Row 2: Work in pattern as established.
Rows 3–6: Repeat last 2 rows twice—62 sts. -
Shape Left Front
Row 1 (Wrong Side): Work in pattern as established across, cast on 44 sts—106 sts.
Work in pattern as established and AT THE SAME TIME increase (M1) 1 st on right hand edge every row 9 times, then every other row 6 times, then every 3rd row 3 times—124 sts.
Work even in pattern as established until left front measures 7½ (8½, 9½, 10½, 11¼)” from left front cast-on; end with a Wrong Side row. -
Left Sleeve
Row 1 (Right Side): Bind off 36 (34, 32, 30, 28) sts, work in pattern as established to end of row—88 (90, 92, 94, 96) sts.
Row 2: Repeat last row—52 (56, 60, 64, 68) sts.
Work in pattern as established until sleeve measures 1½, 2½, 1½, 3½, 2½)” from sleeve bind-off.
Work in pattern as established and, AT THE SAME TIME decrease 1 st at each end every 6th (5th, 5th, 4th, 4th) row 12 (13, 14, 15, 16) times—28 (30, 32, 34, 36) sts.
Work even until sleeve measures same as right sleeve to rib, end with a Wrong Side row.
Work in 2x2 Rib for 10 rows.
Bind off.
FINISHING
Weave in ends. Block piece to schematic measurements.
-
Lower Back Edging
With Right Side facing, pick up 76 (84, 96, 104, 108) sts evenly spaced across lower back edge.
Work in 2x2 Rib for 13 rows. Bind off. -
Front Edging
With Right Side facing, beginning at lower right front corner, pick up 204 (212, 220, 228, 236) sts evenly spaced up front edge, around neck edge, and down opposite front edge to lower left front corner.
Note: Designer recommends picking up 3 sts over every 4 rows or stitches, and picking up 1 st in every row or stitch across curves plus 1 additional stitch in every 3rd row or stitch.
Work in 2x2 Rib for 13 rows.
Bind off. Bind off curves loosely and neck tightly.
Fold piece. Sew side and sleeve seams. Steam very lightly to shape, avoid direct heat on ribbing.
Abbreviations
- k
- knit
- k2tog
- knit next 2 sts together
- p
- purl
- st(s)
- stitch(es)
- yo
- yarn over
- *
- repeat whatever follows the & as indicated
- M1
- Make 1 (Increase) - Lift strand between needles to left-hand needle and work strand through the back loop, twisting it to prevent a hole, [knit or purl as indicated by pattern st].
- ssk
- slip next two stitches knitwise to right needle, insert point of left needle through front of stitches, knit these stitches together through back loop.
Read NextClassic Knit Jacket
Your Recently Viewed Projects
ekkethler 8340268
Mar 03, 2019
I am confused by the pattern right near the beginning at the right sleeve. The first increase gives you 30(32 34 36 38) stitches, and each increase row you increase 2 stitches and you repeat last 6(5 5 4 4) rows 11(12 13 14 15) times ... so hoe yhrn would you get 52(56 60 64 68) stitches being that they are 4 stitches apart... not the usual 2 stitches apart? Maybe i just am not reading it right? Please let me know... thank you.
jkissinger11 01423 19
Feb 28, 2018
Sleeve rows for large size on the increase rows I'm not understanding the repeat rows 5 can you help me
Donna
Jan 17, 2018
I am trying to make this pattern, love the look -first off, right front and back is only 39 stitches and less for larger size, one is 29 rows, other says continue for 7 1/2"
lemonmelon 5923666
Oct 26, 2016
Finished this sweater. I lengthened it quite a lot, since I'm an XL. Used an acrylic yarn, so it's much fluffier, but it'll be really nice this winter.
lemonmelon 5923666
Sep 07, 2016
I am starting mythos today. I'm curious, since one cuff begins with a cast on and the other begins with a cast off, which ones did you use so that they look the same? Thanks!
lemonmelon 5923666
Sep 07, 2016
Sorry about the typos... the right sleeve has a add-on edge and the left has a bind-off edge. They should look similar, and also have some stretch. I'm experimenting.
lemonmelon 5923666
Sep 07, 2016
More typos. This phone is too small. I apologize. Cast-on and bind-off.
jonesmom 0184381
Jun 19, 2016
I am interested in making this garment, but the amount of wear ease doesn't seem right. I am used to 3" positive ease for my cardigans. I would be wanting a size for 42" body bust measurement, but this one is 50" without bands. This is not consistent with the schematic diagram, since it shows the back as 25" then the fronts gap would also be 25", measuring across the gap. The model in the photo is wearing it with a wide gap in front between bands. Even the smallest size has 6" positive ease without band, and a gap this wide would make it even larger. I can't find this on Ravelry, and don't know where else to ask. I am rating it as I did because I can't properly rate it without the information.
Lisa
Jul 21, 2017
This pattern is more shrug than cardigan, if you look around at other shrug patterns, you'll notice that they are much looser than cardigans.
scottadr
Feb 27, 2016
Hello, love the pattern, however I am having some difficulty with first sleeve shaping. When the pattern says (for smallest size), repeat the last six rows, that that include, the knit 1-30, if not, which six rows, can you please advise specifically for the smallest. Thank you
Lisa
Jun 16, 2017
The row 1 states to repeat this row 5 more times at the end in brackets and then you move onto the next row that starts K1 M1, the first 5 rows plus the K1 M1 row are the 6 rows you are repeating, I don't see a knit 1-30 anywhere in the pattern for this size. Repeat last 6 rows specifically references sleeve shaping on this pattern. I know this is late, hope it helps someone.
gotts2b
Nov 08, 2015
Why won't some patterns print? I really like the patterns. But it sucks when I can't get them to print.
Lisa
Jun 16, 2017
All the patterns print. You have to know how to use a printer to do it. Any pattern that you want to print, simply right click on the pattern and you can scroll down to the option to "print".
robyngreenwood 294 6446
Aug 11, 2014
Help, I am knitting laci cardi shrug but having trouble, knitted one sleeve cast on 36 sts twice for fronts = 124 sts. Knitted on front fine but for second front I seem to be 2 sts short to complete pattern, as I say correct st count. What am I doing incorrectly??
Editor JD
Aug 15, 2014
Hi robyngreenwood 2946446, We suggest posting this question to our Facebook page. We have tons of active followers who would love to help you out! We also suggest contacting the designer at Red Heart Yarn if you are still having problems with the pattern. -Editors of AllFreeKnitting
Report Inappropriate Comment
Are you sure you would like to report this comment? It will be flagged for our moderators to take action.
Thank you for taking the time to improve the content on our site.

