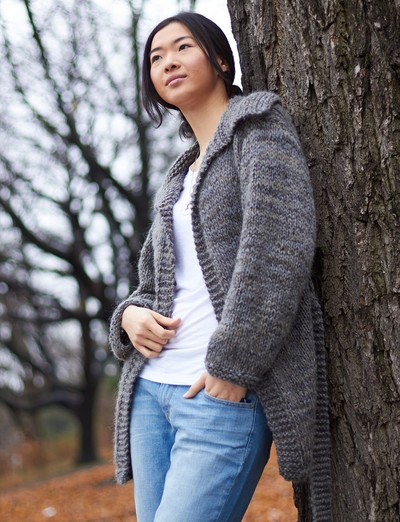
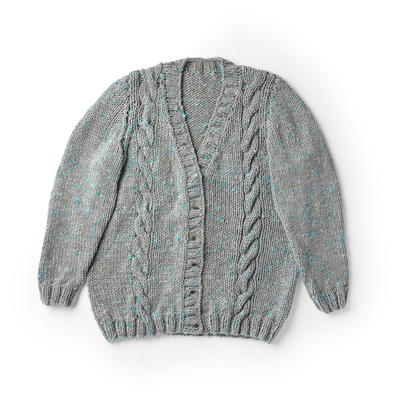
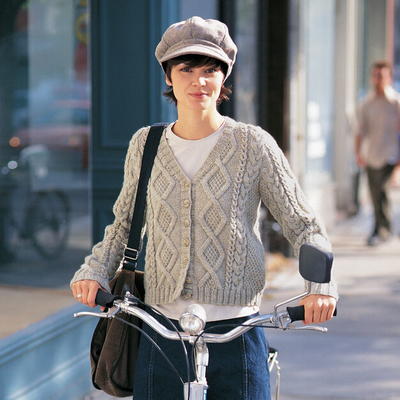
Cozy Cabled Sweater

There's something marvelously charming about cables. The traveling stitches give the patterns that feature them a wonderfully traditional look. The Cozy Cabled Sweater presents cables in a modern light, resulting in a knit sweater that's perfect for a day out. You could wear this attractive sweater out and about or when you're feeling a bit chilly at home. No matter how you plan to wear this sweater, you'll find that this is an engaging project to work on. The cabled knit sweater pattern offers enough variety to keep you interested in the pattern.

Knitting Needle Size6 or 4 mm, 7 or 4.5 mm, Circular Knitting Needles
Yarn Weight(4) Medium Weight/Worsted Weight and Aran (16-20 stitches to 4 inches)
Sizes
Bust measurement
Extra-Small - 32" [81.5 cm ]
Small - 34" [86.5 cm ]
Medium - 36" [91.5 cm ]
Large - 38" [96.5 cm ]
Finished bust
Extra-Small - 34" [86.5 cm ]
Small - 37" [94 cm ]
Medium - 38" [96.5 cm ]
Large - 41" [104 cm ]
Materials
- Patons Classic Wool Worsted (100 g/3.5 oz; 192 m/210 yds) 229 Natural Mix 6 (6, 7, 7) balls
- Sizes 4 mm (U.S. 6) and 4.5 mm (U.S. 7) knitting needles or size needed to obtain tension
- Size 4 mm (U.S. 6) circular knitting needle 36" [90 cm] long
- Cable needle
- Stitch holder
- 7 buttons.
Tension
20 sts and 26 rows = 4" [10 cm] with larger needles in stocking st.
Stitch Glossary
C6B = slip next 3 sts onto a cable needle and leave at back of work. K3, then K3 from cable needle.
C6F = slip next 3 sts onto a cable needle and leave at front of work. K3, then K3 from cable needle.
Cr4B = slip next st onto a cable needle and leave at back of work. K3, then P1 from cable needle.
Cr4F = slip next 3 sts onto a cable needle and leave at front of work. P1, then K3 from cable needle.
Cr7F = slip next 4 sts onto a cable needle and leave at front of work. K3. Slip purl st from cable needle and purl it, then knit rem 3 sts from cable needle.
Wrap 3 = with yarn at back of work, slip next 3 sts onto right hand needle. Bring yarn to front of work and slip same 3 sts back onto left hand needle. Bring yarn in front of these 3 sts and to back of work. (K1. yfwd. K2togtbl) over same 3 sts.
Instructions
Note: The instructions are written for smallest size. If changes are necessary for larger sizes the instructions will be written thus ( ).
PANEL PAT A (worked over 9 sts. See chart on page 4).
1st row: (RS). K9.
2nd and alt rows: P9.
3rd row: C6B. K3.
5th row: K9.
7th row: K3. C6F.
8th row: P9.
These 8 rows form Panel Pat A.
PANEL PAT B (worked over 23 sts. See chart on page 4).
1st row: (RS). P2. Cr4F. (P1. K1) 5 times. P1. Cr4B. P2.
2nd and alt rows: Knit all knit sts and purl all purl sts as they appear.
3rd row: P3. Cr4F. (P1. K1) 4 times. P1. Cr4B. P3.
5th row: P4. Cr4F. (P1. K1) 3 times. P1. Cr4B. P4.
7th row: P5. Cr4F. (P1. K1) twice. P1. Cr4B. P5.
9th row: P6. Cr4F. P1. K1. P1. Cr4B. P6.
11th row: P7. Cr4F. P1. Cr4B. P7.
13th row: P8. Cr7F. P8.
15th row: P7. Cr4B. K1. Cr4F. P7.
17th row: P6. Cr4B. K1. P1. K1. Cr4F. P6.
19th row: P5. Cr4B. (K1. P1) twice. K1. Cr4F. P5.
21st row: P4. Cr4B. (K1. P1) 3 times. K1. Cr4F. P4.
23rd row: P3. Cr4B. (K1. P1) 4 times. K1. Cr4F. P3.
25th row: P2. Cr4B. (K1. P1) 5 times. K1. Cr4F. P2.
26th row: As 2nd row.
These 26 rows form Panel Pat B.
BACK
With smaller needles, cast on 86 (94-98-106) sts.
1st row: (RS). K2. *P2. K2. Rep from * to end of row.
2nd row: P2. *K2. P2. Rep from * to end of row.
These 2 rows form (K2. P2) ribbing.
Cont in (K2. P2) ribbing until work from beg measures 1½" [4 cm], ending on a 2nd row and inc 13 sts evenly across last row. 99 (107-111-119) sts.
Change to larger needles and proceed in pat as follows:
1st row: (RS). K1. (P1. K1) 4 (6-7-9) times. P2. Work 1st row Panel Pat A. P2. (K3. Work 1st row Panel Pat B) twice. K3. P2. Work 1st row Panel Pat A. P2. (K1. P1) 4 (6-7-9) times. K1.
2nd row: P1. (K1. P1) 4 (6-7-9) times. K2. Work 2nd row Panel Pat A. K2. (P3. Work 2nd row Panel Pat B) twice. P3. K2. Work 2nd row Panel Pat A. K2. (P1. K1) 4 (6-7-9) times. P1.
3rd row: P1. (K1. P1) 4 (6-7-9) times. P2. Work 3rd row Panel Pat A. P2. (Wrap 3. Work 3rd row Panel Pat B) twice. Wrap 3. P2. Work 3rd row Panel Pat A. P2. (P1. K1) 4 (6-7-9) times. P1.
4th row: K1. (P1. K1) 4 (6-7-9) times. K2. Work 4th row Panel Pat A. K2. (P3. Work 4th row Panel Pat B) twice. P3. K2. Work 4th row Panel Pat A. K2. (K1. P1) 4 (6-7-9) times. K1.
These 4 rows form Irish Moss St pat at sides and Wrap St pat. Panel Pats A and B are now in position.
Cont in pat, keeping cont of panel pats, until work from beg measures 11¾ (12½-12¾-13)" [30 (32-32.5-33) cm] ending with a WS row.
Shape armholes: Keeping cont of pat, cast off 5 (7-7-8) sts beg next 2 rows. 89 (93-97-103) sts. Dec 1 st each end of needle on next and following alt rows until there are 79 (79-81-85) sts.
Cont even in pat until armhole measures 7¼ (7½-7¾-8)" [18.5 (19-19.5-20.5) cm] ending with a WS row.
Shape shoulders: Keeping cont of pat, cast off 9 (9-9-10) sts beg next 2 rows, then 9 (9-10-10) sts beg following 2 rows. Leave rem 43 (43-43-45) sts on a st holder.
LEFT FRONT
With smaller needles cast on 43 (47-47-51) sts.
1st row: (RS). *K2. P2. Rep from * to last 3 sts. K3.
2nd row: P3. *K2. P2. Rep from * to end of row. These 2 rows form (K2. P2) ribbing.
Cont in (K2. P2) ribbing until work from beg measures 1½" [4 cm] ending on a 2nd row and inc 6 (6-8-8) sts evenly across last row. 49 (53-55-59) sts.
Change to larger needles and proceed in pat as follows:
1st row: (RS). K1. (P1. K1) 4 (6-7-9) times. P2. Work 1st row Panel Pat A. P2. K3. Work 1st row Panel Pat B. P1.
2nd row: K1. Work 2nd row Panel Pat B. P3. K2. Work 2nd row Panel Pat A. K2. (P1. K1) 4 (6-7-9) times. P1.
3rd row: P1. (K1. P1) 4 (6-7-9) times. P2. Work 3rd row Panel Pat A. P2. Wrap 3. Work 3rd row Panel Pat B. P1.
4th row: K1. Work 4th row Panel Pat B. P3. K2. Work 4th row Panel Pat A. K2. (K1. P1) 4 (6-7-9) times. K1.
These 4 rows form Irish Moss St pat at side and Wrap St pat. Panel Pats A and B are now in position.
Cont in pat, keeping cont of panel pats, until work from beg measures 11¾ (12½-12¾-13)" [30 (32-32.5-33) cm], ending with a WS row.
Shape armhole: Keeping cont of pat, cast off 5 (7-7-8) sts beg next row. 44 (46-48-51) sts.
Work 1 row even in pat.
Shape front and armhole: Next row: Work 2tog (armhole edge). Pat to last 2 sts. Work 2tog (front edge). Work 1 row even in pat.
Rep last 2 rows 4 (6-7-8) times more. 34 (32-32-33) sts.
Dec 1 st at front edge only on following alt rows until there are 18 (18-19-20) sts.
Cont even in pat until work from beg measures same length as Back to beg of shoulder shaping, ending with a WS row.
Shape shoulder: Keeping cont of pat, cast off 9 (9-9-10) sts beg next row. Work 1 row even in pat. Cast off rem 9 (9-10-10) sts.
RIGHT FRONT
With smaller needles, cast on 43 (47-47-51) sts.
1st row: (RS). K3. *P2. K2. Rep from * to end of row.
2nd row: *P2. K2. Rep from * to last 3 sts. P3.
These 2 rows form (K2. P2) ribbing.
Cont in (K2. P2) ribbing until work from beg measures 1½" [4 cm], ending on a 2nd row and inc 6 (6-8-8) sts evenly across last row. 49 (53-55-59) sts.
Change to larger needles and proceed in pat as follows:
1st row: (RS). P1. Work 1st row Panel Pat B. K3. P2. Work 1st row Panel Pat A. P2. (K1. P1) 4 (6-7-9) times. K1.
2nd row: P1. (K1. P1) 4 (6-7-9) times. K2. Work 2nd row Panel Pat A. K2. P3. Work 2nd row Panel Pat B. K1.
3rd row: P1. Work 3rd row Panel Pat B. Wrap 3. P2. Work 3rd row Panel Pat A. P2. (P1. K1) 4 (6-7-9) times. P1.
4th row: K1. (P1. K1) 4 (6-7-9) times. K2. Work 4th row Panel Pat A. K2. P3. Work 4th row Panel Pat B. K1.
These 4 rows form Irish Moss St pat at side and Wrap St pat. Panel Pats A and B are now in position.
Cont in pat, keeping cont of panel pats, until work from beg measures 11¾ (12½-12¾-13)" [30 (32-32.5-33) cm], ending with a RS row.
Shape armhole: Keeping cont of pat, cast off 5 (7-7-8) sts beg next row. 44 (46-48-51) sts.
Shape front and armhole: Next row: Work 2tog (front edge). Pat to last 2 sts. Work 2tog (armhole edge).
Work 1 row even in pat.
Rep last 2 rows 4 (6-7-8) times more. 34 (32-32-33) sts.
Dec 1 st at front edge only on following alt rows until there are 18 (18-19-20) sts.
Cont even in pat until work from beg measures same length as Back to beg of shoulder shaping, ending with WS facing for next row.
Shape shoulder: Keeping cont of pat, cast off 9 (9-9-10) sts beg next row. Work 1 row even in pat. Cast off rem 9 (9-10-10) sts.
SLEEVES
With smaller needles cast on 42 sts and work 1½" [4 cm] in (K2. P2) ribbing as given for Back, ending on a 2nd row and inc 13 sts evenly across last row. 55 sts.
Change to larger needles, and proceed in pat as follows:
1st row: (RS). P2. Work 1st row Panel Pat A. P2. K3. Work 1st row Panel Pat B. K3. P2. Work 1st row Panel Pat A. P2.
2nd row: K2. Work 2nd row Panel Pat A. K2. P3. Work 2nd row Panel Pat B. P3. K2. Work 2nd row Panel Pat A. K2.
3rd row: P2. Work 3rd row Panel Pat A. P2. Wrap 3. Work 3rd row Panel Pat B. Wrap 3. P2. Work 3rd row Panel Pat A. P2.
4th row: K2. Work 4th row Panel Pat A. K2. P3. Work 4th row Panel Pat B. P3. K2. Work 4th row Panel Pat A. K2. These 4 rows form Wrap St pat. Panel Pats A and B are
now in position.
Keeping cont of pat, inc 1 st each end of needle on next and following 8th rows until there are 73 (75-77-79) sts, taking inc sts into Irish Moss St pat.
Cont even in pat until work from beg measures 18 (18½-18½-19)" [45.5 (47-47-48) cm], ending with a WS row.
Shape top: Keeping cont of pat, cast off 2 (3-3-4) sts beg next 2 rows. 69 (69-71-71) sts.
Dec 1 st each end of needle on next and following alt row(s) until there are 65 (61-59-55) sts, then on every row until there are 11 (11-13-13) sts. Cast off.
FINISHING
Pin all garment pieces to measurements and cover with a damp cloth, leaving cloth to dry.
Button and Buttonhole Band: Sew shoulder seams. With RS of work facing and circular needle, pick up and knit 66 (66-70-70) sts up Right Front edge to beg of front shaping. Pick up and knit 39 (41-41-42) sts up front neck edge. K43 (43-43-45) from Back st holder, dec 7 sts evenly across. Pick up and knit 39 (41-41-42) sts down Left Front neck edge to beg of front shaping and 66 (66-70-70) sts down Left Front edge to cast on edge. 246 (250-258-262) sts. Do not join. Working back and forth across needle in rows, proceed as follows: Beg on a 2nd row, work 3 rows in (K2. P2) ribbing as given for Back.
4th row: (RS). (Buttonhole row). K2. *Cast off 2 sts. Rib 8 (8-9-9) (including st on needle after cast off ). Rep from * 5 times more. Cast off 2 sts. Rib to end of row.
5th row: Rib, casting on 2 sts over cast off sts.
Work a further 2 rows in (K2. P2) ribbing. Cast off in ribbing.
Sew in Sleeves. Sew side and Sleeve seams. Sew buttons to correspond to buttonholes.
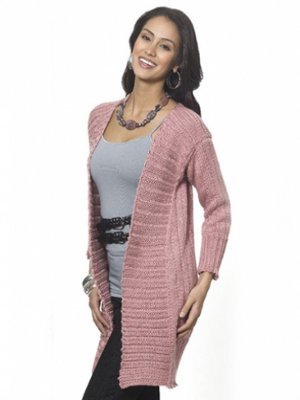
Read NextCabled Mustard Knit Cardigan Pattern
Your Recently Viewed Projects
Thanks for your comment. Don't forget to share!
peramba 3283338
Apr 16, 2020
I just started the back of the sweater in size 36. So I have 111 stitches on my needle, when reviewing the pattern I can only find 108 stitches in the pattern? Not sure what I am missing? In the middle of the back Pattern B is done twice, should I put the three stitches between the repeat?
Judith Huerta
May 23, 2018
I absolutely love cable knit sweaters, but I always think they're very expensive at stores. This tutorial for a cable sweater is so detailed that I'm sure my next one will look store bought!
Member 0606149
Nov 24, 2014
Has anyone actually knit this in size Small? I am working on the left front and despite meticulous stitch- and row-counting I am having trouble with the neck edge decrease running into the diamond cable pattern. There just don't seem to be enough stitches on the front center/neck edge to accommodate the decreases. --SheeptoNuts
ldurocher35 708382 1
Jan 23, 2014
What does "k2togtbl" mean in the wrap 3 part of the pattern? Louise
Member 0606149
Nov 24, 2014
It was also my first time using the Wrap 3 and I couldn't get it until a super knitting buddy in California both explained it to me in detail and then sent me a little swatch! --SheeptoNuts
posypusher1 956223 4
Mar 29, 2018
yes. i am perplexed by this instruction. there do not seem to be any marked decreases in this pattern. one starts and ends with the same number of stitches while working the pattern part of the sweater. so how does one account for the decreased stitches. very confusing to me.
duffyfive 5731717
Jan 23, 2014
I love this pattern but have never managed to work on circular needles. Would it be possible to knit on straight needles?
hamneggs
Jan 23, 2014
I may be wrong, but this pattern is not written in the round, it is only using circular needles to accommodate large number of stitches. So in fact, one could use straight needles- it will just be a lot of stitches to cram onto them.
Member 0606149
Nov 24, 2014
holl the doll is correct, it is not in the round. The circular needles just make it easier to handle so many stitches.
lesyle 9757256
Jan 22, 2014
Does anyone know how to up size this pattern of size 2XL, finished bust size 48, and keep the rest the same? I really want to do this pattern in a size to fit me, since I have no sweater in my wardrobe.....taking all suggestions.....
Report Inappropriate Comment
Are you sure you would like to report this comment? It will be flagged for our moderators to take action.
Thank you for taking the time to improve the content on our site.