Cupcake Cutie
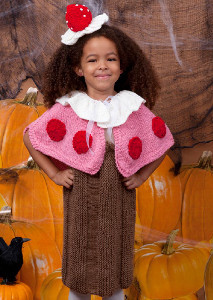
This homemade Halloween costume is perfect for the sweet-tooth in your family. This Cupcake Cutie knitting pattern is simply delightful! With a strawberry and whipped cream headband, a fun frosting topper, and a cupcake wrapper bottom, this cute pattern is perfectly delectable. This three-piece costume is a great project to knit at your leisure. Your little muffin will look like a delicious strawberry cupcake with this creative pattern. This adorable knitting pattern will keep your little girl looking sweet among all of the ghouls and goblins.

Knitting Needle Size10 or 6 mm
Yarn Weight(4) Medium Weight/Worsted Weight and Aran (16-20 stitches to 4 inches)
Materials:
- RED HEART® Super Saver®: 2 Skeins 360 Cafe A; 1 Skein each 319 Cherry Red B, 706 Perfect Pink C, and 316 Soft White D.
- Knitting Needles: 6mm [US 10].
- 1 yd elastic
- 3/8” wide
- 1 yd ribbon
- ¼” wide
- Fiberfill
- Safety pin
- Stitch holders
- Stitch markers
- Yarn needle
Gauge: 14 sts = 4”; 24 rows = 4” in Garter st.
Measurements: (Cupcake Bottom Measurements) Directions are for size 2 years; changes for sizes 4, 6 and 8 years are in parentheses.
- Chest: 20 (21, 22, 24)”
- Bottom Width: 25 (30, 35, 40)”
- Length from Shoulder: 19½ (23, 26, 30)”
Abbreviations:
- K1-f/b: Knit 1 front and back (1 st inc) – Knit next st, then knit it tbl.
- K2tog: (1 st dec) Knit 2 sts together.
- K3tog: (2 st dec) Knit 3 sts together.
- Ssk: (1 st dec) Slip next two stitches knitwise to right needle, insert point of left needle through front of sts, knit these sts together through back loop.
Instructions:
Note: Cupcake Costume consists of Headband, Cupcake Bottom, and Cupcake Icing Topper. Cupcake Bottom is in one piece from side to side. Topper is worked from neck edge down to lower edge.
HEADBAND
Headband
Row 1: With A, cast on 5 sts. Knit until piece measures 16”. Bind off.
Icing Fluff
With D, cast on 99 sts. Knit 6 rows. Change to work in St st until piece measures 3” from beginning, end with a wrong side row.
Decrease Row: [K3tog] across – 33 sts. Cut yarn, leaving a long tail. Thread tail through remaining sts twice and pull to close. Knot to secure.
Strawberry
With B, cast on 24 sts.
Row 1 (Wrong Side): Purl.
Row 2: K1-f/b in each st across – 48 sts.
Row 3: P24, place marker, purl to end.
Decrease Row: K2, k2tog, knit to 3 sts before marker, ssk,
k2, k2tog, knit to last 4 sts, ssk, k2 – 44 sts. Repeat Decrease Row every other row 8 times more – 12 sts on last row. Cut yarn, leaving a long tail. Thread tail through remaining sts twice and pull to close. Knot to secure.
CUPCAKE BOTTOM
With A, cast on 60 (70, 80, 90) sts.
Row 1 (Wrong side): Slip 1, knit to last 5 sts, p1, k4.
Row 2: Slip 1, p3, k1, p4, knit to end.
Row 3: Slip 1, knit to last 5 sts, p1, k4.
Rows 4-21: Repeat Rows 2 and 3.
Row 22: Slip 1, p3, k1, purl to end.
Row 23: Slip 1, knit to last 5 sts, p1, k4.
Rows 24-30: Repeat Rows 21-22. Repeat Rows 2-30 until piece measures 25 (30, 35, 40)” from beginning, end with Row 30. Bind off.
Straps (Make 2): With A, cast on 35 (42, 42, 56) sts. Work in Garter stitch until piece measures 1½” from beginning. Bind off.
CUPCAKE ICING TOPPER
Collar With D, cast on 168 sts. Knit 6 rows. Change to work in St st until piece measures 4” from beginning, end with a wrong side row.
Decrease Row: [K3tog] across – 56 sts. Purl 4 rows.
Topper
Note: Wrong side of Collar will now be right side of Topper so both right sides will show when Collar is folded over.
Eyelet Row (Right Side): Change to C, k3, *yo, k2tog, k2; repeat from * across to last st, k1.
Row 1: K3, place marker, p11, [place marker, p14] twice, place marker, p11, k3.
Row 2: K3, k1-f/b, [knit to 2 sts before marker, k1-f/b, k2, k1-f/b] 3 times; knit to 1 st before last marker, k1-f/b, k3 – 64 sts; 8 sts increased.
Row 3: K3, purl to last 3 sts, k3. Rep Rows 2-3 until piece measures 7” from Eyelet Row, end with Row 2.
Shape Scallops
Row 1 (Wrong Side): K3, *purl to 1 st before marker, k2; repeat from * to last st, k1.
Row 2: K3, k1-f/b, [knit to 3 sts before marker, k1-f/b, k4, k1-f/b] 3 times, knit to 1 st before last marker, k1-f/b, k3.
Row 3: K3, [purl to 3 sts before marker, k6] 3 times, purl to last 3 sts, k3.
Row 4: K3, k1-f/b, [knit to 4 sts before marker, k1-f/b, k6, k1-f/b] 3 times, knit to 1 st before last marker, k1-f/b, k3.
Row 5: K3, purl to 3 sts before marker, k3, leave remaining sts unworked.
First Scallop
Row 6: K3, k2tog, knit to last 5 sts, k2tog, k3.
Row 7: K3, purl to last 3 sts, k3.
Rows 8-13: Repeat Rows 6-7.
Row 14: Repeat Row 6.
Row 15: Knit.
Row 16: K3, k2tog, knit to last 5 sts, k2tog, k3.
Rows 17-20: Repeat Rows 15-16. Bind off.
Second Scallop
Row 5: Join yarn in next unworked st on Row 5, k3, purl to 3 sts before marker, k3, leave remaining sts unworked. Work as for First Scallop.
Third and Fourth Scallop
Work as for Second Scallop.
POLKA DOTS (Make 8)
With B, cast on 5 sts.
Rows 1-42: Knit.Bind off, leaving a long tail.
FINISHING
Headband
Sew short ends of Headband together. Sew short ends of Icing Fluff together. With D, sew French knots around Strawberry. Sew side seam of Strawberry closed, stuffing with fiberfill before closing. Sew Strawberry to center of Icing Fluff. Sew both to Headband. Weave in ends.
Cupcake Bottom
Sew cast-on and bind-off rows together to form a tube. Fold top edge to wrong side along marked stitch and sew in place, leaving an opening for inserting elastic, for casing. Cut a length of elastic, 20 (21, 22, 24)” long, or desired chest measurement. Thread elastic through casing. Overlapping ends, sew ends together. Sew opening closed. Measure and mark center 6 (7, 7, 8)” along top edge on Front and Back for Neck and Strap placement. Sew short edges of each Strap to wrong side of top edge of Front and Back where marked. Weave in ends.
Cupcake Icing Topper
Sew short edges of one Polka Dot together to make a loop. Thread yarn along inside long edge of loop and pull to gather and form center of dot. Knot to secure. Repeat to make 8 Polka Dots. Sew two Polka Dots on each scallop.
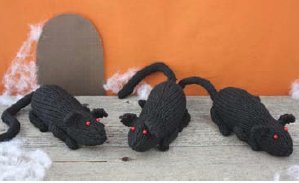
Read NextOne Skein Rats