Young Prince Charming Cardigan
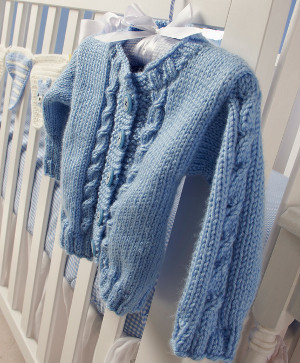
The tiny cables on the Young Prince Charming Sweater are sure to charm even the hardest of hears. This cute knit sweater pattern looks like it is straight from a fairy tale, and youre sure to fall in love with it. Knit up this tiny sweater for the little prince in your life. The cables on the edges of this sweater are a perfect decorative touchtheyre cute without being distracting or overwhelming.
Knitting Needle Size7 or 4.5 mm
Yarn Weight(4) Medium Weight/Worsted Weight and Aran (16-20 stitches to 4 inches)
MATERIALS:
- RED HEART® Soft Baby Steps®: 2 (3, 3, 4) balls 9800 Baby Blue
- Susan Bates® Knitting needles: 4.5mm [US 7] and 5mm [US 8]
- 2 small stitch holders
- stitch markers
- five ¾” (19 mm) buttons
- yarn needle
GAUGE: 17 sts = 4” (10 cm); 23 rows = 4” (10 cm) in Stockinette st (k on right side, p on wrong side) using larger needles. CHECK YOUR GAUGE. Use any size needles to obtain the gauge.
Note: Directions are for size 6 months. Changes for sizes 12 months, 18 months, and 24 months are in parentheses
Finished Chest: 20 (22, 24, 26)” [51 (56, 61, 66) cm] Finished Length: 11 (12, 13, 14)” [28 (30.5, 33, 35.5) cm]
Special Stitchs
M1 = Make 1 (Increase) – Lift strand between needles to left-hand needle and knit strand through the back loop, twisting it to prevent a hole.
Pattern Stitches
2x2 Rib (multiple of 4 sts)
Row 1 (right side): *K2, p2; repeat from * to end of row.
Row 2: K the knit sts and p the purl sts, as they appear.
Repeat last row for 2x2 Rib.
Twisted Cable Pattern (over 8 sts)
Row 1 (wrong side): K2, p4, k2.
Row 2: P2, k4, p2.
Rows 3 and 4: Repeat Rows 1 and 2.
Row 5: Repeat Row 1.
Row 6: P2, knit the 4th stitch on left hand needle but do not remove from needle, knit 3rd stitch on left hand needle but do not remove from needle, knit 2nd stitch on left hand needle but do not remove from needle, knit the first stitch on left hand needle and draw all four stitches off the needle at once, p2.
Repeat Rows 1–6 for Twisted Cable Pattern
Note: Markers are used to indicate cable panels. Slip markers as you come to them. Use of markers in this manner is optional.
INSTRUCTIONS
BACK
With smaller needles, cast on 46 (50, 54, 58) sts.
Row 1 (wrong side): Purl.
Work in 2x2 Rib until piece measures 1½” (4 cm) from beginning; end with a wrong side row.
Change to larger needles.
Set-Up Row (right side): K11 (13, 15, 17), place marker, work Row 2 of Twisted Cable Pattern, place marker, k8 for center Garter st panel, place marker, work Row 2 of Twisted Cable Pattern, place marker, k to end of row.
Next Row: Work in St st (knit on right side, purl on wrong side) to marker, slip marker, work next row of Twisted Cable Pattern, slip marker, k8, slip marker, work next row of Twisted Cable Pattern, slip marker, work in St st to end of row.
Repeat last row until piece measures 11 (12, 13, 14)” [28 (30.5, 33, 35.5) cm] from beginning. Bind off.
LEFT FRONT
With smaller needles, cast on 26 (28, 30, 32) sts.
Row 1 (wrong side): K6 for front band, p to end of row.
Notes: In next row (right side), begin the rib with k2 for sizes 6 and 18 months, begin rib with p2 for sizes 12 and 24 months. This is to ensure that the 2x2 Rib pattern ends with p2 before the 6 front band stitches are knit.
Row 2: Work in 2x2 Rib to last 6 sts, k6.
Row 3: K6, knit the knits sts and purl the purl sts to end of row.
Repeat last 2 rows until piece measures 1½” (4 cm) from beginning; end with a wrong side row.
Change to larger needles.
Set-Up Row (right side): K12 (14, 16, 18), place marker, work Row 2 of Twisted Cable Pattern, place marker, k6 for front band.
Next Row (wrong side): Knit to marker, slip marker, work next row of Twisted Cable Pattern, slip marker, purl to end of row. Next Row: Knit to marker, slip marker, work next row of Twisted Cable Pattern, slip marker, k6.
Repeat last 2 rows until piece measures 9½ (10½, 11, 12)” [24 (26.5, 28, 30.5) cm], end with a right side row.
Shape Neck
Row 1 (wrong side): K6 and place these front band sts on stitch holder, bind off 5 sts, p to end of row—15 (17, 19, 21) sts remain on needle.
Row 2: Knit.
Row 3: Bind off 3 sts, purl to end of row—12 (14, 16, 18) sts.
Row 4: Knit.
Row 5: Bind off 1 st, purl to end of row—11 (13, 15, 17) sts.
Repeat last 2 rows 1 (1, 2, 2) more times—10 (12, 13, 15) sts.
Work even in St st over remaining sts until piece measures same as back. Bind off.
Place 5 markers across front band for buttons.
Place first marker about 1” (2.5 cm) above lower edge and next marker ½” (1.5 cm) below top edge of front band stitches on holder. Evenly space remaining 3 markers between the first two markers.
RIGHT FRONT
With smaller needles, cast on 26 (28, 30, 32) sts.
Row 1 (wrong side): Purl to last 6 sts, k6.
Row 2: K6, *p2, k2; repeat from * to end of row.
Row 3: Knit the knit sts and purl the purl sts to last 6 sts, k6.
Repeat last 2 rows until piece measures 1” (2.5 cm) from beginning; end with a wrong side row.
Buttonhole Row (right side): K2, yo, k2tog, k2, *p2, k2; repeat from * to end of row.
Next Row: Knit the knit sts and purl the purl sts to last 6 sts, k6.
Change to larger needles.
While working remainder of right front, work buttonholes as in Buttonhole Row on right side rows opposite each button marker of Left Front.
Set-Up Row (right side): K6 for front band, place marker, work Row 2 of Twisted Cable Pattern, place marker, knit to end of row.
Next Row (wrong side): Purl to marker, slip marker, work next row of Twisted Cable Pattern, slip marker, knit to end of row.
Next Row: K6, slip marker, work next row of Twisted Cable Pattern, slip marker, knit to end of row.
Repeat last 2 rows until piece measures 9½ (10½, 11, 12)” [24 (26.5, 28, 30.5) cm], end with a wrong side row.
Shape Neck
Row 1 (right side): K6 and place these front band sts on stitch holder, bind off 5 sts, knit to end of row—15 (17, 19, 21) sts remain on needle.
Row 2: Purl.
Row 3: Bind off 3 sts, knit to end of row—12 (14, 16, 18) sts.
Row 4: Purl.
Row 5: Bind off 1 st, knit to end of row—11 (13, 15, 17) sts.
Repeat last 2 rows 1 (1, 2, 2) more times—10 (12, 13, 15) sts.
Work even in St st over remaining sts until piece measures same as back. Bind off.
SLEEVES (make 2)
With smaller needles, cast on 30 (32, 34, 36) sts.
Row 1 (wrong side): Purl.
Work in 2x2 Rib until piece measures 1” (2.5 cm) from beginning, end with a wrong side row.
Change to larger needles.
Set Up Row (right side): K11 (12, 13, 14), place marker, work Row 2 of Twisted Cable Pattern, place marker, knit to end of row.
Next 5 Rows: Work in St st to marker, slip marker, work next row of Twisted Cable Pattern, slip marker, work in St st to end of row.
Increase Row (right side): K1, M1, knit to marker, slip marker, work next row of Twisted Cable Pattern, slip marker, knit to last st, M1, k1—32 (34, 36, 38) sts.
Repeat last 6 rows 4 (5, 6, 7) more times—40 (44, 48, 52) sts.
Next Row: Work in St st to marker, slip marker, work next row of Twisted Cable Pattern, slip marker, work in St st to end of row.
Repeat last row until piece measures 7 (8, 9, 10)” [18 (20.5, 23, 25.5) cm] from beginning.
Bind off.
FINISHING
Sew shoulder seams. Centering top of sleeve over shoulder seam, sew sleeves in place.
Sew side and sleeve seams.
Neckband
With right side facing and smaller needles, knit the 6 right front band sts from holder, pick up and k54 (56, 58, 60) sts across neck edge, knit the 6 left front band sts from holder—66 (68, 70, 72) sts.
Next Row: K6, work in 2x2 Rib to last 6 sts, k6.
Repeat last row until band measures 1” (2.5 cm), end with a wrong side row. Bind of all sts knitwise.
Weave in ends. Block cardigan. Sew buttons to right front band, opposite buttonholes.
Your Recently Viewed Projects
Thanks for your comment. Don't forget to share!
The Designing Peng uin
May 31, 2016
A cardigan and a white shirt on a little boy (with shorts or pants of course) is the perfect image and when that cardigan is hand knit, the image exceeds perfection this cardigan is superb for that special little guy - and I know the ideal little boy - three of them actually to wear this cardigan. wonderful pattern. Thank you
Report Inappropriate Comment
Are you sure you would like to report this comment? It will be flagged for our moderators to take action.
Thank you for taking the time to improve the content on our site.