Log Cabin Pillow Pattern
Based on the traditional log cabin quilt block style, this pillow pattern is versatile and can go with just about any style of decor!
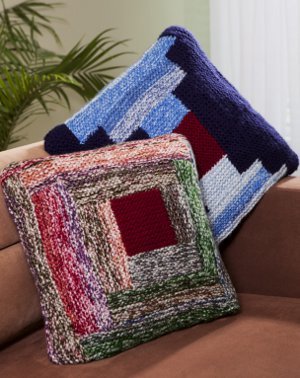
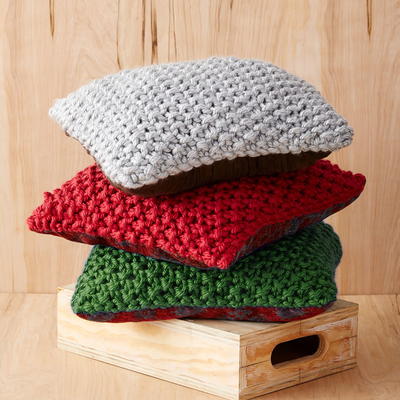
Charmingly rustic, the Log Cabin Pillows are a fun way to dress up your couch, bed, or favorite easy chair. This square shaped knit pillow pattern features rectangular, block-like segments in varying colors for a rugged, geometric look.
With two design versions to choose from, these artsy pillows are a must-knit. This creative knit pillow pattern would look great in any color palette, so get creative choosing colors that will match the decor of your home or apartment. You might be familiar with this style of knitting and picking up stitches to form larger pieces if you've ever tried modular knitting! While that style is usually more associated with mitered squares, log cabin knitting is technically a style of modular knitting.

Knitting Needle Size10 or 6 mm
Yarn Weight(5) Bulky/Chunky (12-15 stitches for 4 inches)
Gauge13 sts x 26 rows = 4” in garter st
Finished Size16” Square
Materials List
-
Pillow Version 1:
Premier Yarns Deborah Norville Serenity Chunky (100% acrylic; 100 gms/109 yds)
- 700-34 Red Ochre – 1 ball (A)
- 675-08 Cirrus – 3 balls (B)
- 700-30 Twilight – 3 balls (C)
-
Pillow Version 2:
Premier Yarns Deborah Norville Serenity Chunky (100% acrylic; 100 gms/109 yds)
- 700-34 Red Ochre – 1 ball (A)
- 675-07 Ruins – 3 balls (B)
- 675-06 Leaves – 3 balls (C)
- Needles: US Size 10 (6 mm) straight needles or size needed to obtain gauge
- Notions: Yarn needle, polyester stuffing
Pattern
Version 1
Front Piece
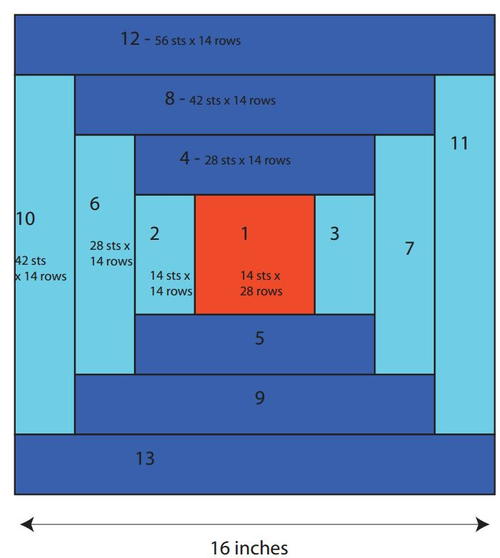
Center (1): With A, cast on 14 sts. Knit 28 rows. Bind off all sts.
Side (2): With B, pick up & knit 14 sts along one side of Center 1. Knit 14 rows. Bind off all sts.
Side (3): With B, pick up & knit 14 sts along opposite side of Center 1 as for Side 2. Comp as for Side 2.
Side (4): With C, pick up & knit 7 sts along edge of Side 3, 14 sts along Center 1, & 7 sts along edge of Side 2 – 28 sts. Knit 14 rows. Bind off all sts.
Side (5): With C, pick up & knit 7 sts along edge of Side 2, 14 sts along Center 1, & 7 sts along edge of Side 3 – 28 sts. Knit 14 rows. Bind off all sts.
Side (6): With B, pick up & knit 7 sts along edge of Side 4, 14 sts along Side 2, & 7 sts along edge of Side 5 – 28 sts. Knit 14 rows. Bind off all sts.
Side (7): With B, pick up & knit 7 sts along edge of Side 5, 14 sts along Side 3, & 7 sts along edge of Side 4 – 28 sts. Knit 14 rows. Bind off all sts.
Side (8): With C, pick up & knit 7 sts along edge of Side 7, 28 sts along Side 4, & 7 sts along edge of Side 6 – 42 sts. Knit 14 rows. Bind off all sts.
Side (9): With C, pick up & knit 7 sts along edge of Side 6, 28 sts along Side 5, & 7 sts along edge of Side 7 – 42 sts. Knit 14 rows. Bind off all sts.
Side (10): With B, pick up & knit, 7 sts along edge of Side 8, 28 sts along Side 6, & 7 sts along edge of Side 9 – 42 sts. Knit 14 rows. Bind off all sts.
Side (11): With B, pick up & knit 7 sts along edge of Side 9, 28 sts along Side 7, & 7 sts along edge of Side 8 – 42 sts. Knit 14 rows. Bind off all sts.
Side (12): With C, pick up & knit 7 sts along edge of Side 11, 42 sts along Side 8, & 7 sts along edge of Side 10 – 56 sts. Knit 14 rows. Bind off all sts.
Side (13): With C, pick up & knit 7 sts along edge of Side 10, 42 sts along Side 9, & 7 sts along edge of Side 11 - 56 sts. Knit 14 rows. Bind off all sts. Continue in this manner, using diagram as a guide, until pieces 1-13 have been worked.
Back Piece
Work as for Front
Finishing
Sew tog 3½ sides of pillow using mattress stitch. Stuff with polyester stuffing. Sew tog remaining ½ edge. Weave in ends.
Version 2
Front Piece
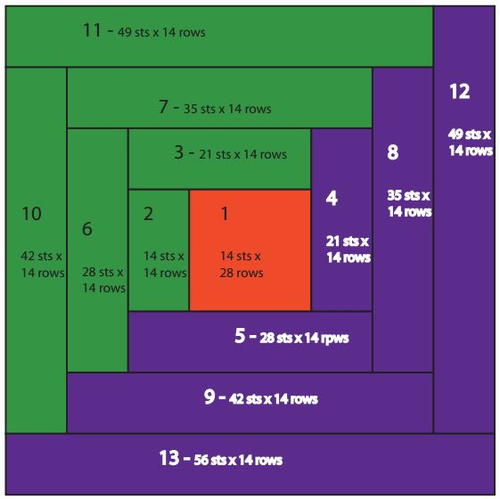
Center (1): With A, cast on 14 sts. Knit 28 rows. Bind off all sts.
Side (2): With B, pick up & knit 14 sts from one side of Center 1. Knit 14 rows.
Side (3): With B, pick up & knit 14 sts along side of Center 1, & 7 sts along edge of Side 2 – 21 sts. Knit 14 rows. Bind off all sts.
Side (4): With C, pick up & knit 14 sts along side of Center 1, & 7 sts along edge of Side 3 – 21 sts.
Knit 14 rows. Bind off all sts.
Side (5): With C, pick up & knit 7 sts along edge of Side 2, 14 sts along Center square 1, & 7 sts along edge of Side 4 – 28 sts. Knit 14 rows. Bind off all sts.
Side (6): With B, pick up & knit 7 sts along edge of Side 3, 14 sts along Side 2, & 7 sts along edge of Side 5 – 28 sts. Knit 14 rows. Bind off all sts.
Side (7): With B, pick up & knit 7 sts along edge of Side 4, 21 sts along Side 3, & 7 sts along edge
of Side 6 – 35 sts. Knit 14 rows. Bind off all sts.
Side (8): With C, pick up & knit 7 sts along edge of Side 5, 21 sts along Side 4, & 7 sts along Side 7 – 35 sts. Knit 14 rows. Bind off all sts.
Side (9): With C, pick up & knit 7 sts along edge of Side 6, 28 sts along Side 5, & 7 sts along edge 8 – 42 sts. Knit 14 rows. Bind off all sts.
Side (10): With B, pick up & knit 7 sts along edge of Side 9, 28 sts along Side 6, & 7 sts along side 7 – 42 sts. Knit 14 rows. Bind off all sts.
Side (11): With B, pick up & knit 7 sts along edge of Side 10, 35 sts along Side 7, & 7 sts along Side 8 – 49 sts. Knit 14 rows. Bind off all sts.
Side (12): With C, pick up & knit 7 sts along edge of Side 9, 35 sts along Side 8, & 7 sts along Side 11 – 49 sts. Knit 14 rows. Bind off all sts.
Side (13): With C, pick up & knit 7 sts along edge of Side 10, 42 sts along Side 9, & 7 sts along Side 12 – 56 sts. Knit 14 rows. Bind off all sts.
Back Piece
Work as for front piece.
Finishing
Sew tog 3½ sides of pillow using mattress stitch. Stuff with polyester stuffing. Sew tog remaining ½ edge. Weave in ends.
Read NextOn Trend Knit Pillows
Your Recently Viewed Projects
3cats2love
Apr 22, 2017
This is a very pretty pillow pattern, and definitely different looking from other ones I've seen. I like how you pick up stitches and knit the sections, rather than having to sew sections together. You could combine complementary colors in the design or use contrasting ones for a bold effect.
paver2
Dec 02, 2016
I would like to make this pillow, but I want to use either a pillow form or an existing pillow and just make a pillow cover with this pattern. I am guessing I could sew three sides together then insert the pillow form and sew the fourth side. The only thing is that it would be a pain to take out the sewing and resew it when I wanted to wash it. Any ideas on how to make it easier?
Alysanne
Jan 20, 2017
I have made knitted pillow covers and used pillow forms. When sewing the fourth side, with a seperate piece of yarn, I left a tale and made a little bow so I can pull the form out and resew. I left the bow in the corner but you could also move to the back so it can't be seen.
Report Inappropriate Comment
Are you sure you would like to report this comment? It will be flagged for our moderators to take action.
Thank you for taking the time to improve the content on our site.

