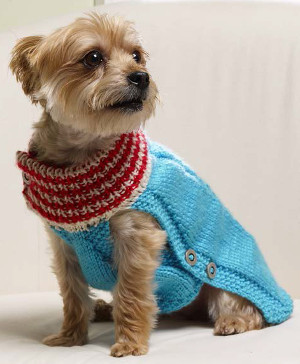
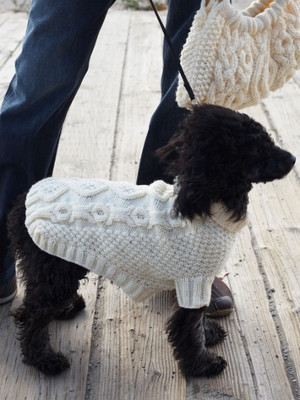
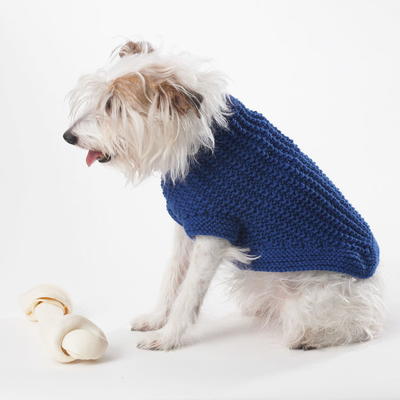
Cable Knit Dog Sweater

Keep your four-legged friend toasty warm this winter in the Cable Knit Dog Sweater. Stylish and cozy, this DIY dog sweater is great for doggy play dates, strolls through the park, burying bones in the backyard, and catching some Z's on the couch. Put the Cable Knit Dog Sweater and a juicy bone under the tree this year. You'll know it's is the perfect gift by Fido's wagging tail. Woof woof, and happy knitting!

Knitting Needle Size7 or 4.5 mm, Circular Knitting Needles, Double-Pointed Knitting Needles (DPNs)
Yarn Weight(4) Medium Weight/Worsted Weight and Aran (16-20 stitches to 4 inches)
Materials:
- RED HEART® Super Saver®: 1 (1, 1, 2, 3) skeins 0313 Aran
- Susan Bates® Knitting Needles: 4.5 mm [US 7] straights AND 4.5 mm [US 7] set of double-pointed needles OR 16” (40 cm) circular needle
- Cable needle
- Stitch markers
- Stitch holder
- Yarn needle
GAUGE: 16 sts = 4” (10 cm); 26 rows = 4” (10 cm), in Moss stitch. CHECK YOUR GAUGE. Use any size needles to obtain the gauge.
Directions are for size X-Small. Changes for sizes Small, Medium, Large, and X-Large are in parentheses
Finished Chest: 13 (15, 19, 27, 33)” [33 (38,
48.5, 68.5, 84) cm]
Finished Length: 12 (16, 20, 24, 28)” [30.5
(40.5, 51, 61, 71) cm], including neckband
Special Stitches
2/2 LC (2 over 2 Left Cross) = Slip next 2 sts to cable needle and hold in front, k2, then k2 from cable needle.
2/2 RC (2 over 2 Right Cross) = Slip next 2 sts to cable needle and hold in back, k2, then k2 from cable needle.
3/3 LC (3 over 3 Left Cross) = Slip next 3 sts to cable needle and hold in front, k3, then k3 from cable needle.
3/3 RC (3 over 3 Right Cross) = Slip next 3 sts to cable needle and hold in back, k3, then k3 from cable needle.
kfb (knit into front and back) = Knit next st but do not remove from needle, knit into back loop of same st and remove from needle.
ssk (slip, slip, knit) = Slip next two stitches as if to knit to right needle, insert point of left needle through front of sts, knit these sts together through back loop.
Pattern Stitches
1x1 Rib (over odd number of sts)
Row 1 (right side): K1, *p1, k1; repeat from * to end of row.
Row 2: Knit the knit sts and purl the purl sts to end of row.
Repeat Row 2 for 1x1 Rib.
2x2 Rib (multiple of 4 sts + 2)
Row 1 (right side): K2, *p2, k2; repeat from * to end of row.
Row 2: Knit the knit sts and purl the purl sts to end of row.
Repeat Rows 1 and 2 for 2x2 Rib.
Moss Stitch (multiple of 2 sts)
Row 1 (right side): *K1, p1; repeat from * to end of row.
Rows 2 and 3: *P1, k1; repeat from * to end of row.
Row 4: *K1, p1; repeat from * to end of row.
Repeat Rows 1–4 for Moss st.
Right Twist Cable (over 6 sts)
Row 1 (right side): Knit.
Row 2: Purl.
Row 3: 3/3 RC.
Row 4: Purl.
Row 5: Knit.
Row 6: Purl.
Repeat Rows 1–6 for Right Twist Cable.
Left Twist Cable (over 6 sts)
Row 1 (right side): Knit.
Row 2: Purl.
Row 3: 3/3 LC.
Row 4: Purl.
Row 5: Knit.
Row 6: Purl.
Repeat Rows 1–6 for Left Twist Cable.
Honeycomb (over 8 sts)
Row 1 (right side): Knit.
Row 2: Purl.
Row 3: 2/2 RC, 2/2 LC.
Row 4: Purl.
Row 5: Knit.
Row 6: Purl.
Row 7: 2/2 LC, 2/2 RC.
Row 8: Purl.
Repeat Rows 1–8 for Honeycomb.
Notes
1. Sweater is made in two pieces: back and chest (underside).
2. Back and chest are worked back and forth in rows beginning at lower edge.
3. The two pieces are then joined and the neck band worked in rounds beginning at the top of the two pieces.
4. Edges of back and chest are seamed leaving openings for front legs.
BACK
With straight needles, cast on 58 (66, 74, 98, 114) sts.
Work in 2x2 Rib until piece measures about 1½ (2, 2½, 2½, 2½)” [4 (5, 6.5, 6.5, 6.5) cm], end with a wrong side row.
Begin Patterns
Note: Take care when setting up the Moss st sections. Notice that one section of Moss st begins with Row 1 of the pattern, and the other section begins with Row 3.
Row 1 (right side): K2, place marker, work Row 1 of Moss st over next 4 (8, 12, 24, 32) sts, place marker, k1, p1, place marker, work Row 1 of Right Twist Cable over next 6 sts, place marker, p1, k1, p1, place marker, work Row 1 of Honeycomb over next 24 sts, place marker, p1, k1, p1, place marker, work Row 1 of Left Twist Cable over next 6 sts, place marker, p1, k1, place marker, work Row 3 of Moss st over next 4 (8, 12, 24, 32) sts, place marker, k2.
Note: Markers indicate the beginning and end of each of the pattern stitch sections. Slip markers as you come to them. Use of markers in this manner is optional.
Row 2: P2, work Row 4 of Moss st to next marker, p1, k1, work Row 2 of Left Twist Cable to next marker, k1, p1, k1, work Row 2 of Honeycomb to next marker, k1, p1, k1, work Row 2 of Right Twist Cable to next marker, k1, p1, work Row 2 of Moss st to next marker, p2.
Row 3: K2, work next row of Moss st to next marker, k1, p1, work next row of Right Twist Cable to next marker, p1, k1, p1, work next row of Honeycomb to next marker, p1, k1, p1, work next row of Left Twist Cable to next marker, p1, k1, work next row of Moss st to next marker, k2.
Row 4: P2, work next row of Moss st to next marker, p1, k1, work next row of Left Twist Cable to next marker, k1, p1, k1, work next row of Honeycomb to next marker, k1, p1, k1, work next row of Right Twist Cable to next marker, k1, p1, work next row of Moss st to next marker, p2.
Repeat last 2 rows, working next row of each pattern between markers, until piece measures about 10½ (14, 17½, 21½, 25½)” [26.5 (35.5, 44.5, 54.5, 65) cm] from beginning. Place all stitches on stitch holder.
CHEST (underside)
With straight needles, cast on 21 (23, 31, 41, 49) sts.
Work in 1x1 Rib until piece measures about 3½ (4½, 5½, 7, 8½)” [9 (11.5, 14, 18, 21.5) cm] from beginning, end with a wrong side row.
Decrease Row (right side): K1, ssk, work in 1x1 Rib to last 3 sts, k2tog, k1—19 (21, 29, 39, 47) sts.
Next Row: P2, work in 1x1 Rib to last 2 sts, p2.
Repeat last 2 rows 6 (7, 11, 16, 20) more times, end with a wrong side row—7 sts remain.
Join Back and Chest for Neckband
Change to circular needle or double-pointed needles to work in rounds.
Joining Round (right side): Working across remaining chest sts, k1, p2, kfb, p2, slip last st onto holder with back sts; working across sts on holder, ssk, k1, *p2, k2; repeat from * across to last 4 sts, p2, k1, knit the last st and the first st of this round together to join piece into a round—64 (72, 80, 104, 120) sts.
Next Round: *P2, k2; repeat from * around.
Repeat last round until neckband measures about 1½ (2, 2½, 2½, 2½)” [4 (5, 6.5, 6.5, 6.5) cm].
Bind off in pattern.
FINISHING
Sew edges of back and chest together beginning at neckband and sewing to where shaping of chest begins. Leave 2 (2½ 3, 4, 5)” [5 (6.5, 7.5, 10, 12.5) cm] open for leg opening then finish sewing side edges of back and chest together. Weave in ends.
ABBREVIATIONS
k = knit
k2tog = knit next 2 sts together
p =purl
st(s) = stitch(es)
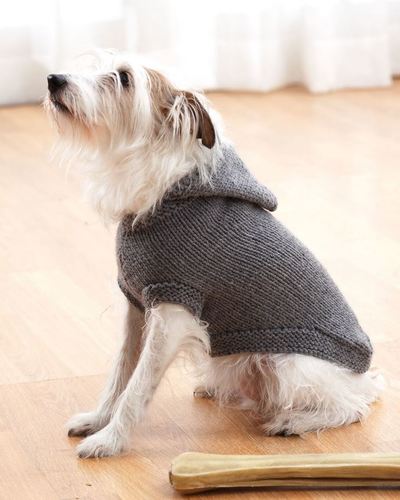
Read NextLife is Ruff Knit Dog Sweater
Your Recently Viewed Projects
Thanks for your comment. Don't forget to share!
lorraine6lh 059705 4
Jun 07, 2018
Hi all, what size would i do to knit this for a sydney silky terrier. Thank you in advance.
Kristina K
Jun 07, 2018
Hi Lorraine! If your Sydney Silky Terrier is average in size for his or her breed, I would suggest a size small or medium, but I recommend measuring your pup before beginning and using the "finished chest" and "finished length" portions of this pattern to be sure. Perhaps someone else has knit this for the same kind of dog already and can comment? -Editors of AllFreeKnitting
Member 5225449
Feb 27, 2018
Hi, Please can someone help. Where the pattern says "Repeat last 2 rows, working next row of each pattern between markers, until piece measures about 10 (14, 17, 21, 25) 26.5 (35.5, 44.5, 54.5, 65) cm from beginning. Place all stitches on stitch holder." Am i meant to keep repeating row 34 from the 'begin pattern' section until my piece reaches the correct length, OR am i meant to repeat rows 34, then do rows 1, 2, 3, 4, 3, 4 until it reaches the right size? Thanks in advance!
ArtByNeedle
Jan 09, 2016
I really love this website however, please get rid of all the "ads" that constantly run while this site is open. These ads use so much RAM that my computer runs too slowly to enjoy your site. even eliminating many of the background programs running on the computer don't help.
Ladyblue364 048953 4
May 07, 2015
Help, I'm at a standstill. I've finished the "back" piece and the instructions say to place it on a stitch holder. Do I finish this piece and cut the yarn or start the "chest" piece. With new yarn. Thanks mickey
Bonnie in AZ
Nov 04, 2016
Hi Ladyblue, from the looks of it leave the stitches on a stitch holder and start the chest piece with new yarn. Then when the chest piece is to the final row you will put the back piece on circular needles, then the back piece on the same circular needle, making one piece when start the neckline rows. You go across the back on the circular needle then the chest as if they are one piece. After the neckband is done they show to sew the chest to the back like this --Sew edges of back and chest together beginning at neckband and sewing to where shaping of chest begins. Leave 2 (2 3, 4, 5) 5 (6.5, 7.5, 10, 12.5) cm open for leg opening then finish sewing side edges of back and chest together.--- I hope that helps as it is a nice little sweater for some of those dogs with less coats to keep them warm.
debbys 5895274
Dec 19, 2014
Thank you so much for the free Cabled dog sweater, very clear and easy pattern to follow, looks fab and s sizing was perfect x x x
hazel 2871574
Aug 19, 2014
I Am so disappointed that I can not receive CREATIVE_ Knitting in South Africa or on my email as i do get FREE KNITTING sent via my email Many Thanks Have a lovely day Hazel Gietzmann
sarahrschnell 2887 330
Mar 12, 2014
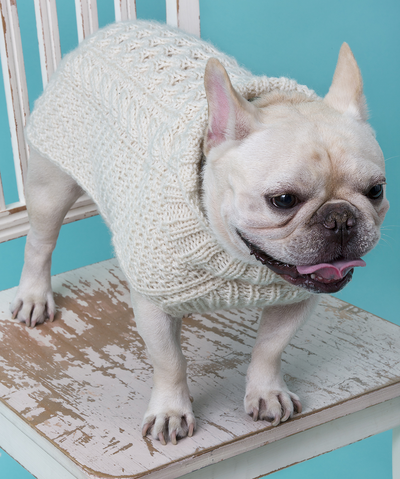
First time I have ever cabled or done anything other then knit and purl . Pattern was clear easy to follow fits a frenchie perfectly in the chest.
Report Inappropriate Comment
Are you sure you would like to report this comment? It will be flagged for our moderators to take action.
Thank you for taking the time to improve the content on our site.