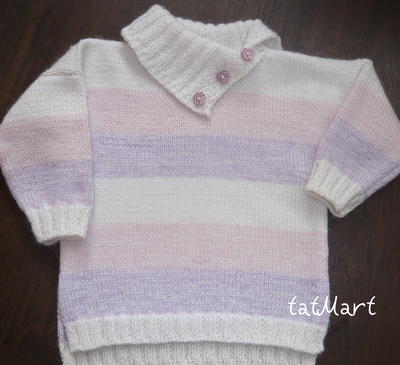
Sweet Seed Stitch Vest
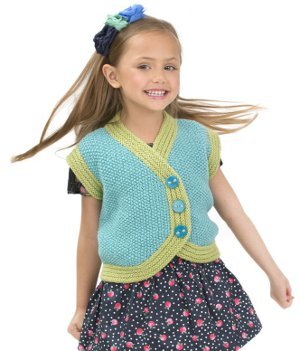
Perfect for playtime, nap time, and every time in between, the Sweet Seed Stitch Vest is sure to become one of your child's favorites. This darling knit vest pattern features the classic seed stitch and a fun, asymmetrical opening with three whimsical buttons. Have fun mixing and matching yarn color and button choices. The Sweet Seed Stitch Vest is an adorable garment for both little girls and boys.

Knitting Needle Size7 or 4.5 mm, 8 or 5 mm, Circular Knitting Needles
Yarn Weight(4) Medium Weight/Worsted Weight and Aran (16-20 stitches to 4 inches)
Materials:
- RED HEART® With Love®: 2 (2, 3, 3) skeins 1502 Iced Aqua A, and 1 (1, 2, 2) skeins 1601 Lettuce B
- Susan Bates® Knitting Needles: 5mm [US 8]
- Susan Bates® Circular Knitting Needle: 4.5mm [US 7], 32” (80 cm) long
- Stitch holder
- 3 buttons
- 3 snap closures
- sewing needle and matching thread
- yarn needle
GAUGE: 18 sts = 4” (10 cm); 36 rows = 4” (10 cm) in Seed stitch using larger needles.
CHECK YOUR GAUGE. Use any size needles to obtain the gauge.
Directions are for size 2 years. Changes for sizes 4 years, 6 years, and 8 years are in
Finished Chest: 24 (26, 28, 30)” [61 (66, 71, 76) cm], closed.
Finished Length: 12½ (13½, 14½, 16)” [31 (34.5, 37, 40.5) cm], including lower band.
Special Stitch
M1 = Make 1 (Increase) – Lift strand between needles to left-hand needle and knit strand through the back loop, twisting it to prevent a hole.
Pattern Stitches
Seed Stitch (over odd number of sts)
Row 1: K1, *p1, k1; repeat from * to end of row.
Row 2: Knit the purl sts and purl the knit sts.
Repeat last row for Seed st.
Double Garter Stitch
Row 1 (Wrong Side): Knit.
Rows 2 and 3: Purl.
Row 4: Knit.
Repeat Rows 1–4 for Double Garter st.
Notes
1. Vest is made in three pieces: Back, left front, and right front.
2. Left front and right front are worked exactly the same. Seed stitch is reversible, so right front is worked like left front then flipped over.
3. Wide bands are worked across all outer edges of the vest.
BACK
With larger needles and A, cast on 55 (59, 63, 67) sts.
Work in Seed st until piece measures 6 (6½, 7, 8)” [15 (16.5, 18, 20.5) cm] from beginning.
Shape Armholes
Row 1: Bind off 2 (3, 4, 5) sts, work in Seed st to end of row—53 (56, 59, 62) sts.
Row 2: Bind off 2 (3, 4, 5) sts, work in Seed st to end of row—51 (53, 55, 57) sts.
Rows 3–8 (decrease): K2tog, work in Seed st to end of row—45 (47, 49, 51) sts.
Work even in Seed st until armhole measures 5 (5½, 6, 6½)” [12.5 (14, 15, 16.5) cm].
Note: At this point, back should measure 11 (12, 13, 14½)” [28 (30.5, 33, 37) cm] from beginning.
Shoulders
Row 1: Bind off 12 (13, 13, 14) sts, work in Seed st to end of row—33 (34, 36, 37) sts.
Row 2: Bind off 12 (13, 13, 14) sts, work in Seed st to end of row—21 (21, 23, 23) sts.
Slip remaining sts onto holder for back neck.
LEFT FRONT
With larger needles and A, cast on 25 (27, 31, 33) sts.
Row 1: Work in Seed st to end of row.
Shape Front Edge
Row 2 (Right Side - increase): Work in Seed st to last st, M1, k1 (front edge)—26 (28, 32, 34) sts.
Row 3: Work in Seed st to end of row. Repeat last 2 rows 9 more times—35 (37, 41, 43) sts.
Work even in Seed st until piece measures 6 (6½, 7, 8)” [15 (16.5, 18, 20.5) cm] from beginning, end with a Wrong Side row
Shape Armhole and Neck Edge
Row 1 (Right Side): Bind off 2 (3, 4, 5) sts, work in Seed st to last 2 sts, k2tog—32 (33, 36, 37) sts.
Row 2: Work in Seed st to end of row.
Row 3: K2tog, work in Seed st to last 2 sts, k2tog—30 (31, 34, 35) sts.
Rows 4–7: Repeat last 2 rows 2 more times—26 (27, 30, 31) sts.
Shape Neck Edge Only
Row 8: Work in Seed st to end of row.
Row 9: Work in Seed st to last 2 sts, k2tog—25 (26, 29, 30) sts.
Repeat last 2 rows 13 (13, 16, 16) more times—12 (13, 13, 14) sts.
Work even in Seed st until piece measures same as back to shoulder.
Bind off.
RIGHT FRONT
Work same as left front. Seed st is reversible.
Turn piece over to create right front.
FINISHING
Lower Back Band
With Right Side facing, circular needle, and B, pick up and k55 (59, 63, 67) sts evenly spaced across lower edge of back.
Work back and forth in rows as if working with straight needles. Beginning with Row 1 of pattern, work in Double Garter st for 14 rows.
Bind off loosely.
Sew shoulder seams.
Front Bands
With Right Side facing, circular needle, and B, beginning in lower corner at side edge of right front, pick up and k25 (27, 31, 33) sts evenly spaced across lower edge of right front, 18 sts across curved right front edge, 18 (20, 22, 28) sts across straight right front edge, 30 (32, 34, 38) sts up right front neck edge, knit across the 21 (21, 23, 23) back neck sts on holder, pick up and k30 (32, 34, 38) sts across left front neck edge, 18 (20, 22, 28) sts across straight left front edge, 18 sts across curved left front edge, 25 (27, 31, 33) sts across lower edge of left front—203 (215, 233, 257) sts.
Work back and forth in rows as if working with straight needles. Beginning with Row 1 of pattern, work in Double Garter st for 14 rows.
Bind off loosely.
Armhole Edging
With Right Side facing, circular needle and B, pick up and k54 (58, 66, 74) sts evenly across one armhole opening.
Work back and forth in rows as if working with straight needles. Beginning with Row 1 of pattern, work in Double Garter st for 14 rows.
Bind off loosely. Repeat across other armhole opening.
Sew side seams, carefully matching Double Garter st bands. Weave in ends.
Attach Buttons and Snaps
Place vest face up and mark placement for 3 buttons, sew buttons on right front with thread. Sew one half of snap on Wrong Side of right front behind each button. Mark placement for other half of snaps on left front and sew in place. If desired, buttons and snaps can be reversed to show on left front.


Read NextSidekick Polo