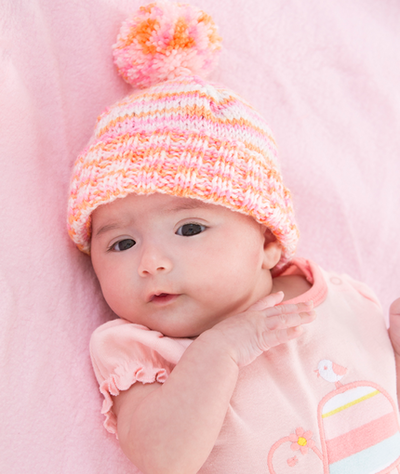
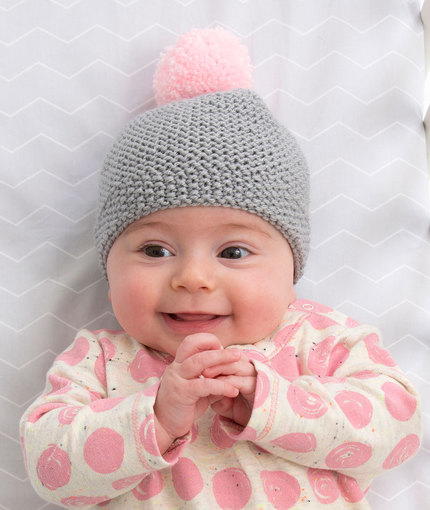
Pixie Earflap Knit Baby Hat

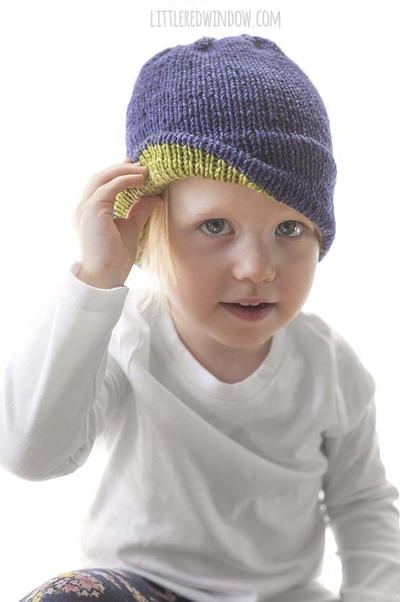
This sweet Pixie Earflap Knit Baby Hat is just the thing for a chilly little one. It offers coverage all around the head to keep fussy babies warm, and it's terribly cute. The oversized pom poms attached to the earflaps are just to die for! The lovely fair isle design is of blossoming flowers, making this hat wonderful for spring and winter alike. Baby knitting patterns are so fun to make because the little angels look good in absolutely anything, so it's always nice to see a pattern that is not only cute but functional.

Knitting Needle Size6 or 4 mm, 7 or 4.5 mm, 8 or 5 mm, Double-Pointed Knitting Needles (DPNs)
Yarn Weight(4) Medium Weight/Worsted Weight and Aran (16-20 stitches to 4 inches)
Gauge1 stitches, 2 rows, 3 inches. stockinette stitch
Materials:
- 1 (2: 2) x 50g balls Rowan All Seasons Cotton Oddments for any embroidery, edging and pompoms
- 1 pair each of 4mm and 5mm knitting needles
- 1 pair 4.5mm double-pointed knitting needles to make the strings
- Stitch holder, safety pin or spare length of yarn
- Sewing needle
Measurements:
Circumference
- 0-6 mos: 36cm
- 6-18 mos: 44cm
- 18+ mos: 48cm
Length
- 0-6 mos: 20cm
- 6-18 mos: 24cm
- 18+ mos: 28cm
Gauge: 16 stitches and 24 rows to 10cm square measured over stocking stitch on 5mm needles. Always work a tension swatch and change needles accordingly if necessary.
Instructions
KNITTING THE EARFLAPS (make 2)
With 4.5mm needles, cast on 1 stitch.
Row 1: Knit 1 purl 1 knit 1 into stitch.
Row 2: Purl.
Work in stocking stitch – one row knit, one row purl alternately – increasing 1 stitch at each end of next and every alternate row until 15 (19: 23) stitches, ending with a wrong side row.
Leave stitches on a stitch holder, safety pin or spare length of yarn.
KNITTING THE HAT
With 4.5mm needles and yarn A, cast on 7 (9: 11) stitches, knit across 15 (19: 23) stitches from one earflap, cast on 12 (14: 16) stitches, knit across 15 (19: 23) stitches from other earflap, cast on 7 (9: 11) stitches. 56 (70: 84) stitches.
Starting with a purl row, work 17 (21: 25) rows in stocking stitch.
Shape top (row 1): Knit 8 (10: 12), knit 3 together, knit 15 (20: 25), knit 3 together, knit 15 (20: 25), knit 3 together, knit 9 (11: 13).
Row 2: and every even row: Purl.
Row 3: Knit 7 (9: 11), knit 3 together, knit 13 (18: 23), knit 3 together, knit 13 (18: 23), knit 3 together, knit 8 (10: 12).
Row 5: Knit 6 (8: 10), knit 3 together, knit 11 (16: 21), knit 3 together, knit 11 (16: 21), knit 3 together, knit 7 (9: 11).
Row 7: Knit 5 (7: 9), knit 3 together, knit 9 (14: 19), knit 3 together, knit 9 (14: 19), knit 3 together, knit 6 (8: 10).
Row 9: Knit 4 (6: 8), knit 3 together, knit 7 (12: 17), knit 3 together, knit 7 (12: 17), knit 3 together, knit 5 (7: 9).
Row 11: Knit 3 (5: 7), knit 3 together, knit 5 (10: 15), knit 3 together, knit 5 (10: 15), knit 3 together, knit 4 (6: 8).
Row 13: Knit 2 (4: 6), knit 3 together, knit 3 (8: 13), knit 3 together, knit 3 (8: 13), knit 3 together, knit 3 (5: 7).
Row 15: Knit 1 (3: 5), knit 3 together, knit 1 (6: 11), knit 3 together, knit 1 (6: 11), knit 3 together, knit 2 (4: 6).
Size 1 only (last row)
Row 17: Knit 1, knit 3 together, knit 1, knit 3 together. 4 stitches
Size 2 and 3 only
Row 17: Knit 0 (2: 4), knit 3 together, knit 0 (4:9), knit 3 together, knit 0 (4: 9), knit 3 together, knit 0 (3: 5).
Row 19: Knit 0 (1: 3), knit 3 together, knit 0 (2: 7), knit 3 together, knit 0 (2: 7), knit 3 together, knit 0 (2: 4).
Size 2 only (last row)
Row 21: [Knit 3 together] 3 times, knit 1. 4 stitches.
Size 3 only
Row 21: Knit 2, knit 3 together, knit 5, knit 3 together, knit 5, knit 3 together, knit 3. 18 stitches.
Row 23: Knit 1, knit 3 together, knit 3, knit 3 together, knit 2. 12 stitches.
Row 25: [Knit 3 together, knit 1] 3 times. 6 stitches.
FINISHING THE HAT
Cut working yarn, leaving a long end. Thread yarn through remaining stitches and pull tight. Join hat at back with a flat seam. With 4.5mm needles and contrasting yarn, starting at centre back seam, pick up 1 stitch at edge, knit it then * pick up and knit next stitch, put this stitch back onto left hand needle and knit it and cast off with stitch on right needle. Repeat from * all around edge of hat. Fasten off. Sew in any yarn ends.
KNITTING THE TIES (make 2)
With 4.5mm double-pointed needles and contrasting yarn, cast on 3 stitches.
Next row (right side): Knit 3 (all 3 stitches now on right needle), slip these stitches to opposite end of needle and transfer needle to your left hand, without turning work, take yarn tightly across back of work and knit these 3 stitches again (all 3 stitches now on right needle again). Repeat until tie is approximately 20cm in length.
MAKING THE POM POMS
Cut two cardboard circles approximately 6.5cm in diameter, then carefully cut another hole in the centre of each to leave a ring. Wind a small amount of matching or contrasting colour yarn into a ball that will pass through the centre of the ring. Hold the two cardboard circles together and wind the yarn around the ring, keeping the strands close together. Wind as many layers of yarn as possible around the ring before the centre hole becomes too small for the ball of yarn to pass through. Using sharp scissors, slip one of the blades between the two layers of card and cut around the circumference of the circle. Slip a length of yarn between the two layers and around the centre of what will become the pompom, pull tight and knot the yarn. Cut the cardboard ring away. Shake the pompom, fluff it up and trim it to a neat shape. Attach a pompom to one end of each tie and sew one tie to each earflap. Alternatively add a pompom to the tip of the hat.
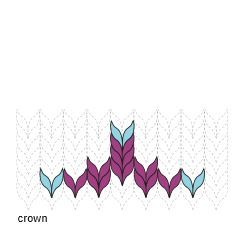
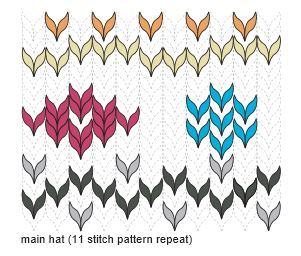
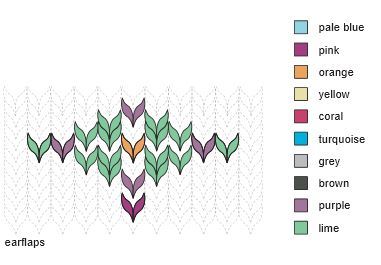
EMBROIDERING THE HAT
Following the charts, embroider the hat using oddments of yarns in Swiss darning or duplicate stitch. The embroidered stitch is worked on top of the knitted stitch in a contrasting colour. Using a blunt-ended needle and the required colour in a yarn of similar weight, darn the yarn invisibly at the back. * Then bring the needle up through the centre of the stitch from the back of the work, insert the needle from the right to the left, behind the stitch immediately above. Insert the needle through the centre of the original stitch and out through the centre of the stitch to the left, repeat from *.
Read NextGoldfish Baby Hat Pattern