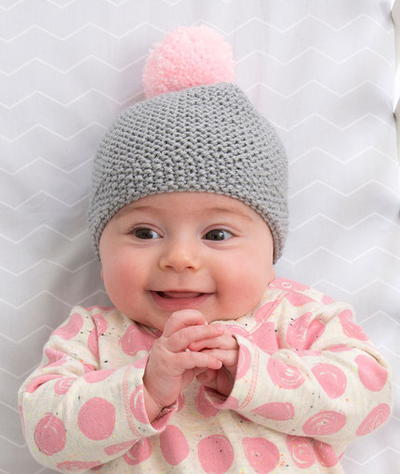
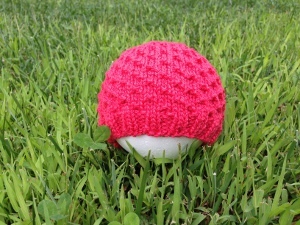
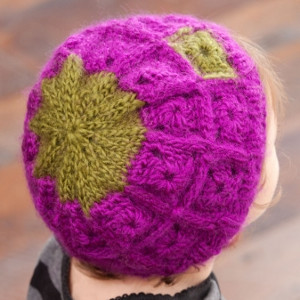
Baby Granny Hat
Knitting for baby can be fun; it's finding the perfect patterns that's the hard part. The Baby Granny Hat is where the knitting and crocheting worlds collide to make one darling little knit baby hat pattern you'll want to return to again and again. Use this shocking twist on the classic granny square to learn how to knit a hat guaranteed to look absolutely adorable on your little one. The hat's band stretches to account for head growth, so you'll get plenty of wear and tear out of this amazing knit hat pattern before your child outgrows it.

Knitting Needle Size8 or 5 mm, Circular Knitting Needles, Double-Pointed Knitting Needles (DPNs)
Yarn Weight(4) Medium Weight/Worsted Weight and Aran (16-20 stitches to 4 inches)
Gauge1 stitches, 2 rows, 3 inches. stockinette stitch
Materials:
- Sheep(ish)™ by Vickie Howell (85 g/3 oz, 153 m/167 yds) Contrast A Magenta(ish) (00006) - 1 ball; Contrast B Olive(ish) (00019) - 1 ball
- Size 5 mm (U.S. H-8) crochet hook, or size needed to obtain gauge.
- Size 5 mm (U.S. 8) circular needle, 16" [40.5 cm] long, or size needed to obtain gauge.
- Set of four size 5 mm (U.S. 8) double-pointed knitting needles
- Yarn needle
GAUGE:
One granny square measures approx 2 x 2" [5 x 5 cm]
In 2 x 2 Rib, 15 sts = 4" [10 cm], unstretched
Sizes: Baby (Toddler)
Measurements: Hat measures approximately 17 (19)" [43 (48.5) cm] circumference at band, unstretched
Note: Band will stretch to accommodate a range of head sizes
Abbreviations:
ch(s) = Chain(s)
Dc = Double crochet
K = Knit
K2tog = Knit 2 together– Knit 2 sts together through the front loops. (1 st decreased)
P = Purl
Sc = Single crochet
Sl st = Slip stitch
Instructions:
2 x 2 Rib (multiple of 4 sts):
Round 1: (RS) *K2, p2; repeat from * around.
Round 2: Knit the knit sts and purl the purl sts as they face you.
Repeat Round 2 for 2 x 2 Rib.
GRANNY SQUARE (make 17 (19) with A and , 1 with B - 18 (20) total)
With crochet hook and A, ch 5; join with sl st in first ch to form a ring.
Round 1 (RS): Ch 3 (counts as dc), 2 dc in ring, ch 3, [3 dc in ring, ch 3] 3 times; join with sl st in top of beginning ch—12 dc and 4 ch-3 sps.
Round 2: Ch 1, sc in same st as join, sc in next 2 dc, 3 sc in next ch-3 sp, [sc in next 3 dc, 3 sc in next ch-3 sp] 3 times; join with sl st in first sc—24 sc. Fasten off.
Assembly: Arrange granny squares, with RS facing up, into 2 strips of 9 (10) squares each, placing B-colored square as shown in photo. Sew squares together to form strips. Sew long edges of strips together. Sew short ends of piece together to form ring of squares. Weave in ends.
BAND
With RS facing, circular needle and A, pick up and k64 (72) sts evenly spaced around lower edge of granny square ring. Note: Lower edge is edge with strip of squares that contains the B-colored square. Work in 2 x 2 Rib for 6 rounds. Cast off in 2 x 2 Rib.
CROWN
With RS facing, circular needle and B, pick up and k64 (70) sts evenly spaced around top edge of granny square ring. Note: Change to double pointed needles when stitches have been sufficiently decreased.
Rounds 1–5: Knit.
Round 6: *K2tog, k1; repeat from * to last st, k1—43 (47) sts.
Round 7: Knit.
Round 8: *K2tog; repeat from * to last st, k1—22 (24) sts.
Round 9: Knit.
Round 10: *K2tog; repeat from * around—11 (12) sts.
Round 11: Knit.
Cut yarn, leaving a long tail. Thread tail through stitches of last round. Pull gently, but firmly, to close opening. Secure end.
FINISHING
Using yarn needle, weave in all ends.
Read NextGarter Stitch Baby Hat
Your Recently Viewed Projects
Thanks for your comment. Don't forget to share!
lizbailey 3702419
Aug 02, 2015
When looking at the yarn, why does it not say what ply, eg 4ply, DK?
Report Inappropriate Comment
Are you sure you would like to report this comment? It will be flagged for our moderators to take action.
Thank you for taking the time to improve the content on our site.