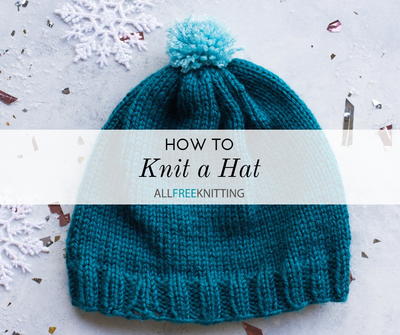
How to Knit a Hat
Learn how to knit a hat with this easy tutorial for beginners!

There's nothing better than getting to show off one of a knitted accessory that you've made yourself! But for many beginner knitters, this just means scarves. Most other types of knitted items, like hats and socks, involve knitting in the round, which scares off many beginners.
But never fear! Hats are not nearly as hard as they look.
We've put together this handy guide for knitting your very first hat. It's a simple pattern -- just stockinette and some ribbing. But it will give you a cute, cozy hat that you can work up in no time. Below, you'll find everything you'll need to complete this hat, from video tutorials for the various techniques, tips and tricks for getting your first circular knitting project just right, and step-by-step photos, so you know you're on the right track!
For more great projects like this, subscribe to our free email newsletter!
Quick Note:
If you're new to knitting in the round, there are a few things you should probably know before picking up your needles. There are a few different ways to knit in the round that use different kinds of needles; for this particular pattern, we will be using circular knitting needles.
Want a crash course in knitting in the round before you begin? Check out our complete beginner's guide here — How to Knit in the Round
Materials
- 1 skein of bulky (weight 5) yarn
- US size 9 or 5.5 mm, 16" circular knitting needles
- Stitch markers
- A tapestry needle
- A pom pom
Step 1: Casting On
Begin by casting on 80 stitches onto your circular needles, using the longtail cast-on method. The longtail method will give you a nice, clean looking cast on that's stretchy enough to go with the ribbing around the base of the hat but also structured enough to take the wear-and-tear that your hat's brim will receive.
Watch the video below to learn how to do the longtail cast-on method, or click below to get the full tutorial.
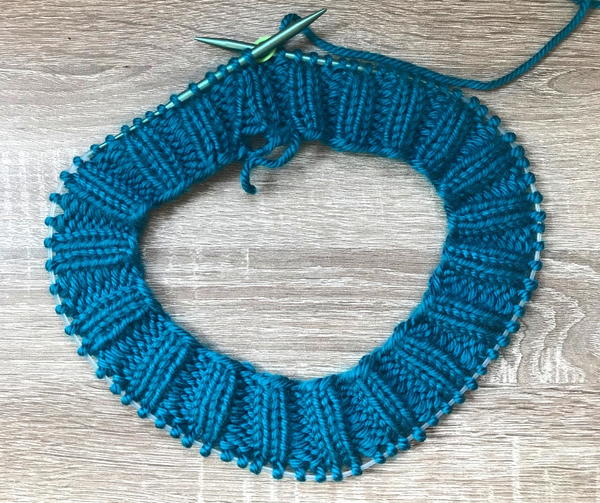
Once you've cast on your 80 stitches, go back and count them all one more time. If you don't have the proper number of stitches, your ribbing will not line up properly!
Here's what your cast-on row should look like:

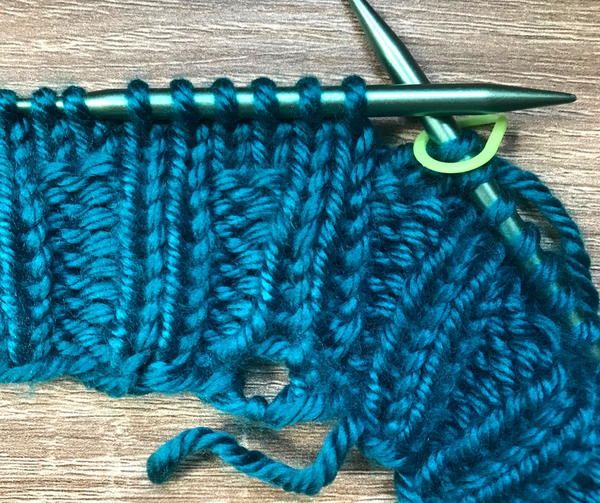
Step 2: Joining
Next, you'll need to join your knitting. There are many different ways to do this, but the invisible join is one of the most common and most visually appealing joins for things like hats and socks.
For this join, you will need to cast on one more stitch for a total of 81. Once you've completed this join, your total number of stitches will have reduced back to 80.
Watch the video below to learn how to do this join, or click below to get the full tutorial.
Step 3: Ribbing
Once you've got your 80 stitches cast on and you invisible join completed, you will start the ribbing portion of the hat. The purpose of ribbing is to give the base of the hat a little more stretch, which will help the finished product fit more securely.
This particular rib is a 2-by-2 rib, which aligns perfectly with the 80 cast-on stitches.
How to Do the 2-by-2 Rib:
- Once you've joined, place your stitch marker on your right-hand needle. This will mark the spot in your work where each round beings and ends.
- Next, knit two stitches.
- Then, purl two stitches.
- Repeat steps 2 and 3 all the way around your work until you've reached the stitch marker. Now you've completed the first round of your hat!
- Pass the stitch marker to your right-hand needle and repeat this row until you have about 1 to 1.5 inches of ribbing.
Need A Refresher?
If this is the first thing you've ever knit or if you're picking up knitting for the first time in a long time, you might need a quick tutorial on knitting and purling. Head on over to our knitting class and check out the tutorials for how to knit and purl:
Quick Note:
The number of rows required to get to this point will be a little bit different for each knitter, based on your individual knitting gauge. For me, this took 9 rows.
Step 4: The Body of the Hat
Once you've done the ribbing, you've completed the hardest part of your hat! The remainder of this hat pattern is just stockinette stitch. If you're familiar with stockinette, you know it is alternate rows of knitting and purling and can be recognized by its signature "v-stitch" or "arrow" pattern.
Things are a little different for stockinette stitch in the round. Because knitting in the round has no wrong side rows, there is no purling involved. That means you just have to knit all the way around every row!
This part of the pattern is super relaxing. Put on your favorite show, kick back, and do the knit stitch all the way around until you have about 8-9 inches of stockinette!
Quick Note:
For my hat, I did about 8.5-9 inches of stockinette to form the body. The longer you make the body of the hat, the more drape the final hat will have.
Some people prefer this in their hats! That said, if you really want to get some nice drape to your hat to give it that casual look, you should try going up one needle size.
Optional: Get Creative With Your Pattern!
If you're starting to feel comfortable with knitting in the round at this point, you can get creative and add some decoration to your pattern. For example, you could browse our stitch library and find a new stitch to incorporate into your pattern to make your hat truly one of a kind. Cabling is a common way to take hats to the next level.
For the purposes of this tutorial, I have just kept it simple and done a plain stockinette stitch hat, but feel free to experiment with something new if the repetitive knit stitch is getting a little boring; we won't blame you!
Step 5: Finishing
One of the things that makes this hat pattern so great is that there is no bind off! Instead, you simply take your tail of yarn and thread it through the loops of your last row and pull the hat together.
Here's how you do it:
- Work your field of stockinette until you've reached the desired length of your hat.
- Once you've reached the end of your last row, reserve a tail of yarn that's about 1.5 feet long. Cut this yarn and place the rest to the side.
- Pick up your tapestry needle and thread the tail of yarn through the eye of the needle; tie a simple knot to hold the yarn in place through the needle.
- Then, with your tapestry needle, pick up your last row of stitches 2-3 at a time. Bring your yarn through the stitches, and sweep them off the end of your needle.
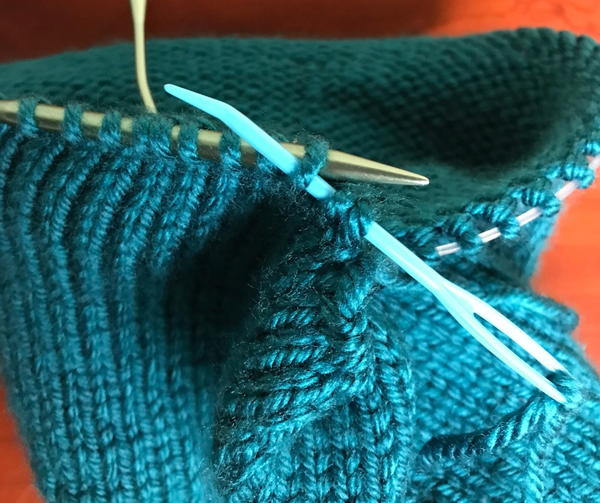
- Continue threading the yarn through the stitches and sweeping the stitches off until you've removed every stitch from your circular needles.
- Set your circular needles aside and pull on the tail of yarn to tighten the top of the hat!

Step 6: Attaching the Pom-Pom
Once you've got your yarn threaded through your last round of stitches and ever stitch off of the circular needles, it's time to attach the pom-pom.
Don't have a pom-pom handy? Watch this video below to learn how to make one yourself from some scrap yarn:
Here's how to attach the pom-pom and finish the hat:
- Take your tail of yarn from your hat and place it down the center hole of the hat so that it dangles in the middle.
- Take your pom-pom and find the two extra long pieces of yarn that are dangling from it.
- Take one of the pieces of yarn and thread it through your tapestry needle.
- Insert the tapestry needle through one of the stitches of the last row of your hat.
- Do the same for the other piece of yarn coming off of your pom pom.
- Pull both of these pieces of yarn tightly so that the pom pom is secured to the hat.
- Turn your hat inside out so that you can see both pieces of yarn from the pom-pom and also the tail of yarn from the hat itself.
- To make the pom-pom more secure, bring the two pieces of yarn through stitches on the last row of your hat at least one more time.
Quick Note:
We recommend doing this in a sort of criss-cross formation around the top hole of the hat. This will ensure that the top of the hat is securely in place and that the pom-pom does not move around.
Step 7: Weaving In the Ends
You're almost done! All you have left to do is weave in your ends. You should have four ends in total. Two from the pom-pom, one from the top of the hat, and one from the bottom.
Watch this video below to learn how to weave in your ends:
Congrats!
You've completed your first hat pattern!
Ready for More?
Your Recently Viewed Projects
Thanks for your comment. Don't forget to share!
mulberrygalprinces s
May 18, 2018
This is a perfect project for a beginner. I am trying to teach my grand daughter how to knit. These crafts like crochet and knit are dying out and I am trying to save it. She has learned to crochet so now we have moved up to knitting. Thank you for sharing.
cjs2sew 6363647
Apr 11, 2018
Working on more premie and regular baby hats for our local hospital
Tricia108
Mar 07, 2018
A basic knit hat is always needed. I know the pattern only comes in one size but you can size it to your head because it starts off with basic ribbing and then just knit since it is done on a circular needle joining the stitches in the round. Good to knit up a hat quickly and also for gifts and charity knitting. Thanks for the pattern.
cloandron 3321869
May 31, 2015
LeI want to knit pretty. Hats for a cancer patient ave a comment...
lashelliab 2365370
Apr 19, 2015
I am new to knitting so i been doing a little research on this kind of stuff for the last few months now. Things like this i enjoy.
ahuggett5122014 76 41263
May 12, 2014
It would be very easy to customize this pattern, even just by changing the yarn!
jcoop1 8205388
Feb 05, 2014
I am new to knitting and need to know if the beanie is knitted on straight or circular needles.
Lisa
Mar 28, 2014
This is knit on straight needles. If it was knit on circs, there wouldn't be a seam to sew at the end. I've done it both ways and find in the round to come out a bit too tight, it was much looser and easier on the hands with straight needles. hope this helps.
lnstitch2 4675184
Mar 24, 2012
When I copied the actual page of this pattern and took it to buy yarn I discovered it did not have the type of yarn or number of skeins needed. It also did not have the size needles to use. I came home and found the page again and the information was listed on the page before the actual instruction page. To make it more convenient all of this should have been listed on the pages you printout for the instrutions.
Gigit
Feb 02, 2012
The pattern above was corrected to: R1 k2p2 R2 k R3 p How do you start and complete the decrease R2 k
Sunflower Susie
Jan 18, 2012
I am looking for a plain "beret" type hat to knit with eyelash yarn. Looks like a fluffy "mushroom" top. Very cute for bad hair days. Anyone have one?
neve 8777468
Jan 17, 2012
I am having trouble getting to the knitting instructions. When I reach the page I get the message that it cannot be opened, operation aborted. Nan
JennyBee1
Jan 18, 2012
Hi neve 8777468, We just tested the link on our end and it seems to be working fine. We suggest you try clicking one more time on the link above that says "click here for knitting pattern," and let us know if the problem continues. Thanks! --editors of AllFreeKnitting
catmandoo 1876003
Dec 24, 2011
What do I think? I think this pattern has been here for MONTHS without the right directions. HELP!!!!!!
Gigit
Feb 06, 2012
Someone posted that the pattern should be: R1 k2P2 R2 K R3P It certainly looks to be correct. Does someone know how and when to start the decrease?
Lisa
Mar 07, 2015
pattern states rather clearly that you start the decrease when the hat measures 7". The k1, p1 ribbing is done for 6 rows and the stockinette stitch is done till 7", then the decrease is completed in 3 rows and the hat is finished.
editorKS
Dec 08, 2011
Hi, mauieast 2528821. I'm sorry to hear of your trouble. I have two options for you: 1. You can contact the pattern designer directly for help. The designer is specified in the byline. 2. I might also suggest that you try posting your question to our sites Facebook page. It is monitored by the editor and is a great resource for helpful tips and suggestions from our Facebook friends; perhaps they can offer some guidance! Here is the link: http://www.facebook.com/FaveCrafts Good luck! --Editors of AllFreeKnitting
mauieast 2528821
Dec 07, 2011
Has anyone actually made this hat and had it look like the picture? I tried, using various comments by other, but no go.
catmandoo 1876003
Nov 13, 2011
Can somebody correct this pattern so it has the right # of stitches AND looks like the pattern on the pictured hat????? Thanks!
PatchesPatches
Oct 19, 2011
IMHO, and judging by the picture, there are 3 rows to that pattern: Row 1: K2, P2, to end Row 2: Knit Row 3: Purl Repeat these three rows for the pattern. Knit till your hat is the length you want it, then do the decrease rows.
JennyBee1
Oct 12, 2011
@rdbell1 3408708, We suggest you try contacting the pattern designer directly for help. The designer is specified in the byline. --Editor of AllFreeKnitting
lisadonne40 797966 8
Oct 12, 2011
When i have had trouble printing any patterns from this site, I just copy and paste the text and a pic of the finished item into a Word or Pages document and print from there. This helps eliminate extra ads and such. Saves paper and ink AND makes it much easier to follow! Just a tip for those who are having troubles printing the patterns here.
rdbell1
Oct 07, 2011
I am working on this beanie & find some confusion. When you finish doing rows 1-6, do you then go on to rows 7 & 8. Do you then go back to rows 1-6 until the hat if ready for the decrease area?
Crafter 1847400
Jan 12, 2012
When you get to 10 inches by repeating rows 7 & 8 you then go to the line that states Start Decrease. The hat will become smaller every other row. Finish with a purl row across. Cut yarn at approximately 15 inches from end of row, stictch through every row until you are at the beginning row. This will create a nice warm hat. Decorate as you wish with a crocheted flower, or your favority acessory. Hope this is helpful
martraffas 6547812
Sep 29, 2011
Very frustrating. I can't print the directions and i can't make the hat without the directions.
Crafter 1847400
Jan 12, 2012
You may want to highlight the page as far down as the directions go, copy and past on a word document. Then save it on your computer or print it immediately for your pattern stash. I have copied and pasted, then deleted what I didn't want to be on the page and save before printing. Works great on my HP Vista. Hope this is helpful
sschauss 9579362
Feb 17, 2011
I do not know why I cannot print out the free patterns. I have signed and all of the things I need to do, but I cannot print out. sschauss @insightbb.com
wengoo 9133139
Jan 21, 2011
Looking for a knitted bear hat do you have a pattern for one please?
jeannetaylor 58920 73
Jan 03, 2011
The ad on the right from shokay.com, is the exact style hat pattern I am looking for. Any luck with you having one like it? My granddaughter would like to be able to tuck her long hair into it, rather like a snood type hat.I love your page. It is great. Thanks. Jeanne.
Diane84 2286466
Jan 03, 2011
This is the first time I signed on, and you know you are super good at it... I am super happy now and I sure do thankyou a lot to keep me busy... Diane
okerr43 7159727
Oct 29, 2010
I am glad I wasn't the only one with a problem with this pattern. Will you run it again?
Member 8385529
Oct 20, 2010
I just finished knitting the hat and I just made it 9" long and used the right size needle and it is to big for me and I am 75 years old and knit all the time. I was a little disappointed in the way it turned out. It does not look like the picture. Gerry Cummings cummings.ge@verizon.net
Jobie
Oct 07, 2010
Barbra 121...do you think you need to repeat rows 1-8 until reaching 10" instead of repeating the k rows p rows On the decrease rows, do you knit together all of the stitches, halving the # each time? Thanks...new to knitting.
Barbra121
Oct 04, 2010
The directions and the photo for this don't seem to match. You have a repeat a k row and a p row for many inches yet the pattern looks like a rib.
Report Inappropriate Comment
Are you sure you would like to report this comment? It will be flagged for our moderators to take action.
Thank you for taking the time to improve the content on our site.