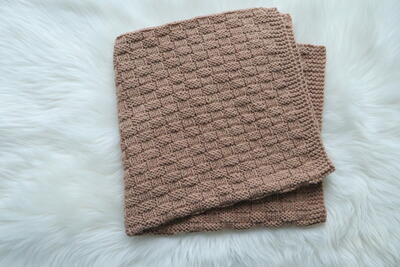
Rockin' Ruffles Baby Dress Pattern

This Rockin' Ruffles Baby Dress Pattern is an adorable baby dress knitting pattern available in multiple sizes, from 6 months to 24 months. If you've been looking for a simple, classic knit baby dress pattern to make for your daughter or granddaughter, this free knitting pattern will fit the bill.
While the ruffled neck makes this baby dress pattern super adorable, the stockinette stitch body makes it look clean and classic. Not too many frills; just a simple dress for baby. If you love free baby knitting patterns, you'll want to make this classic knit baby dress again and again.
NotesYou will need both straight needles and two circular needles for this pattern.

Knitting Needle Size8 or 5 mm, Circular Knitting Needles
Yarn Weight(4) Medium Weight/Worsted Weight and Aran (16-20 stitches to 4 inches)
Finished SizeFinished Chest: 21 (22, 24, 25)”, [53.5 (56, 61, 63.5) cm]. Finished Length: 14 (15, 15½, 16)”, [35.5 (38, 39.5, 40.5) cm].
Materials List
- RED HEART® Baby Hugs™ Medium: 1 (1, 2, 2) balls 4820 Sky
- Susan Bates® Knitting Needles: 5 mm [US 8] straight needles and two 16” [40 cm] circular needles
- Stitch holder
- Locking stitch markers
- Yarn needle
- One [16 mm] button
Rockin' Ruffles Baby Dress Pattern
This dress is made from 2 pieces (back and front). The shoulders are seamed together and the ruffled collar is worked and attached to the neck edge in two steps. First, using one circular needle, stitches are picked up across the neck edge, left on the needle, and set aside. With the 2nd circular needle, the ruffle is worked from the outer (wider) edge inwards. Then the ruffle stitches and the stitches picked up around the neck edge are matched and purled together to attach the ruffle to the dress. Additional rows are worked to complete the ruffled collar.
Directions are provided for size 6 months. Changes for sizes 12 months, 18 months, and 24 months are in parentheses. Schematics for the front and back of the dress are provided at the beginning of each section below.
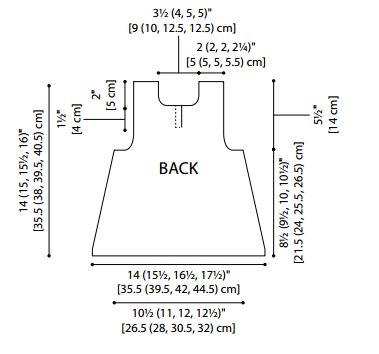
Back of the Dress
-
With straight needles, cast on 56 (62, 66, 70) sts. (Click the image to zoom in.)
-
Work in Garter st (knit every row) for 6 rows.
-
Next Row (wrong side): Purl.
-
Decrease Row (right side): K1, ssk, knit to last 3 sts, k2tog, k1. Stitch count: 54 (60, 64, 68) sts.
-
Work in Stockinette st (knit on right side, purl on wrong side) for 5 rows.
-
Repeat last 6 rows 5 (7, 7, 8) more times. Stitch count: 44 (46, 50, 52) sts.
-
Repeat Decrease Row. Stitch count: 42 (44, 48, 50) sts.
-
Begin shaping the arm holes. Row 1 (right side): Bind off 3 sts, knit to end of row. Stitch count: 39 (41, 45, 47) sts
-
Row 2: Bind off 3 sts, purl to end of row. Stitch count: 36 (38, 42, 44) sts.
-
Row 3 (decrease row): K1, ssk, knit to last 3 sts, k2tog, k1. Stitch count: 34 (36, 40, 42) sts.
-
Work even in Stockinette st until piece measures about 8½ (9½, 10, 10½)” [21.5 (24, 25.5, 26.5) cm] from beginningl. End with a wrong side row.
-
Row 4: Purl.
-
Repeat last 2 rows 2 more times. Stitch count: 30 (32, 36, 38) sts.
-
Work even in Stockinette st until armholes measure about 2” [5 cm]. End with a wrong side row.
-
Begin shaping the right placket. Row 1 (right side): K15 (16, 18, 19), place remaining 15 (16, 18, 19) sts on holder for left placket and neck, cast on 2 sts. Stitch count: 17 (18, 20, 21) sts remain on your needle and 15 (16, 18, 19) sts are on the holder.
-
Work the following 2 steps over the 17 (18, 20, 21) sts on needle only.
-
Row 2: K4, purl to end of row.
-
Row 3: Knit
-
Repeat last 2 rows until right armhole measures about 3½” [9 cm]. End with a right side row
-
Begin shaping the right neck. Row 1 (wrong side): Bind off 4 (5, 6, 6) sts, purl to end of row. Stitch count: 13 (13, 14, 15) sts.
-
Row 3: Bind off 3 (3, 4, 4) sts, purl to end of row. Stitch count: 10 (10, 10, 11) sts.
-
Row 4: Knit.
-
Row 2: Knit.
-
Row 5: Bind off 2 sts, purl to end of row. Stitch count: 8 (8, 8, 9) sts.
-
Work even in Stockinette st until right armhole measures about 5½” [14 cm]. End with a wrong side row. Bind off.
-
Begin shaping the left placket. Row 1 (right side): Cast on 2 sts to right needle, then with right side facing, knit the 15 (16, 18, 19) left placket and neck sts from the holder. Stitch count: 17 (18, 20, 21) sts.
-
Row 2: Purl to last 4 sts, k4.
-
Row 3: Knit.
-
Repeat last 2 rows until left armhole measures about 2¾” [7 cm]. End with a right side row.
-
Buttonhole Row (wrong side): Purl to last 4 sts, k1, yo, k2tog, k1.
-
Next Row: K2, knit into the yo, knit to end of row.
-
Next Row: Purl to last 4 sts, k4.
-
Next Row: Knit
-
Next Row: Purl to last 4 sts, k4. Note: The left armhole should measure about 3½” [9 cm].
-
Begin shaping the left neck. Row 1 (right side): Bind off 4 (5, 6, 6) sts, knit to end of row. Stitch count: 13 (13, 14, 15) sts.
-
Row 2: Purl.
-
Row 3: Bind off 3 (3, 4, 4) sts, knit to end of row. Stitch count: 10 (10, 10, 11) sts.
-
Row 4: Purl.
-
Row 5: Bind off 2 sts, knit to end of row. Stitch count: 8 (8, 8, 9) sts.
-
Work even in Stockinette st until left armhole measures same as right armhole, end with a wrong side row. Bind off.
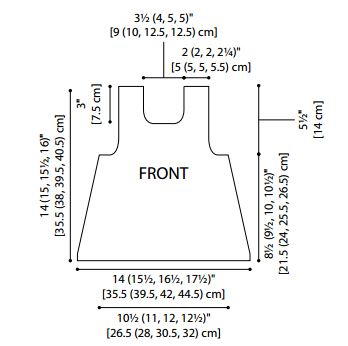
Front of Dress
-
Work same as Back to armhole shaping. Begin shaping armholes. (Click the image to zoom in.)
-
Row 1 (right side): Bind off 3 sts, knit to end of row. Stitch count: 39 (41, 45, 47) sts.
-
Row 2: Bind off 3 sts, purl to end of row. Stitch count: 36 (38, 42, 44) sts.
-
Row 3 (decrease row): K1, ssk, knit to last 3 sts, k2tog, k1. Stitch count: 34 (36, 40, 42) sts.
-
Row 4: Purl.
-
Repeat last 2 rows 2 more times. Stitch Count: 30 (32, 36, 38) sts.
-
Work even in Stockinette st until armholes measure about 2½” [6.5 cm]. End with a wrong side row.
-
Divide for the neck. Row 1 (right side): K12 (13, 14, 15) and place these sts on holder for left neck, bind off next 6 (6, 8, 8) sts for front neck, knit to end of row for right neck. Stitch count: 12 (13, 14, 15) sts remain on needle and 12 (13, 14, 15) sts are on the holder.
-
Shape the right neck. Work the following steps over the 12 (13, 14, 15) sts on your needle only.
-
Row 2 (wrong side): Purl.
-
Row 3: Bind off 2 (3, 3, 3) sts, knit to end of row. Stitch count: 10 (10, 11, 12) sts.
-
Row 4: Purl.
-
Row 5: Bind off 2 (2, 3, 3) sts, knit to end of row. Stitch count: 8 (8, 8, 9) sts.
-
Work even in Stockinette st until right armhole measures about 5½” [14 cm]. End with a wrong side row. Bind off.
-
Begin shaping the left neck. Return the 12 (13, 14, 15) left neck sts from the holder to your left needle so that you are ready to work a wrong side row.
-
Row 2 (wrong side): Purl.
-
Row 3: Knit.
-
Row 4: Bind off 2 (3, 3, 3) sts, purl to end of row. Stitch count: 10 (10, 11, 12) sts.
-
Row 5: Knit
-
Row 6: Bind off 2 (2, 3, 3) sts, purl to end of row. Stitch count: 8 (8, 8, 9) sts.
-
Work even in Stockinette st until left armhole measures same as right armhole. End with a wrong side row. Bind off.
Finishing
-
Sew shoulder seams. Place left placket over right placket and tack in place along bottom edge.
-
Along the Neck Edge: With right side facing and circular needle, beginning at left back neck edge (skipping the edge of the left placket), pick up and k52 (56, 62, 66) sts across neck edge (stopping at the beginning of the right placket). Leave stitches on needle and cut yarn.
-
Ruffle: With 2nd circular needle, cast on 97 (104, 116, 123) sts. Work back and forth in rows as if working with straight needles.
-
Row 1 (wrong side): Knit.
-
Beginning with a right side (knit) row, work even in Stockinette st until piece measures about 1½ (1½, 1¾, 2)” [4 (4, 4.5, 5) cm] from beginning. End with a wrong side row.
-
Next Row (right side): K1, *k2tog, k3; repeat from * to last 1 (3, 0, 2) sts, k1 (3, 0, 2). Stitch count: 78 (84, 93, 99) sts.
-
Next Row: *P2tog, p1; repeat from * to end of row. Stitch count: 52 (56, 62, 66) sts/
-
With both right sides facing out, place ruffle in front of stitches picked up along neck edge. With yarn attached to ruffle, working 1 stitch from neck edge together with 1 stitch from ruffle, purl across neck edge to join ruffle to dress.
-
Next 2 Rows: Purl.
-
Bind off as if to purl.
-
Armhole Edging: With right side facing and straight needles, pick up and k42 (44, 46, 48) sts along armhole edge.
-
Knit 3 rows.
-
Bind off as if to knit. Repeat for 2nd armhole.
-
Sew side and armhole edge seams. Sew button to right placket opposite buttonhole. Weave in ends.
Abbreviations
- k
- Knit
- sts
- Stitches
- k2tog
- Knit next 2 stitches together
- P
- Purl
- p2tog
- Purl next 2 stitches together
- yo
- Yarn over
- ssk
- Slip slip knit: Slip next 2 stitches, one at a time, as if to knit to the right needle, insert the point of the left needle through the front of the stitches, knit these stitches together through the back loop – 1 st decreased.
What's your favorite baby dress knitting pattern?
Read Next75+ Free Baby Knitting Patterns
Your Recently Viewed Projects
Thanks for your comment. Don't forget to share!
Lisa
Jun 01, 2017
I'm surprised that there is absolutely no yarn information, which yarn and how much would be very helpful.
KathrynAllison
Jun 01, 2017
Hi Lisa, the Materials List was accidentally omitted from this pattern, but it can now be found above. Thank you for bringing this to our attention. Our apologies for the inconvenience! -Editors of AllFreeKnitting
clady101 9627560
Apr 13, 2017
It decidedly looks EASY (like a beginner could knit it. Just one row around the bottom and one around the ruffle of yo K2tog would make it a LOT prettier.
paver2
Jan 21, 2017
Such a pretty little dress! It could easily be decorated with duplicate stitch to create flowers or other simple shapes. I wonder how hard it would be to put an edging on the ruffled collar? Maybe with crochet or just a whip stitch with a yarn needle? Is there a way to knit an edge on without it being too difficult?
Report Inappropriate Comment
Are you sure you would like to report this comment? It will be flagged for our moderators to take action.
Thank you for taking the time to improve the content on our site.