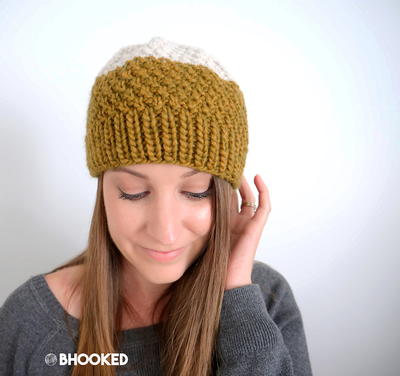
Camel Seed Stitch Slouchy Hat
This simple seed stitch knit hat pattern is easy and oh-so-perfect for fall.

This Camel Seed Stitch Slouchy Hat is a stylish yet easy knitting pattern. This hat knitting pattern uses simple seed stitch knitting to create the interesting texture and simple 2x2 knit and purl ribbing for the cuff. Since the skills needed for this knit hat pattern are basic, even beginners with experience in these stitches should be able to complete this slouchy hat knitting pattern without much trouble. While this free knitting pattern looks wonderful worked in camel, it would also be lovely in forest green, dark blue, or any other fall-friendly color.
NotesDirections are for size Small/Medium with changes for size Large/Extra-Large in parentheses. Hat fits most adults.

Knitting Needle Size8 or 5 mm
Yarn Weight(4) Medium Weight/Worsted Weight and Aran (16-20 stitches to 4 inches)
Gauge16 sts = 4” [10 cm]; 29 rows = 4” [10 cm] in Seed Stitch. CHECK YOUR GAUGE. Use any size needle to obtain the gauge.
Finished SizeHat Measures: 18 (20)” [46 (51) cm] in circumference. Finished Length: 9 (10)” [23 (25) cm] with cuff turned up.
Materials List
- RED HEART® Boutique Gleam™: 1 ball 3305 Toasty/Gold
- Susan Bates® Knitting Needles: 5 mm [US 8]
- Yarn needle
If you love hat knitting patterns, don't miss these
Seed Stitch Knit Hat Pattern
This hat is knitted flat and seamed. Directions are for size Small/Medium with changes for size Large/Extra-Large in parentheses.
Pattern Stitches
-
2x2 Rib
Row 1 (Right Side): *K2, p2; repeat from * to last 2 sts, k2.
Row 2 (Wrong Side): Knit the k sts, purl the p sts. Repeat Rows 1-2 for 2x2 Rib. -
Seed Stitch
Row 1 (Right Side): *K1, p1; repeat from * to end of row.
Row 2 (Wrong Side): *P1, k1; repeat from * to end of row. Repeat Rows 1-2 for Seed Stitch. -
Stockinette Stitch
Row 1 (Right Side): Knit all stitches.
Row 2 (Wrong Side): Purl all stitches. Repeat Rows 1-2 for Stockinette Stitch
Knit Hat Pattern
-
Start of Cuff. Cast on 74 (82) sts.
-
Next Rows: Work in 2x2 Rib for 3” [8 cm], ending on a Wrong Side row.
-
Next Row (Right Side) Turning Row: Knit across row.
-
Next Row (Wrong Side): Work in 2x2 Rib across row.
-
Next Rows: Continue working in 2x2 Rib until piece measures 6” [15 cm] from caston edge, ending on a Wrong Side row.
-
Begin Body of Hat
Next Row (Right Side): Knit 1 edge stitch, work in Seed Stitch to last stitch, knit 1 edge stitch. Keeping first and last stitches in Stockinette Stitch for edge stitches, and remaining stitches in Seed Stitch, continue until piece measures 7 (8)” [18 (20) cm] from Turning Row, ending with a Wrong Side row. -
Begin Shaping the Crown
Row 1 (Right Side) decrease: K1 edge st, *work 6 sts in Seed Stitch, k2tog; repeat from * to last st, k1 edge st—65 (72) sts. -
Row 2 (Wrong Side): P1 edge st, *work 6 sts in Seed Stitch; repeat from * to last st, p1 edge st.
-
Row 3 (Right Side) decrease: K1 edge st, *work 5 sts in Seed Stitch, k2tog; repeat from * to last st, k1 edge st—56 (62) sts.
-
Row 4 (Wrong Side): P1 edge st, *p1, work 5 sts in Seed Stitch; repeat from * to last st, p1 edge st.
-
Row 5 (Right Side) decrease: K1 edge st, *work 4 sts in Seed Stitch, k2tog; repeat from * to last st, k1 edge st—47 (52) sts.
-
Row 6 (Wrong Side): P1 edge st, *p1, work 4 sts in Seed Stitch; repeat from * to last st, p1 edge st.
-
Row 7 (Right Side) decrease: K1 edge st, *work 3 sts in Seed Stitch, k2tog; repeat from * to last st, k1 edge st—38 (42) sts.
-
Row 8 (Wrong Side): P1 edge st, *p1, work 3 sts in Seed Stitch; repeat from * to last st, p1 edge st.
-
Row 9 (Right Side) decrease: K1 edge st, *work 2 sts in Seed Stitch, k2tog; repeat from * to last st, k1 edge st—29 (32) sts.
-
Row 10 (Wrong Side): P1 edge st, *p1, work 2 sts in Seed Stitch; repeat from * to last st, p1 edge st.
-
Row 11 (Right Side) decrease: K1 edge st, *work 1 st in Seed Stitch, k2tog; repeat from * to last st, k1 edge st—20 (22) sts.
-
Row 12 (Wrong Side): P1 edge st, *p1, work 1 st in Seed Stitch; repeat from * to last st, p1 edge st.
-
Row 13 (Right Side) decrease: K1 edge st, k2tog to last st, k1 edge st—11 (12) sts. Cut yarn leaving a tail 20” [51 cm] long. With yarn needle, draw tail through remaining sts twice, pull tightly and secure.
Finishing
-
With Right Side facing, sew seam from top down to turning row. Then turn hat inside out with Wrong Side facing and sew remainder of cuff as established. Weave in ends.
Abbreviations
- k
- knit
- st(s)
- stitch(es)
- K2tog
- Knit 2 sts together (decrease)
- p
- purl
- St st
- Stockinette stitch
- cm
- centimeters
- st(s)
- stitch(es)
- *
- repeat whatever follows the * as indicated
What's your favorite seed stitch knitting pattern?
Read NextPink Quick-Knit Beanie
Your Recently Viewed Projects

Thanks for your comment. Don't forget to share!
Member 7262490
Nov 08, 2018
I agree. There should be P1 before you do the six stitches (line 8 in the directions.
zephyr0269 8987924
Jan 22, 2018
I started the hat, goes fast, but at the decreases I am a little confused row 2 of the decreasing rows says to work 6 sets in seed stitch repeat from to last st. Am I missing something? What about the other 65 sts on the row?
Bangtan1013
Apr 28, 2018
I agree I was also confused but I figured that all the 2nd decrease row on the wrong side had a purll 1 before the seed stitch continued so I just followed this pattern P1 edge st, p1, work 6 sts in Seed Stitch repeat from to last st, p1 edge st. and it seems t be working fine.... so maybe try that???
Lisa
Oct 02, 2018
Yes, you are missing something, when a pattern states repeat from or to that means those directions in a pattern are repeated.
Lisa
Dec 17, 2018
In knitting when they state to repeat between the asterisks, you do exactly that, not every row is a decrease. It's odd that there is an error in the pattern but because knitters are not understanding or doing the pattern correctly, no one on here has mentioned the errors.
opheliakc
Jul 26, 2017
I hate foldin brims so I skipped that. Didn't like the way we decreased the work.
kathleenm 2750052
Jan 27, 2017
I am about 3/4 done with this hat and because of the fold over brim I am finding that it needs at least two balls of yarn depending on the size of the ball. I also started with the large size and it is way too big for ANY female so I tore it out and am making it in the small size. I am not a tight knitter. Just average.
3cats2love
Jan 20, 2017
This is a nice textured hat pattern and I'm happy to see that it includes directions for a larger size. Many hat patterns are too small for me, or maybe I just knit more tightly than other people. The neutral color is nice but I think the pattern would also look good in most colors.
The Designing Peng uin
Dec 17, 2016
this hat is one that looks to be fun to wear and uses three basic stitches, so would be fun to knit a change of colour would lead to a different hat ideal
Susan S
Dec 12, 2016
I love that this hat combines three of my favorite stitches. It's such a classic and depending on the color can be worn by either a man or a woman, so it's perfect for charity knitting or a grab bag at work. This one is a keeper.
Sara R
Aug 19, 2016
I think this is my new favorite seed stitch knitting pattern! I love the texture on this hat.
Report Inappropriate Comment
Are you sure you would like to report this comment? It will be flagged for our moderators to take action.
Thank you for taking the time to improve the content on our site.