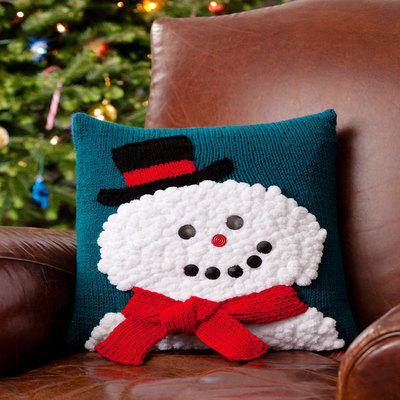
Smiley Snowman Pillow
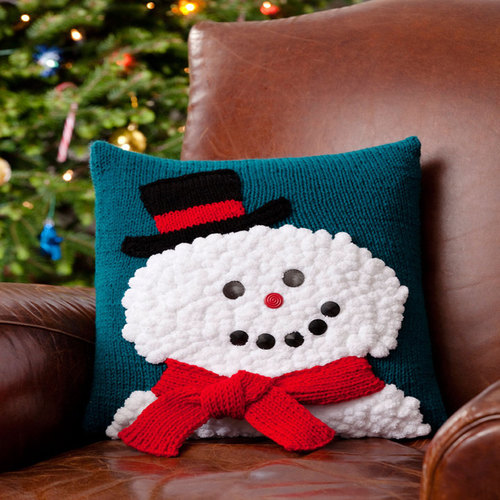
Celebrate Christmas time by making your own knitted snowman pattern. Bring holiday cheer into your home with this Smiley Snowman Pillow. This happy snowman will bring a smile to your face. This comfy pillow cover will add a bit of Christmas magic no matter where you put it. This jolly pillow would make a great homemade gift for friends or loved ones. Have some holiday fun by knitting this easy pattern. Bring this snowman to life with cute buttons and a scarf. This little guy will never melt away!

Knitting Needle Size5 or 3.75 mm, 7 or 4.5 mm
Yarn Weight(4) Medium Weight/Worsted Weight and Aran (16-20 stitches to 4 inches)
Materials:
- RED HEART® “Super Saver®” (Weight 4: Medium): 1 skein 656 Real Teal A
- RED HEART® “Super Saver®” (Weight 4: Medium): 1 skein 319 Cherry Red B
- RED HEART® “Super Saver®” (Weight 4: Medium): 1 skein 312 Black C.
- RED HEART® “Spark-a-Doodle™” (Weight 6: Super Bulky): 1 ball 9001 White Cloud D.
- Knitting Needles: 3.75mm [US 5] and 4.5mm [US 7]
- 4 Stitch markers
- Yarn needle
- One ¾” red button for nose
- Five ¾” black buttons for mouth
- Two ” black buttons for eyes
- Sewing needle and thread
Gauge: 14 sts = 4”; 22 rows = 4” on larger needles in St st with A.
Note: Spark-a-Doodle gauge is slightly larger, but the yarns are stretchable and allow the pillow to fill the pillowcase evenly.
Measurements: Pillowcase stretches to fit a 16” x16” pillow
Abbreviations:
- M1 (make one stitch) = Lift running thread before next stitch onto left needle and knit into the back loop
- A, B, C, D = color A, B, C, D
- K = knit
- mm = millimeters
- P = purl
- St st = Stockinette stitch (Knit on right side rows; Purl on wrong side rows.)
- st(s) = stitch(es)
- tog = together
- [] = work directions in brackets the number of times specified.
Instructions:
Tips for using Spark-a-Doodle yarn: Your stitches must be made between pom-poms. In this pattern, because of the smaller needle size, you should be able to make two or three stitches between pom-poms. Try to stagger the placement of the pom-poms (instead of being lined up in vertical columns). If you find that your pom-poms are falling in vertical columns, you can correct this by making more or fewer stitches between one pom-pom and the next. This will shift the following pom-poms over by one stitch.
When knitting with Spark-a-Doodle yarn, the pom-poms will appear on the back of your work; when purling with pompa-doodle, the pom-poms will appear on the front of your work. In this pattern, you will work all of the Spark-a-Doodle stitches in Reverse Stockinette stitch (purl on right side row; knit on wrong side rows), and all Super Saver stitches in Stockinette stitch (knit on right side rows; purl on wrong side rows). This will place all of the pom-poms on the right side of your work. To make it easier to weave in Spark-a-Doodle yarn ends, you can trim down the pom-poms carefully by cutting some of the fluff off of them.
To work color changes: Use the intarsia method of knitting; use a separate ball of yarn for each large block of color. Pick up new yarn color from under old yarn color to twist yarns and prevent holes.
Pillow
With smaller needles and A, cast on 52 sts. Work in ribbing as follows:
Rows 1-8: [K2, P2] 13 times. Place 1 stitch marker at each end of 8th row. Change to larger needles and work in St st until 10” from beginning, end purl row. Now work from chart using A and D. (Remember to work all A sts in St st, and all D sts in Reverse St st). Using only A, work in St st until 34½” from beginning. Place 1 stitch marker at each end of this row. Change to smaller needles and repeat Rows 1-8. Bind off in ribbing.
Scarf (Make 2)
With smaller needles and B, cast on 14 sts. Work in ribbing as follows:
Row 1: Slip 1 knitwise, P1, [K1, P1] 6 times. Repeat Row 1 until 13” from beginning. Bind off in ribbing leaving long tail for sewing to pillow.
Hat
With smaller needles and C, cast on 30 sts.
Row 1 (Right Side): Knit.
Row 2: Purl.
Row 3: Knit.
Row 4: Bind off 8 sts, P14 including st on needle after bindoff, bind off 8 sts – 14 sts.
Row 5: With right side facing and B, K14.
Rows 6-10: Work 5 rows in St st, begin purl row, end purl row.
Row 11: With C, K1, M1, K12, M1, K1 – 16 sts.
Rows 12-16: Repeat Rows 6-10.
Row 17: K1, M1, K14, M1, K1 – 18 sts.
Rows 18-22: Repeat Rows 6-10. Bind off leaving long tail for sewing to pillow.
Finishing
Using needle and thread, stitch all buttons onto face securely (Optional: use small scraps of fabric on the wrong side of the pillow to stitch your buttons into). Using yarn needle and A, sew side seams of pillow as follows: Matching markers,
overlap the ribbed sections of the pillow and sew together (for about 3-4”) at sides only. (The back of this pillow remains open when complete, but the overlap will mask the opening). With right sides together, and first row of Sparka-Doodle at bottom edge of fold, sew side seams of pillow together. Turn right side out and insert pillow. It is helpful to have the pillow inside when placing the scarf and hat. Using yarn needle, and B, sew an end of each scarf piece to each side of snowman’s neck as follows: To make it look like the scarf wraps around the back of the snowman’s neck, place right side of scarf (whichever side you want to be the public side), onto right side of pillow, butting up the edge of scarf to the side edge of snowman’s neck. Sew edge of scarf to pillow front. Repeat for other side of scarf. Tie scarf ends into a knot. Using B, sew top edge of scarf to front of pillow. To help mask stitching, sew through scarf along inside of purl channel in ribbing. Using long yarn tail and yarn needle, sew hat onto pillow, just above head. Weave in all ends.
Chart for Smiley Snowman Pillow