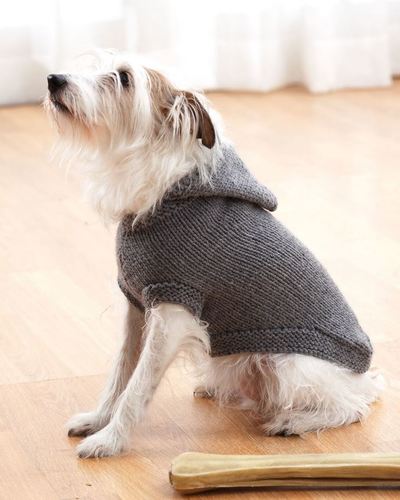
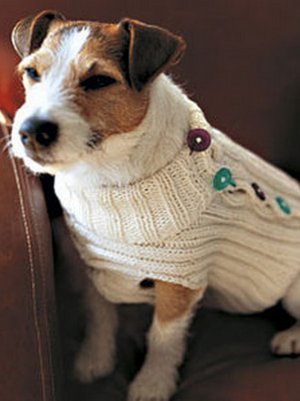
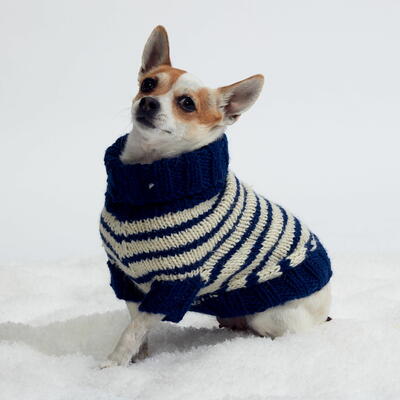
Winter Woof Dog Sweater
This DIY dog coat will keep your pup looking fabulous this holiday season. Keep your furry friend warm with the Winter Woof Dog Coat. This bright and cheery knit will make sure that you don't lose your pup in the snow. The little buttons make it easy to take on and off. There's no more struggling to wiggle Fido into this sweater. Because this sweater is knit from the top down, you can make sure it fits as you knit. Your dog will love lounging around in this knit.

Knitting Needle Size8 or 5 mm
Yarn Weight(4) Medium Weight/Worsted Weight and Aran (16-20 stitches to 4 inches)
Gauge17 stitches, 23 rows, 4 inches. stockinette stitch
Materials:
- RED HEART® Soft®: 1 ball each
- RED HEART® Soft®: 1 ball 2515 Turquoise A
- RED HEART® Soft®: 1 ball 5142 Cherry Red B
- RED HEART® Soft®: 1 ball 4601 Off White C.
- Susan Bates® Knitting Needles: 5mm [US8]
- Yarn needle
- Stitch markers
- Stitch holder
- 3 (5, 7, 7) buttons 1” (25 mm) in diameter
Gauge: 17 sts = 4” (10 cm); 23 rows = 4” (10 cm) in Stockinette st. CHECK YOUR GAUGE. Use any size needles to obtain the specified gauge.
Measurements:
- Directions are for size X-small. Changes for sizes Small, Medium, and Large are in parentheses:
- Finished Neck: 11 (13½, 16½, 19½)” (28, 34.5, 42, 49.5 cm), buttoned
- Finished Chest: 16½ (20, 24, 28)” (42 (51, 61, 71 cm), slightly stretched and buttoned at widest
- Finished Length: 9 (14, 18, 23)” (23 (35.5, 45.5, 58.5 cm), including neckband
Abbreviations:
- LT (Left Twist) = Knit into the back of the second stitch on the left needle leaving the stitch on the needle, knit the first stitch on the left needle, slipping both stitches off the needle.
- M1 = Make 1 (Increase) – Lift strand between needles to left-hand needle and knit strand through the back loop, twisting it to prevent a hole.
- RT (Right Twist) = Knit into the front of the second stitch on the left needle leaving the stitch on the needle, knit the first stitch on the left needle, slipping both stitches off the needle.
- ssk = Slip next 2 stitches, one at a time as if to knit, to right needle, insert point of left needle through front of sts, knit these sts together through back loop.
- A = Color A
- B = Color B
- C = Color C
- k = knit
- p = purl
- st(s) = stitch(es)
- [ ] = work directions in brackets the number of times specified
- * = repeat whatever follows the * as indicated
Instructions:
Pattern Stitches
1x1 Rib (multiple of 2 sts)
Row 1: *K1, p1; repeat from * to end of row.
Repeat Row 1 for 1x1 Rib.
Seed Stitch (over odd number of sts)
Row 1: K1, *p1, k1; repeat from * to end of row.
Row 2: Knit the purl sts and purl the knit sts, as they appear.
Repeat last row for Seed st.
Woven Band (over 21 sts)
Row 1 (Right Side): P3, *[RT] 3 times, p3; repeat from * once more.
Row 2: K3, [p6, k3] twice.
Row 3: P3, *k1, [LT] twice, k1, p3; repeat from * once more.
Row 4: Repeat Row 2.
Repeat Rows 1–4 for Woven Band pattern.
Notes
1. Sweater is worked from the top down, beginning at the neckband. Neckband is folded lengthwise and chest and back pieces worked from neckband down.
2. Different breeds and different dogs vary greatly in size. Working from the neck down allows you to try sweater on your dog as you go to check for appropriate length and placement of buttonholes.
3. When instructed to work in patterns “as established” this means you should work the next row of each pattern ensuring that the stitches line up as before.
NECKBAND
With C, cast on 54 (64, 76, 90) sts.
With C, work in 1x1 Rib for 2 rows.
With B, work in 1x1 Rib for 2 rows.
Continue to work in 1x1 Rib, alternating 2 rows with C and 2 rows with B, until piece measures 1 (1½, 1½, 2)” (2.5 (4, 4, 5) cm) from beginning. Continue to change colors every other row throughout neckband.
Buttonhole Row 1 (Right Side): K1, p1, bind off 2 sts for buttonhole, *k1, p1; repeat from * to end of row.
Buttonhole Row 2: *K1, p1; repeat from * to bound-off sts, cast on 2 sts, k1, p1. Continue in 1x1 Rib until piece measures 3 (4½, 4½, 6)” (7.5 (11.5, 11.5, 15) cm) from beginning, ending with a wrong side row
Repeat Buttonhole Rows 1 and 2. Continue in 1x1 Rib until piece measures 4 (6, 6, 8)” (10 (15, 15, 20.5) cm) from beginning, end with a wrong side row.
CHEST
Row 1 (Right Side): Bind off 6 sts, cut yarn, join A, k5, place marker, k3, place marker, k5, slip remaining 35 (45, 57, 71) sts on holder for back—13 sts.
Row 2: K1, [p1, k1] twice for Seed st border, slip marker, purl to next marker, slip marker, k1, [p1, k1] twice for Seed st border.
Row 3 (increase row): K1, [p1, k1] twice, slip marker, M1, knit to next marker, M1, slip marker, k1, [p1, k1] twice—15 sts.
Rows 4–17: Repeat last 2 rows 7 more times—29 sts.
Row 18: K1, [p1, k1] twice, slip marker, purl to next marker, slip marker, k1, [p1, k1] twice.
Row 19: K1, [p1, k1] twice, slip marker, knit to next marker, slip marker, k1, [p1, k1] twice.
Row 20: K1, [p1, k1] twice, slip marker, purl to next marker, slip marker, k1, [p1, k1] twice.
Row 21: Repeat Row 3 (increase row)— 31 sts.
Repeat last 4 rows 0 (2, 4, 6) more times—31 (35, 39, 43) sts.
Next Row: K1, [p1, k1] twice, slip marker, purl to next marker, slip marker, k1, [p1, k1] twice.
Next Row: K1, [p1, k1] twice, slip marker, knit to next marker, slip marker, k1, [p1, k1] twice. Repeat last 2 rows until piece measures 4½ (7, 11, 15)” (11.5 (18, 28, 38) cm) from beginning of chest.
Work even in Seed st for 1” (2.5 cm).
Bind off.
BACK
Return back sts to needle, ready to work a right side row—35 (45, 57, 71) sts.
Row 1 (Right Side): Join A, k5, place marker, k2 (7, 13, 20), place marker, k21, place marker, k2 (7, 13, 20), place marker, k5.
Row 2: K1, [p1, k1] twice for Seed st border, slip marker, purl to next marker, slip marker, work Row 2 of Woven Band pattern, slip marker, purl to next marker, slip marker, k1, [p1, k1] twice for Seed st border.
Row 3 (increase row): K1, [p1, k1] twice, slip marker, M1, knit to next marker, slip marker, work next row of Woven Band pattern, slip marker, knit to next marker, M1, slip marker, k1, [p1, k1] twice—37 (47, 59, 73) sts.
Work even in patterns as established for 3 rows.
Repeat Row 3 (increase row)—39 (49, 61, 75) sts.
Repeat last 4 rows 4 (4, 3, 0) more times—47 (57, 67, 75) sts.
Continue in patterns as established and repeat Row 3 (increase row) every 6th row 0 (1, 3, 0) time(s), then every 8th row 0 (0, 0, 5) time(s)—47 (59, 73, 85) sts.
Work even in patterns as established for about ½” (1.5 cm), end with a wrong side row.
Buttonhole Row 1 (Right Side): K1, p1, bind off 2 sts, k1, slip marker, continue in patterns as established to last marker, slip marker, k1, bind off 2 sts, p1, k1.
Buttonhole Row 2: K1, p1, cast on 2 sts, k1, slip marker, continue in patterns as established to last marker, slip marker, k1, cast on 2 sts, p1, k1. Work even in patterns as established and repeat Buttonhole Rows 1 and 2 about every 1 (1½, 2, 3)” (2.5 (4, 5, 7.5) cm) 0 (1, 2, 2) more times.
Work even in patterns as established until piece measures 6 (10, 14, 18)” (15 (25.5, 35.5, 45.5) cm) from beginning of back, end with a right side row.
Next Row (Wrong Side): K1, [p1, k1] twice, slip marker, purl to next marker, slip marker, k3tog, [p6, k3tog] twice, slip marker, purl to next marker, slip marker, k1, [p1, k1] twice—41 (53, 67, 79) sts.
Work even in Seed st for 1” (2.5 cm).
Bind off.
FINISHING
Fold neckband in half lengthwise and sew cast-on edge to wrong side of last row of
neckband. Take care to match-up buttonholes.
Sew side edges of neckband together. Sew around edges of buttonhole to strengthen.
Sew one button to end of neckband opposite buttonhole. Sew remaining buttons to chest piece opposite buttonholes on back piece.
Weave in ends.
Winter Woof Dog Sweater Charts
Read NextLife is Ruff Knit Dog Sweater
Your Recently Viewed Projects
Thanks for your comment. Don't forget to share!
Pat from PA
Jan 15, 2020
Really like the style of this pattern. I added a neck ruffle for my furry granddaughter
shsteckenrider 471 2034
Feb 03, 2016
"Work even in patterns as established for three rows" !! Do they mean the Woven Band Pattern? Level is noted as Intermediate. They must not mean knitting skills , they must mean understanding the instruction skill. Wow.
kspunkin98
Apr 17, 2016
Shsteckenrider. Did you get an answer to your question? I am at the same place and do not know what the instructions mean!
rethabrunjes 94312 84
Oct 23, 2016
It does mean from the Woven Band pattern. You continue from how you left off the row before and continue the same way for 3 rows with out any increase or decrease. Sorry I can't describe instructions well but I hope I helped.
elenatakaki 583022 9
Dec 09, 2016
So, does that mean do the Woven Band pattern rows 1-3 just in that middle section? Or, do rows 2-4 in that middle section?
Patricia
Dec 06, 2020
Did you ever get an answer to this? I'm at this point right now and thinking that it means (on back) to go from Woven Band row 2, 3 then 4 (which repeats row 2) since this maintains the pattern.. but I'm not sure. Would love someone who has made this to verify.
Lisa
Dec 14, 2020
"Work as established for 3 rows" means the previous 3 rows that have been established, it even continues to explain in the pattern that you will repeat the third row because its an increase row. The pattern is an intermediate, when those designations are given it means both knitting skills and pattern reading/interpretation skills. There is no such thing as an intermediate pattern with "easy" instructions. Happy knitting
Report Inappropriate Comment
Are you sure you would like to report this comment? It will be flagged for our moderators to take action.
Thank you for taking the time to improve the content on our site.