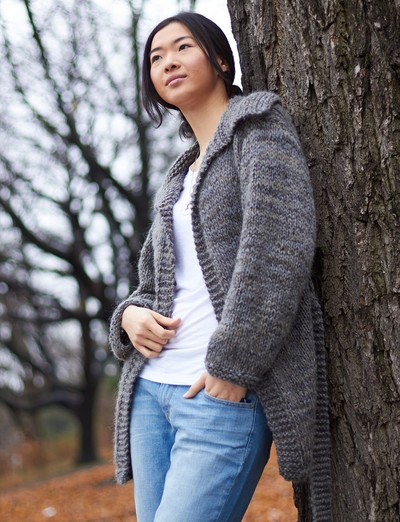
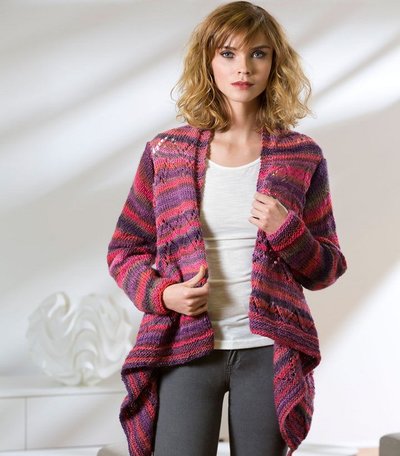
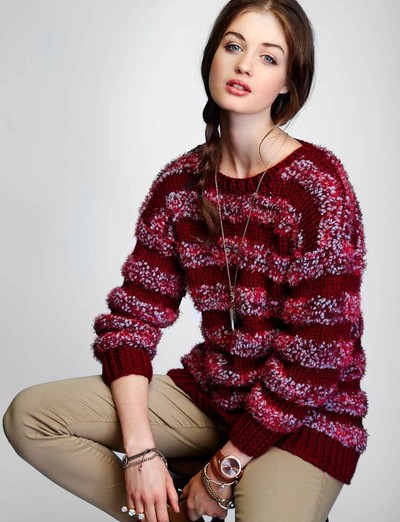
Bohemian Rose Cardigan
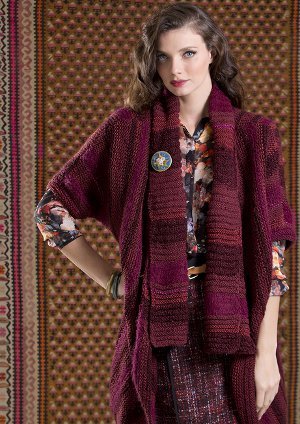
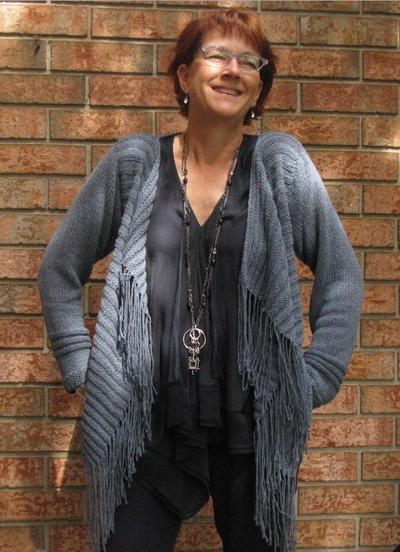
The Bohemian Rose Cardigan is the ultimate knit cardigan pattern for the free-spirited dresser. This drape front cardi features short, elbow-length sleeves and an over-sized silhouette for an interesting, yet flattering shape. You are sure to wow those around you whenever you wear this luxurious knit cardigan. Worked from side to side with chunky weight yarn, this cardigan pattern is an easy and quick knit you'll cherish for years to come.

Knitting Needle Size10 or 6 mm, 9 or 5.5 mm, Circular Knitting Needles
Yarn Weight(5) Bulky/Chunky (12-15 stitches for 4 inches)
Gauge16 stitches, 32 rows, 4 inches. garter stitch
Instructions
Materials:
- RED HEART® Boutique Changes® (Art E771 available in 3.5 oz (100 g), 187 yd (171 m) balls.): 9 (10, 11, 12 13) balls 9914 Garnet
- Susan Bates® Circular Knitting Needles: 5.5mm [US 9] and 6mm [US 10] circular knitting needles, 32” (81 cm) long
- Detachable stitch markers
- yarn needle
GAUGE: 16 sts = 4”; 32 rows = 4” in Garter stitch (knit every row) and larger needle.
CHECK YOUR GAUGE. Use any size needles to obtain the gauge.
ABBREVIATIONS
k = knit; k2tog = knit next 2 sts together; st(s) = stitch(es).
Directions are for size Small; changes for sizes Medium, Large, 1X and 2X are in parentheses.
Finished Chest: 40 (44, 48, 52, 56)” [101.6 (112, 122, 132, 142) cm], including front bands.
Finished Length: 28 (28¾, 29, 29¾, 30)” [71 (73, 73.6, 75.5, 76.2) cm] including edging
Note: Sweater is very loose-fitting.
Special Stitch
kfb (Knit into front and back) = Knit next st but do not remove from needle, knit into back loop of same st and remove from needle.
Notes
1. Back is worked sideways, from wrist edge of left sleeve across to wrist edge of right sleeve. Piece is increased from left sleeve to back neck, piece is then worked even for back neck, and then decreased to wrist edge of right sleeve.
2. The stitch pattern is reversible. The left front and right front are worked the same, beginning at the wrist edge and ending at the front edge.
3. It is very helpful to mark the Right Side of your work, with a detachable marker, to keep track of the shaping.
4. Reviewing the schematic, before and while working pieces, will help in understanding the shaping of the pieces.
BACK
Beginning at wrist edge of left sleeve, with larger needle, cast on 26 (28, 28, 30, 30) sts.
Shape First Sleeve
Notes: Increases are worked on the lower/underarm edge (beginning of Right Side rows) and upper/shoulder edge (end of Right Side rows) at the same time. Increases on the upper/shoulder edge are worked every 8 rows. Increases on the lower/underarm edge are worked every 4th row.
Rows 1–3: Work in Garter st for 3 rows.
Row 4 (Right Side): Kfb (increase on lower/ underarm edge), knit to end of row—27 (29, 29, 31, 31) sts.
Rows 5–7: Work in Garter st for 3 rows.
Row 8: Kfb (increase on lower/underarm edge), knit to last st, kfb (increase on upper/ shoulder edge)—29 (31, 31, 33, 33) sts.
Rows 9–32: Repeat last 8 rows 3 more times—38 (40, 40, 42, 42) sts. Place a marker on the upper/shoulder edge.
Notes: Increases on the upper/shoulder edge continue to be worked every 8 rows. Increases on the lower/underarm edge are worked every other row.
Row 33 (Wrong Side): Knit.
Row 34: Kfb, knit to end of row—39 (41, 41, 43, 43) sts.
Rows 35–38: Repeat last 2 rows 2 more times—41 (43, 43, 45, 45) sts.
Row 39: Knit.
Row 40: Kfb, knit to last st, kfb—43 (45, 45, 47, 47) sts.
Rows 41–48: Repeat Rows 33–40—48 (50, 50, 52, 52) sts.
Row 49: Knit.
Row 50: Cast on 2 sts, knit to end of row—50 (52, 52, 54, 54) sts.
Rows 51–54: Repeat last 2 rows 2 more times—54 (56, 56, 58, 58) sts.
Row 55: Knit.
Row 56: Cast on 2 sts, knit to last st, kfb—57 (59, 59, 61, 61) sts.
Row 57: Knit.
Row 58: Cast on 4 sts, knit to end of row—61 (63, 63, 65, 65) sts.
Rows 59–62: Repeat last 2 rows 2 more times—69 (71, 71, 73, 73) sts.
Row 63: Knit.
Row 64: Cast on 4 sts, knit to last st, kfb—74 (76, 76, 78, 78) sts.
Row 65: Knit.
Row 66: Cast on 8 sts, knit to end of row—82 (84, 84, 86, 86) sts.
Rows 67–70: Repeat last 2 rows 2 more times—98 (100, 100, 102, 102) sts.
Row 71: Knit.
Row 72: Cast on 8 sts, knit to last st, kfb— 107 (109, 109, 111, 111) sts.
First Shoulder
Rows 1–7: Knit.
Row 8 (Right Side): Knit to last st, kfb—108 (110, 110, 112, 112) sts.
Repeat last 8 rows 2 (3, 4, 5, 6) more times—110 (113, 114, 117, 118) sts.
Back Neck
Place marker on upper/shoulder edge of last row worked, to mark beginning of back neck.
Work even in Garter st for 12” (30.4 cm), end with a Wrong Side row. Place marker on upper/shoulder edge of last row worked, to mark end of back neck.
Second Shoulder
Row 1 (Right Side): Knit to last st, k2tog—109 (112, 113, 116, 117) sts.
Rows 2–8: Knit.
Repeat last 8 rows 2 (3, 4, 5, 6) more times—107 (109, 109, 111, 111) sts.
Shape Second Sleeve
Row 1 (Right Side): Bind off 8 sts (decrease on lower/underarm edge), knit to end of row—99 (101, 101, 103, 103) sts.
Row 2: Knit.
Rows 3–6: Repeat last 2 rows 2 more times—83 (85, 85, 87, 87) sts.
Row 7: Bind off 8 sts (decrease on lower/underarm edge), knit to last st, k2tog (decrease on upper/shoulder edge)—74 (76, 76, 78, 78) sts.
Row 8: Knit.
Row 9: Bind off 4 sts, knit to end of row—70 (72, 72, 74, 74) sts.
Row 10: Knit.
Rows 11–14: Repeat last 2 rows 2 more times—62 (64, 64, 66, 66) sts.
Row 15: Bind off 4 sts, knit to last st, k2tog—57 (59, 59, 61, 61) sts.
Row 16: Knit.
Row 17: Bind off 2 sts, knit to end of row—55 (57, 57, 59, 59) sts.
Row 18: Knit.
Rows 19–22: Repeat last 2 rows 2 more times—51 (53, 53, 55, 55) sts.
Row 23: Bind off 2 sts, knit to last st, k2tog—48 (50, 50, 52, 52) sts.
Row 24: Knit.
Row 25: K2tog, knit to end of row—47 (49, 49, 51, 51) sts.
Row 26: Knit.
Rows 27–30: Repeat last 2 rows 2 more times—45 (47, 47, 49, 49) sts.
Row 31: K2tog, knit to last st, k2tog—43 (45, 45, 47, 47) sts.
Rows 32–39: Repeat Rows 24–31—38 (40, 40, 42, 42) sts.
Row 40: Knit.
Row 41: K2tog, knit to end of row—37 (39, 39, 41, 41) sts.
Rows 42–44: Work in Garter st for 3 rows.
Row 45: K2tog, knit to last 2 sts, k2tog—35 (37, 37, 39, 39) sts.
Rows 46–48: Work in Garter st for 3 rows.
Rows 49–72: Repeat last 8 rows 3 more times—26 (28, 28, 30, 30) sts.
Bind off loosely.
RIGHT FRONT
Work same as back through first shoulder, end with a Right Side row—110 (113, 114, 117, 118) sts.
Shape Neck
Row 1 (Wrong Side): K2tog (decrease at upper/neck edge), knit to end of row—109 (112, 113, 116, 117) sts.
Row 2 (Right Side): Knit to last 2 sts, k2tog (decrease at upper/neck edge)—108 (111, 112, 115, 116) sts.
Repeat last 2 rows 29 more times—50 (53, 54, 57, 58) sts.
Front Band
Change to smaller needle.
Purl 2 rows
Knit 2 rows.
Repeat last 4 rows 2 more times.
Bind off loosely.
LEFT FRONT
Work same as right front. Flip piece over so that it is a mirror-image of the right front.
COLLAR (worked in 2 pieces)
Right Collar
With smaller needles, cast on 44 sts.
Row 1 (Wrong Side): Knit.
Row 2: Purl to last 2 sts, k2.
Row 3: K2, purl to end of row.
Rows 4 and 5: Knit.
Rows 6 and 7: Repeat Rows 2 and 3.
Row 8: K2tog, knit to end of row—43 sts.
Repeat Rows 1–8 until 26 sts remain.
Repeat Rows 1–4 until piece measures 26” (66 cm) from beginning. Bind off.
Left Collar
With smaller needles, cast on 44 sts.
Row 1 (Wrong Side): Knit.
Row 2: K2, purl to end of row.
Row 3: Purl to last 2 sts, k2.
Rows 4 and 5: Knit.
Rows 6 and 7: Repeat Rows 2 and 3.
Row 8: Knit to last 2 sts, k2tog—43 sts.
Repeat Rows 1–8 until 26 sts remain.
Repeat Rows 1–4 until piece measures 26”(66 cm) from beginning. Bind off.
FINISHING
Sew upper/shoulder seams, leaving 12” (30.4 cm) between markers unsewn for back neck.
Sleeve Cuffs
With Right Side facing and smaller needle, pick up and k52 (56, 56, 60, 60) sts evenly spaced across wrist edge of sleeve.
Purl 2 rows.
Knit 2 rows.
Repeat last 4 rows 2 more times.
Bind off loosely. Repeat on 2nd sleeve.
Sew underarm and side seams.
Lower Edging
With Right Side facing and smaller needle, beginning in lower left front corner, pick up and k6 sts evenly spaced across edge of front band, pick up and k1 st between each Garter ridge to opposite front band, pick up an k6 sts evenly spaced across edge of front band.
Purl 2 rows.
Bind off loosely as if to knit.
Sew right collar to right front along shaped edges of both pieces, with collar ending at center back neck. Sew left collar to left front along shaped edges of both pieces, with collar ending at center back neck. Sew bind-off edges of right and left collar together at back neck.
Weave in ends.
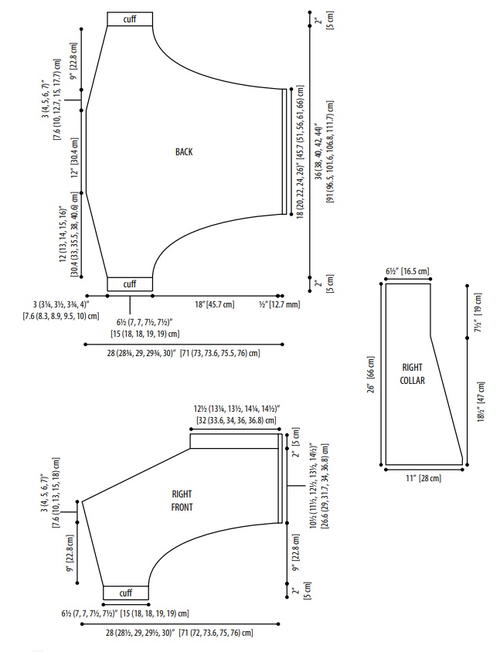
Diagram:
Your Recently Viewed Projects
Thanks for your comment. Don't forget to share!
HoneyLynn
Sep 11, 2018
I cannot find a pix of the back of the cardigan. How long is it? Can I make the drape in the back also? Is there a pix of the back somewhere? Thanks!
Editor Dana
Sep 12, 2018
Hi there! Unfortunately there aren't any photos of the back of the cardigan, but there is a diagram which I've included an image of above and I hope that helps! You can click the image for a larger version. Good luck, and I do apologize for the inconvenience!
Hippie Chick
Feb 07, 2018
The colors for this cardigan from Red Heart yarns is very pretty, but I would not really say that this is or looks like a Bohemian or Boho cardigan. Unfortunately the yarn used for this cardigan is no longer in production either so good luck on finding any.
Tricia108
Dec 24, 2017
I have never made a side to side sweater but there is a first time for everything. I like when directions are detailed and these are. It even includes a chart which will come in handy. I can always use another cardigan and this one will be a bit different. You have to pay a bit of attention so the directions but they are not hard. Thank you for the free pattern.
achumley0003 31706 34
Aug 20, 2017
I love the vintage feel of this sweater and the colors are perfect for fall. This would definitely be a perfect sweater to throw on during a chilly fall day and it is nice enough to wear at the office. I really like the yarn used but, it could easily be subsituted for something already in your stash.
sylviainmojacar 08 71995
Sep 30, 2015
I have just finished the Bohemian Rose Jacket and I just wanted to say what a lovely pattern to follow. It was so clear. I am really pleased with the result even though I didn't knit it in the yarn specified, it was unobtainable. Thank you.
fairknitter
Oct 27, 2014
The pattern refers to the "wrist" of the sleeves. The picture shows the sweater doesn't quite reach the elbows. I would love to knit this with long sleeves. How would I adjust this pattern? Thank you.
Editor JD
Oct 28, 2014
Hi fairknitter, What a lovely modification! We suggest contacting the designer, Heather Lodinsky, via the Red Heart website for any adjustment questions you may have. Hope this helps! -Editors of AllFreeKnitting
kathyvangundy 8749 506
Aug 02, 2014
You say to review the schematic to understand the shaping of the pieces - but there is no schematic. Could you send it to me please. Thank you. Kathy Van Gundy
hamneggs
Aug 02, 2014
The schematic is right below the "Notes". Click on the green link that says "Bohemian Rose Card. Chart".
Lisa
Oct 30, 2014
the schematic is there, its highlighted in green-click on it and it opens. happy knitting.
Report Inappropriate Comment
Are you sure you would like to report this comment? It will be flagged for our moderators to take action.
Thank you for taking the time to improve the content on our site.