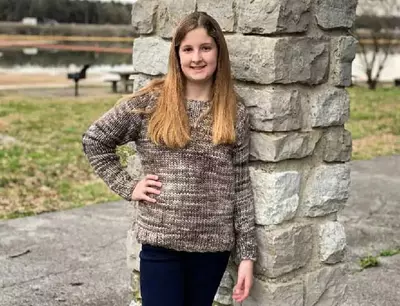
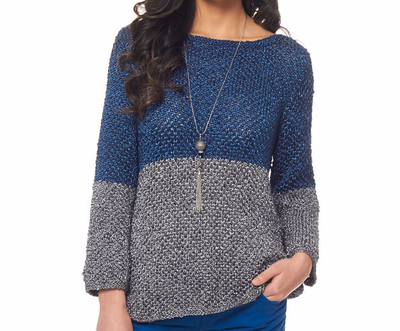
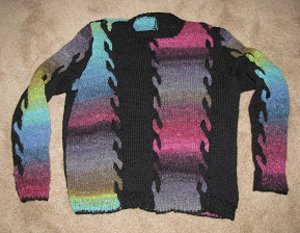
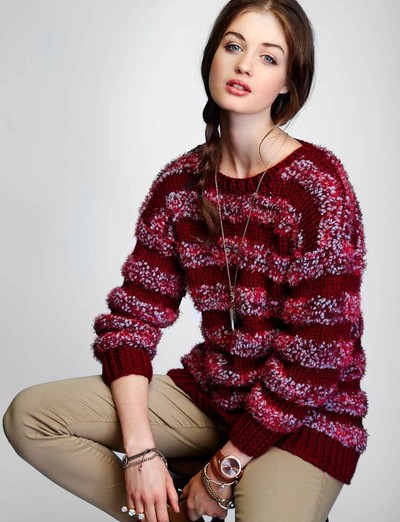
Lazy Day Striped Pullover Pattern
This super cute and trendy sweater pattern is great for a chilly fall afternoon!

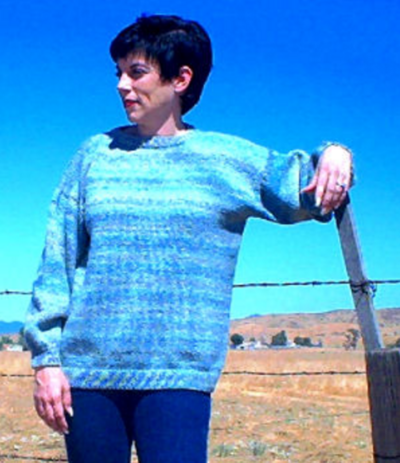
Do you ever have those days where you just want to laze around the house in your comfiest clothes? All you're missing is this Lazy Day Striped Pullover to wear with your sweatpants while you sip on some hot tea and relax. The cozy loose fit makes this one of the comfiest free knitting patterns out there. Despite being comfortable, this sweater also looks pretty great with a pair of jeans and flats for a cute boho look. Knit this for yourself, or for your daughter or granddaughter as a birthday gift. It's sure to be appreciated.

Knitting Needle Size10.5 or 6.5 mm, 11 or 8 mm
Yarn Weight(6) Super Bulky/Super Chunky (4-11 stitches for 4 inches)
Gauge10 sts and 15 rows = 4" [10 cm] in stocking stitch with larger needles with 1 strand of Bernat® Blissful™ or 2 strands of Bernat® Satin™ held together.
Materials List
- Main Color: Bernat® Satin™ (3.5 oz/100 g; 200 yds/182 m) Bordeaux (04430) - 4 (5, 5, 6, 7, 8) balls
- Contrast A: Bernat® Blissful™ (3.5 oz/100 g; 106 yds/97 m) Ruby (89006) - 3 (4, 4, 5, 6, 6) balls
- Sizes U.S. 10½ (6.5 mm) and U.S. 11 (8 mm) knitting needles or size needed to obtain gauge.
- 3 stitch holders
- 4 stitch markers
Pattern
SIZES:
To fit bust measurement
XSmall/Small: 28-34" [71-86.5 cm]
Medium: 36-38" [91.5-96.5 cm]
Large: 40-42" [101.5-106.5 cm]
Extra-Large: 44-46" [112-117 cm]
2/3 Extra-Large: 48-54" [122-137 cm]
4/5 Extra-Large: 56-62" [142-157.5 cm]
Finished bust
XSmall/Small: 44" [112 cm]
Medium: 48" [122 cm]
Large: 52" [132 cm]
Extra-Large: 56" [142 cm]
2/3 Extra-Large: 64" [162.5 cm]
4/5 Extra-Large: 70" [178 cm]
Instructions
The instructions are written for smallest size. If changes are necessary for larger sizes the instructions will be written thus (). When only one number is given, it applies to all sizes.
Note:
MC is always worked with 2 strands held tog. A is always worked with 1 strand.
Stripe Pat (worked in stocking st)
With 1 strand of A, work 6 rows.
With 2 strands of MC, work 6 rows.
These 12 rows form Stripe Pat.
BACK
**With 2 strands of MC and smaller needles, cast on 57 (63-67-73-83-89) sts.
1st row: (RS). K1. *P1. K1. Rep from * to end of row.
2nd row: P1. *K1. P1. Rep from * to end of row.
Rep last 2 rows of (K1. P1) ribbing for 3" [7.5 cm], ending on a 2nd row.**
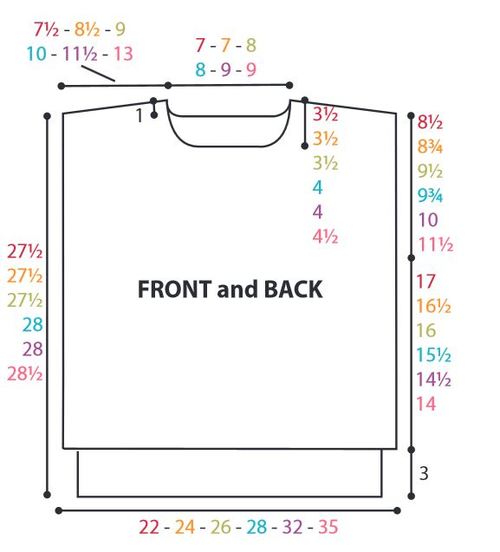
Change to larger needles and cont in Stripe Pat until work from beg measures 27½ (27½-27½-28-28-28½)" [70 (70-70-71-71-72.5) cm], ending on a purl row.
Keep cont of Stripe Pat proceed as follows:
Shape Shoulders and Back Neck:
1st row: (RS). Cast off 6 (7-7-8-9-10) sts. K11 (12-13-15-17-19). K2tog. K2. Turn. Leave rem sts unworked.
2nd row: P2. P2tog. Purl to end of row.
3rd row: Cast off 6 (7-7-8-9-10) sts. Knit to last 4 sts. K2tog. K2.
4th row: Purl.
Cast off rem 6 (6-7-8-9-10) sts.
With RS facing, slip next 15 (17-19-19-23-23) sts onto a st holder.
1st row: Join appropriate yarn to rem sts. K2. ssk. Knit to end of row.
2nd row: Cast off 6 (7-7-8-9-10) sts. Purl to last 4 sts. P2togtbl. P2.
3rd row: K2. ssk. Knit to end of row.
4th row: Cast off 6 (7-7-8-9-10) sts. Purl to end of row.
5th row: Knit.
Cast off rem 6 (6-7-8-9-10) sts.
FRONT
Work from ** to ** as given for Back.
Change to larger needles and cont in Stripe Pat until work from beg measures 25" [63.5 cm], ending on a purl row.
Keep cont of Stripe Pat proceed as follows:
Shape neck: 1st row: (RS). K24 (27-29-32-36-39). Turn. Leave rem sts on a st holder.
Dec 1 st at neck edge on next 3 (4-4-4-5-5) rows, then every following alt row 3 (3-4-4-4-4) times more. 18 (20-21-24-27-30) sts rem.
Cont even in Stripe Pat until work from beg measures same length as Back to beg of shoulder shaping, ending on a purl row.
Shape shoulder:
Cast off 6 (7-7-8-9-10) sts beg of next and following alt row. Purl 1 row even. Cast off rem 6 (6-7-8-9-10) sts.
With RS facing, slip next 9 (9-9-9-11-11) sts onto a st holder. Join appropriate yarn to rem sts and knit to end of row.
Dec 1 st at neck edge on next 3 (4-4-4-5-5) rows, then every following alt row 3 (3-4-4-4-4) times more. 18 (20-21-24-27-30) sts rem.
Cont even in Stripe Pat until work from beg measures same length as Back to beg of shoulder shaping, ending on a knit row.
Shape shoulder:
Cast off 6 (7-7-8-9-10) sts beg of next and following alt row. Knit 1 row even. Cast off rem 6 (6-7-8-9-10) sts.
SLEEVES
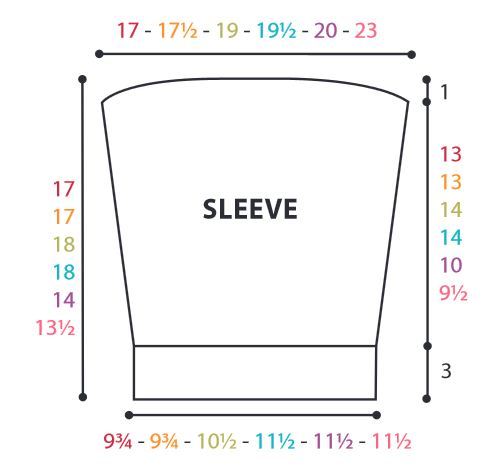
With MC and smaller needles, cast on 25 (25-27-27-29-29) sts.
Work 3" [7.5 cm], in (K1. P1) ribbing as given for Front, ending on a 2nd row.
Change to larger needles and cont in Stripe Pat, inc 1 s t each end of needle on next and every following 2nd row until there are 31 (33-33-35-41-53) sts, then every following 4th row until there are 43 (45-47-49-51-57) sts.
Cont even in Stripe Pat until work from beg measures 16 (16-17-17-13-12½)" [40.5 (40.5-43-43-33-32) cm], ending on a purl row.
Shape top: Cast off 7 (8-8-8-9-10) sts beg next 4 rows. Cast off rem 15 (13-15-17-15-17) sts.
FINISHING
Pin garment pieces to measurements and cover with damp cloth leaving cloth to dry.
Neckband: Sew right shoulder seam.
With 2 strands of MC held tog and smaller needles, pick up and knit 11 (11-11-13-13-15) sts down left front neck edge. K9 (9-9-9-11-11) from front st holder. Pick up and knit 11 (11-11-13-13-15) sts up right front neck edge and 3 sts down right back neck edge. K17 (17-19-19-23-23) across back st holder, dec 1 st at center. Pick up and knit 3 sts up left back neck edge. 43 (43-45-49-55-59) sts.
Beg on a 2nd row, work 3 rows in (K1. P1) ribbing as given for Front. Cast off in ribbing.
Sew left shoulder and neckband seam.
Place markers on Front and Back 8½ (8¾-9½-9¾-10-11½)" [21.5 (22-24-25-25.5-29) cm] down from shoulders. Sew in Sleeves between markers. Sew side and sleeve seams.
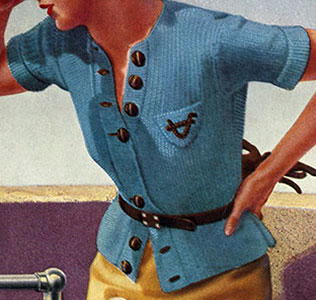
Read NextVintage Skyline Blouse
Your Recently Viewed Projects
Thanks for your comment. Don't forget to share!
lcarr
Apr 27, 2018
What a fun looking sweater. I am not sure that I would enjoy working with Bernat Blissful though. I do like the unique look it gives this sweater, so I may give it a shot. I bet it would look great with fun fur and eyelash type yarns as well.
Hippie Chick
Feb 05, 2018
I found this pattern for the lazy day striped pullover because it was featured. I like that it is a loose-fitting sweater which makes it have so much more of a casual feel to it as you can down dress it with jeans or even yoga pants to lounge around home.
Tricia108
Dec 18, 2017
This is an interesting looking pattern. I like the look with the two different yarns. It adds a nice effect. The instructions are a bit confusing regarding the shoulders. It is always interesting how there are several ways to explain shoulder shaping. I have knit sweaters before so I am sure I will figure it out. Also I like the way the sleeves are sewn in. It is going on my list to do. Thank you.
Sharonf80 8189096
Oct 26, 2017
I cannot find the yarn suggested in super bulky will any (6) yarn for?
The Designing Peng uin
Jun 07, 2016
this sweater looks meant for a pair of jeans or khakis and a weekend - perhaps a walk in the woods with the dog? or a photo safari with the dog along for company? it is one of the projects on the go now and so far no problem but I have made note of the explanation for the shoulder shaping - thank you Elizabethane 1862 886
agp917
Dec 08, 2015
I'm working on shaping the right shoulder on the back and am confused about how to handle the colors If I follow the shoulder shaping instructions and then cast off the required number of stitches it seems I am left with main color stitch on the right needle The instructions following the shoulder shaping say to slip the next of stitches to a stitch holderdoes that include the remaining main color stitch If yes then by doing so a vertical gap is created between the shaped section and the stripe section with the contrasting color If no then I don't know what I'm supposed to do with that main color stitch Fortunately I ran a lifeline before starting the shaping so I frogged back to the beginning of the shaping instructions I'm assuming I'll run into these instructions a few more times before I'm finished with the shoulder and neck shaping…Read More so any help in understanding them will be appreciated
Lisa
Jan 25, 2018
What you think you are supposed to do and what you are actually doing sound like they are 2 very different things. If you have cast off correctly and changed colours correctly there wouldn't be a main colour stitch in the row.
peggymedford 90770 25
May 04, 2015
Looks like a comfy sweater but don't understand Shape Shoulders and Back Neck 1st row ---does it mean you cast off at beginning of row? if you ' Leave rem sts unworked' how do you turn begin knitting 2nd row?
Lisa
May 05, 2015
It means you are turning in the middle of the row, not at the end of the row, you turn the work just like you normally would but not at the end in the middle. Short row shaping also does this in many knitting patterns. Hope this helps.
Report Inappropriate Comment
Are you sure you would like to report this comment? It will be flagged for our moderators to take action.
Thank you for taking the time to improve the content on our site.