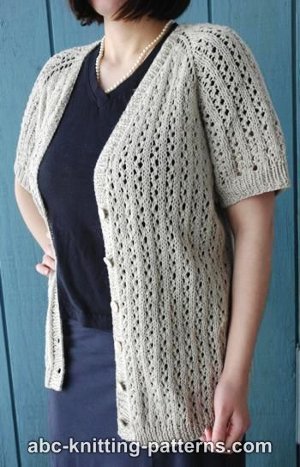
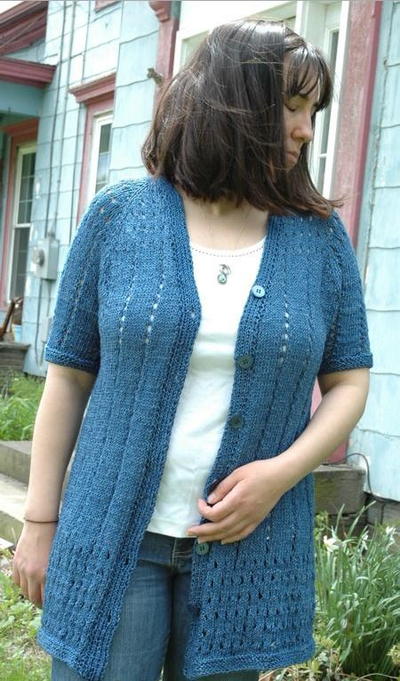
Angel Lace Cardigan

Sweet yet sophisticated, the Angel Lace Cardigan is a stylish option for mild weather. This darling knit cardigan pattern features a trellis lace body and garter stitch yoke. This pretty, feminine knit cardigan is perfect for casual as well as dressier occasions.
This is a perfect project for the intermediate knitter who loves lace knitting patterns. This gorgeous cardigan is an essential, year-round layering piece that looks great over a dress or skirt combo as well as a basic top and jeans.

Knitting Needle Size6 or 4 mm, Circular Knitting Needles
Yarn Weight(4) Medium Weight/Worsted Weight and Aran (16-20 stitches to 4 inches)
Gauge17 sts = 4”; 28 rows = 4” in Trellis Lace. 20 sts = 4”; 32 rows = 4” in Garter stitch.
Check your gauge. Use any size needle to obtain the gauge.
Materials List
- RED HEART® “Shimmer™”: 4 (4, 5, 5, 6, 6) balls 1010 Snow.
- Crochet Hook: 3 mm [US D].
- Three 5/8” buttons, stitch holders, yarn needle
Instructions
Note
Cardigan is worked back and forth in rows. Circular
needles are used to accommodate large number of sts.
Directions are for size X-Small. Changes for sizes Small, Medium, Large, X-Large and XX-Large are in parentheses.
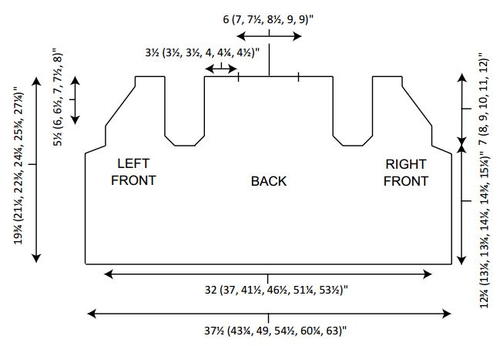
Finished Bust: 32 (37, 41½, 46½, 51¼, 53½)”
Finished Length: 19¾ (21¼, 22¾, 24¼, 25¾, 27¼)”
Trellis Lace (multiple of 6 plus 4)
-
Row 1 (right side): K2, * k3, yo, slip 1, k2tog, psso yo; repeat from * to last 2 sts, k2.
-
Row 2: Purl.
-
Row 3: K2, * yo, slip 1, k2tog, psso, yo, k3; repeat from * to last 2 sts, k2.
-
Row 4: Purl.
-
Repeat Rows 1 - 4 for pattern.
Cardigan
-
Body
Cast on 160 (184, 208, 232, 256, 268) sts. -
Begin with Row 1, work in Trellis Lace pattern until piece measures 12 (12½, 13, 13½, 14, 14½)” from beginning, ending with Row 4 of pattern.
-
Begin Garter st, and k 6 rows even.
-
Divide for Fronts and Back
-
Next Row (right side): Work across first 35 (40, 46, 51, 57, 59) sts and place on st holder for right front; bind off next 10 (12, 12, 14, 14, 16) sts for armhole, work across 70 (80, 92, 102, 114, 118) sts for back; place remaining 45 (52, 58, 65, 71, 75) sts on st holder for left front.
-
Shape Armholes
Back
Working on sts for back only, *dec 1 st at each armhole edge every other row 3 (5, 9, 10, 13, 14) times–64 (70, 74, 82, 88, 90) sts. Work even until armhole measures 7 (8, 9, 10, 11, 12)”, ending with a wrong side row. Bind off. -
Right Front
Slip sts for right front from holder onto needle and attach yarn to wrong side at armhole edge. -
Shape Armhole
Dec 1 st at armhole edge every other row 3 (5, 9, 10, 13, 14) times –32 (35, 37, 41, 44, 45) sts. Work even until armhole measures 1½ (2, 2½, 3, 3½, 4)”, ending with a wrong side row. -
Shape Neck
Dec 1 st at neck edge this row, then every other row 11 (11, 9, 11, 11, 12) times, then every other right side row 5 (6, 8, 8, 9, 9) times–15 (17, 19, 22, 23, 23) sts. Work even until armhole measures 7 (8, 9, 10, 11, 12)”, ending with a wrong side row. Bind off remaining sts for shoulder. -
Left Front
Slip sts for left front from holder onto needle, attach yarn to right side at armhole edge, and bind off 10 (12, 12, 14, 14, 16) sts for armhole, k to end. Work armhole and neck shaping same as for Right Front, reversing shaping. -
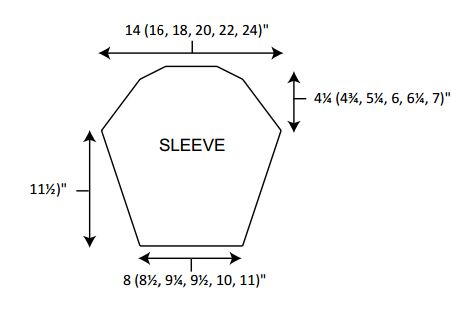
Sleeves
Cast on 40 (42, 46, 48, 50, 54) sts. Working in garter stitch, k 2 rows even. -
Next Row (right side): Begin shaping sleeve by inc 1 st each side this row, then every other row 0 (0, 4, 11, 16, 20) times, then every fourth row 8 (18, 17, 14, 13, 12) times, then every sixth row 6 (0, 0, 0, 0, 0) times–70 (80, 90, 100, 110, 120) sts. Work even until sleeve measures 9 (9½, 10, 10½, 11, 11½)” from beginning, ending with a wrong side row.
-
Cap shaping
Bind off 5 (6, 6, 7, 7, 8) sts at beginning of next 2 rows, then dec 1 st each side every right side row 5 times, then every row 9 (11, 17, 18, 19, 20) times, then every right side row 4 (5, 4, 6, 7, 9) times. Bind off 3 (3, 3, 3, 4, 4) sts at beginning next 4 rows. Bind off remaining 12 (14, 14, 16, 18, 20) sts.
Finishing
-
Sew shoulder seams. Set in sleeves. Sew sleeve and side seams.
-
Front and Neck Bands
Place markers for 3 buttons evenly spaced along bodice, with first button at right front center neckline. -
Beginning at lower left front edge, work single crochet along bottom edge, up right front edge, skipping a space for buttonholes at markers by working a chain 3 in place of the single crochet where buttonholes should be, along neck edge, back neck, left neck edge and left front edge.
-
Work a reverse single crochet (crab stitch) over these stitches and fasten off.
-
Sew on buttons to correspond to buttonholes. Weave in yarn ends.
Abbreviations
- dec
- decrease
- inc
- increase
- k
- knit
- mm
- millimeters
- psso
- pass slipped st(s) over
- st(s)
- stitch(es)
- tog
- together
- yo
- yarn over
- * or **
- repeat whatever follows the * or ** as indicated
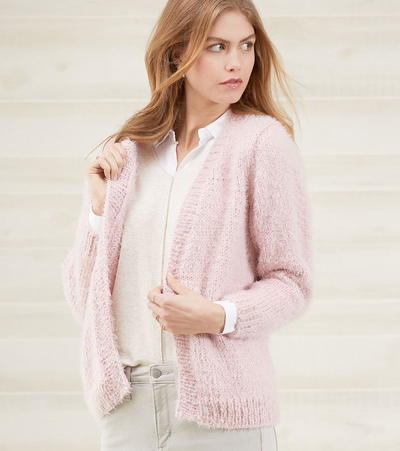
Read NextMidtown Cardigan
Your Recently Viewed Projects
Thanks for your comment. Don't forget to share!
junebugernie 12180 58
May 21, 2018
This pattern is very similar to one I am knitting now, with a few adjustments. I picked up the pattern from the store called Jo-Ann. Itis named "Lovely lacy cardigan". That pattern knits the sleeves on with a raglan style sleeve. I like the pattern from Jo- ann a little better because there is very little sewing to do after knitting. I plan to make your pattern, but I plan to modify it so I don't have to sew in the sleeves.
Tricia108
Jun 11, 2017
I always need cardigans since I work in an office and the temperature fluctuates. I like the pattern in this cardigan because it is lacy and adds something to a business outfit. You could also make this in a glittering yarn to add on top of a black dress. I also like the fact that there are no side seams and you can knit it in one piece. Thank you.
quanahs 5032097
May 08, 2016
I love this cardigan and the bottom up construction eliminates the side seams which would mar the look of the pretty trellis lace. Its always good to have a schematic diagram included too so you can make sure you are knitting the pattern to size. I think this sweater is professional enough to wear to the office with a cute pair of pants.
knotthemama
Dec 15, 2015
Made this sweater for my sister, she requires a wider sleeve and found this pattern to be perfect for her
Sassy Sue
Aug 29, 2015
I'm having a terrible time keeping the same number of stitches that I started with. By the time I've done 6 down, I have lost 2 stitches--not dropped. Auggh! I've ripped it out twice already and am now searching the third time for a row with an error in it. I'm assuming it's me, not the pattern. I'm making the 1X size. Can anyone help?
glitterqueen 14924 35
Jan 15, 2016
I was having the same problem then realised the number of stitches didn't divide by 6 (4) as stated. Once I added another 2 stitches it worked out fine.
glitterqueen 14924 35
Jan 15, 2016
That should say 6 4
Lisa
May 01, 2016
The stitch count is a multiple of 6 4, I've checked the numbers and it works adding stitches will throw the entire stitch count out, unless it is done in multiples of 6. If you are having trouble with the stitch count for each row, it's probably because of the yo being in with slipped stitches and psso's-I figured this out the hard way, tore it out about a dozen times but eventually got through it. Hope this helps,happy knitting.
bjdodd
May 16, 2015
Does anyone ever look at these comment and put in corrections? I'd like to make this but am still fairly new to knitting. If the pattern needs corrections, please make them. Perhaps this is why pattern is free?
Valerieblaes 57810 34
Apr 26, 2015
i believe there is a mistake in the sleeve shaping the numbers for the second set of increases every 4 th row are backwards im currently ( right now) making the pattern and my first sleeve is way toooo big
bicksin 0980732
Dec 24, 2014
I am interested in starting the angel lace cardigan and noticed the comment about starting with 4 rows of garter which sounds like a good idea. Has anyone actually completed this sweater and if so, are there other comments or suggestions? Thank you.
naranjank 1142094
Apr 21, 2017
Ai have just got to the part dividing for the armholes bit confused wot does bind mean please explain
Annieoldgirl
Oct 20, 2014
I have some lovely alpaca yarn that will need size 5 needles to make a good gauge...to figure the changes is my real challenge...but here I go! It is a lovely pattern and I expect success!
mrleese
Jun 14, 2014
I am in the process of starting this cardigan and was wondering if there should be a couple of rows of garter stitch at the beginning to ensure that the edges do not roll? The pattern immediately starts with the Trellis Lace (in the 1st row). I am worried that the cardigan edges will roll. Thanks
Lisa
Nov 13, 2014
It doesn't say to do it, but mine completely rolled up and this yarn did not block, so I think if I do it again I would take your suggestion and knit a few garter rows first. Great idea, happy knitting.
CCUK 2272297
Apr 27, 2015
Rather than undo the sweater pick up enough stitches on a slightly smaller needle and knit downwards for a few rows in a suitable stitch, all garter or rib with ample knitted stitches not purl at the opening so none of the edges can roll? Have a practice first with different coloured yarn for a few cms until you are happy with the result then undo and complete using appropriate yarn. You could try a contrasting colour.
mrleese
Jun 14, 2014
I am starting this cardigan but was worried that the edges would roll since the pattern starts immediately after Cast On with the Trellis Lace. I thought that 4 rows of garter stitch would ensure that the edges would not roll. If anyone has made this pattern, please let me know if the edges roll? Thanks.
joemar31 6741544
Oct 24, 2019
I would like to print this angel lace cardigan it does say printable.
Report Inappropriate Comment
Are you sure you would like to report this comment? It will be flagged for our moderators to take action.
Thank you for taking the time to improve the content on our site.