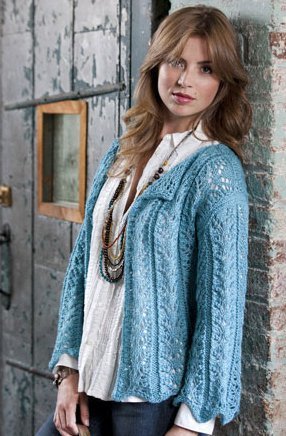
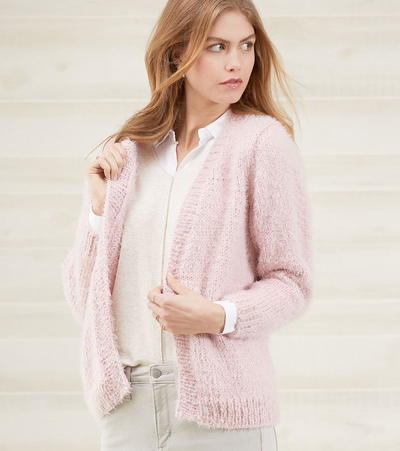
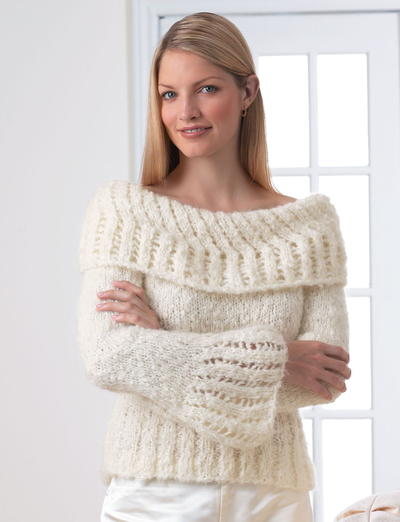
Italian Summer Cardigan
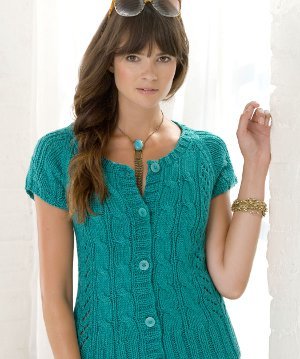
Travel-ready, the Italian Summer Cardigan is the perfect option for a warm weather getaway. This carefree knit cardigan pattern features a classic cable design, flattering neckline, and flirty short sleeves. Knit in a beautiful color that reminds us of the Mediterranean Sea, the Italian Summer Cardigan is the perfect mix of polish and playfulness. Throw on a chunky stone necklace and your favorite pair of sunglasses - you're ready to let your hair down as you cruise along the Italian coastline.

Knitting Needle Size6 or 4 mm, 7 or 4.5 mm
Yarn Weight(4) Medium Weight/Worsted Weight and Aran (16-20 stitches to 4 inches)
Materials:
- STITCH NATION by Debbie Stoller™ “Bamboo Ewe™”: 4 (5, 5,6, 7) balls 5529 Mermaid
- Knitting Needles: 4mm [US 6] and 4.5mm [US 7]
- Cable needle
- Stitch markers (4)
- 5 7/8” diameter buttons (model shown JHB)
- Yarn needle
GAUGE: 19 sts = 4”; 24 rows = 4” in Cable pattern slightly stretched.
CHECK YOUR GAUGE. Use any size needles to obtain the gauge given.
ABBREVIATIONS:
Dec = decrease
k = knit
mm = millimeters
p = purl
st(s) = stitch(es)
St st = Stockinette st (k on right side rows, p on wrong side rows)
tbl = through back loop
tog = together
yo = yarn over
* or ** = repeat whatever follows the *or ** as indicated.
Special Abbreviations
3/3 LC = Slip next 3 sts to cable needle, hold to front; k3; k3 from cable needle.
M1 (make one stitch) = Lift running thread before next stitch onto left needle and knit into the back loop.
Ssk = Slip next 2 sts knitwise, one at a time to right needle; insert point of left needle into the fronts of these 2 sts and knit them together from this position.
K2, p2 Rib (Multiple of 4 sts)
Row 1 (right side): * K2, p2; repeat from * across.
Repeat Row 1 for K2, p2 rib pattern.
Directions are for size Small; changes for sizes Medium, Large, XLarge and XXLarge are in parentheses.
Finished Bust: 35 (40, 44, 48, 52)”.
Finished Length: 21 (22½, 23½, 24½, 25)”.
CARDIGAN
Back
With larger needles, cast on 84 (96, 104, 116, 124) sts. Work in K2, p2 rib for 4”, end by working a wrong side row and dec 0 (2, 0, 2, 0) sts evenly across last row–84 (94, 104, 114, 124) sts.
Setup Patterns
Next Row: K1, m1, k9 (14, 19, 24, 29), p1, place marker, work Row 1 of Chart 1 over next 11 sts, place marker, work Row 1 of
Chart 2 over next 39 sts, place marker, work Row 1 of Chart 1 over next 11 sts, place marker, p1, k11 (16, 21, 26, 31)–85 (95, 105, 115, 125) sts.
Next Row: P11 (16, 21, 26, 31), k1, work Row 2 from charts as established between markers, k1, p11 (16, 21, 26, 31).
Work in patterns as established until piece measures 13 (14, 14½, 15, 15)” from beginning, end by working a wrong side row.
Shape Raglan
Bind off 6 (10, 10, 10, 10) sts at beginning of next 2 rows–73 (75, 85, 95, 105) sts.
For Sizes S (M, L, XL) only
Next Row (dec) (right side): K2, ssk, work in patterns as established across row to last 4 sts, k2tog, k2.
Repeat dec row every right side row 14 (15, 21, 25) times more, then every other right side row 4 (4, 1, 0) times. Bind off remaining 35 (35, 39, 43) sts.
For Size XXL only
Next Row (dec) (right side): K2, ssk, work in patterns as established across row to last 4 sts, k2tog, k2.
Next Row (dec) (wrong side): P2, p2tog, work across row to last 4 sts, p2tog-tbl, p2.
Repeat last 2 dec rows 8 times more, then work like dec row every third row 12 times. Bind off remaining 45 sts.
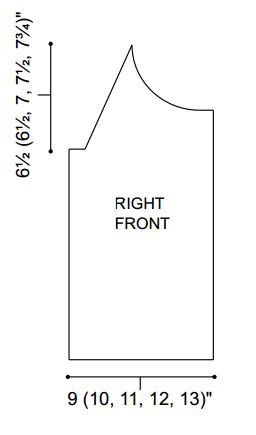
Right Front
With larger needles, cast on 44 (48, 52, 60, 64) sts. Work in K2, p2 rib for 4”, end by working a wrong side row and dec 0 (0, 0, 2, 0) sts evenly across last row–44 (48, 52, 58, 64) sts.
Setup Patterns
Next Row: K2, p1, place marker, work Row 1 of Chart 2 over next 18 sts, place marker, work Row 1 of Chart 1 over next 11 sts, place marker, p1, k11 (15, 19, 25, 31).
Next Row: P11 (15, 19, 25, 31), k1, work Row 2 from charts as established between markers, k1, p2.
Work in patterns as established until piece measures 13 (14, 14½, 15, 15)” from beginning, end by working a right side row.
Shape Raglan and Neck
(Read thru instructions once before beginning)
Bind off 6 (10, 10, 10, 10) sts at beginning of row for armhole edge, work to end–38 (38, 42, 48, 54) sts.
For Sizes S (M, L, XL) only
Next Row (dec) (right side): Work across row in pattern to last 4 sts, k2tog, k2. Repeat dec row every right side row 16 (17, 19, 21) times more.
For Size XXL only
Next Row (dec) (right side): Work across row in pattern to last 4 sts, k2tog, k2.
Next Row (dec) (wrong side): P2, p2tog, work to end of row.
Repeat last 2 dec rows 8 times more, then work like dec row every third row 9 times.
For All Sizes
AND AT THE SAME TIME when piece measures 17 (18½, 19½, 20, 20)” from beginning, end wrong side row shape neck as follows: bind off 6 (6, 7, 8, 8) sts at beginning of next row for neck edge, continue to bind off at same edge 4 (4, 4, 6, 6) sts, then 3 (3, 3, 4, 4) sts. Work 1 row even.
Next Row (dec) (right side): K1, ssk, work to end of row. Repeat dec row every right side row 4 (3, 4, 4, 5) times more–3 sts. P3tog. Fasten off.
Left Front
Cast on and work same as for Right Front to Setup Patterns.
Setup Patterns
Next Row: K11 (15, 19, 25, 31), p1, place marker, work Row 1 of Chart 1 over next 11 sts, place marker, work Row 1 of Chart 2 over next 18 sts, place marker, p1, k2.
Next Row: P2, k1, work Row 2 from charts as established between markers, p11 (15, 19, 25, 31) sts.
Work in patterns as established until piece measures 13 (14, 14½, 15, 15)” from beginning, end by working a wrong side row.
Shape Raglan and Neck
(Read thru instructions once before beginning)
Bind off 6 (10, 10, 10, 10) sts at beginning of row for armhole edge, work to end–38 (38, 42, 48, 54) sts.
Next Row: Work even across.
For Sizes S (M, L, XL) only
Next Row (dec) (right side): K2, ssk, work to end of row. Repeat dec row every right side row 16 (17, 19, 21) times more.
For Size XXL only
Next Row (dec) (right side): K2, ssk, work to end of row.
Next Row (dec) (wrong side): Work across row to last 4 sts, p2tog-tbl, p1. Repeat last 2 dec rows 8 times more, then work like dec row every third row 9 times.
For All Sizes
AND AT THE SAME TIME when piece measures 17 (18½, 19½, 20, 20)” from beginning, end right side row shape neck as
follows: bind off 6 (6, 7, 8, 8) sts at beginning of next row for neck edge, continue to bind off at same edge 4 (4, 4, 6, 6) sts, then 3 (3, 3, 4, 4) sts.
Next Row (dec) (right side): Work across row to last 3 sts, k2tog,k1. Repeat dec row every right side row 4 (3, 4, 4, 5) times more–3 sts. P3tog. Fasten off.
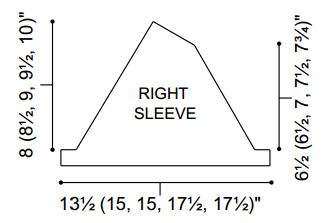
Right Sleeve
With larger needles, cast on 64 (72, 72, 84, 84) sts. Work in K2, p2 rib for 1”, end by working a wrong side row and dec 0 (0, 0, 1, 1) st across last row–64 (72, 72, 83, 83) sts.
Setup Pattern
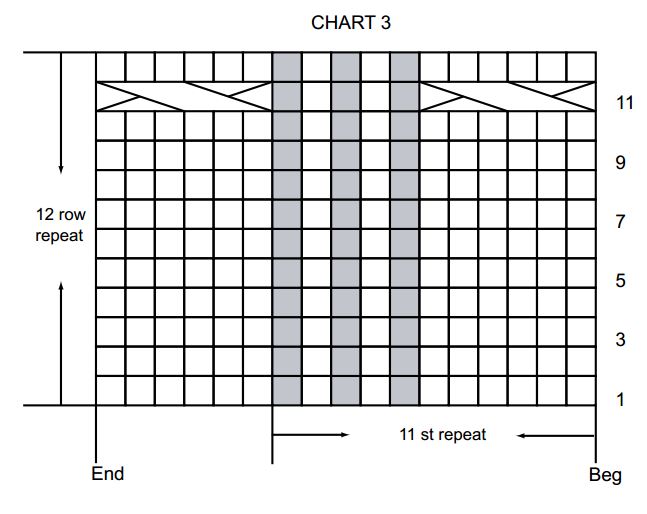
K7 (11, 11, 11, 11) sts, place marker, work Row 1 of Chart 3 over next 50 (50, 50, 61, 61) sts, place marker, k7 (11, 11 ,11 ,11) sts.
Working first and last 7 (11, 11, 11, 11) sts in St st, and sts between markers in pattern as established, work 1 row even.
Shape Raglan
Bind off 6 (10, 10, 10, 10) sts at beginning of next 2 rows–52 (52, 52, 63, 63) sts.
Next Row (dec) (right side): K2, ssk, work in pattern as established across row to last 4 sts, k2tog, k2.
Repeat dec row every right side row 15 (11, 10, 18, 17) times more, then every other right side row 3 (7, 8, 5, 6) times AND AT THE SAME TIME when piece measures 7 (7½, 8, 8½, 9)” from beginning, end by working a wrong side row, shape top of sleeve by bind off 4 sts at beginning of next row, then bind off 2 sts at same edge, then 2 sts at same edge, then dec 1 st at same edge every right side row until 3 sts remain. Bind off.
Left Sleeve
Cast on and work same as for Right Sleeve to Shape Raglan.
Shape Raglan
Bind off 6 (10, 10, 10, 10) sts at beginning of next 2 rows–52 (52, 52, 63, 63) sts.
Next Row (dec) (right side): K2, ssk, work in patterns as established across row to last 4 sts, k2tog, k2.
Repeat dec row every right side row 13 (11, 10, 18, 17) times more, then every other right side row 5 (7, 8, 5, 6) times AND AT THE SAME TIME when piece measures 7 (7½, 8, 8½, 9)” from beginning, end by working a right side side row, shape top of sleeve by bind off 3 sts at beginning of next row, then bind off 2 sts at same edge every wrong side row 2 times, then dec 1 st at same edge every wrong side row 4 (4, 4, 4, 4) times. Bind off remaining 3 (3, 3, 4, 4) sts
FINISHING
Sew raglan seams. Sew sleeve and side seams.
Neck Band
With right side facing and smaller needle, pick up and k6 (6, 7, 8, 8) bound off sts from right front neck edge, 7 (7, 7, 10, 10) bound off sts from side neck edge, 10 (10, 10, 10, 12) sts up side neck edge, 16 (16, 16, 16, 20) sts across sleeve, 34 (34, 36, 40, 42) sts across back, 16 (16, 16, 16, 20) sts across sleeve, 10 (10, 10, 10, 12) sts from side neck, 7 (7, 7, 10, 10) bound off sts from side neck bind off, 6 (6, 7, 8, 8) bound off sts from left front neck edge–112 (112, 116, 128, 142) sts. Work in K2 p2 rib for 1”. Bind off in rib.
Button Band
With right side facing and smaller needle, pick up and k84 (88, 96, 100, 100) sts evenly along left front edge. Work in K2, p2 rib for 1”. Bind off in rib. Place markers for 5 buttons evenly spaced.
Buttonhole Band
Work same as for button band along right front edge, until band measures ½”
Next Row: Make buttonholes opposite markers by binding off 2 sts. On following row, cast on 2 sts over bound off sts. Work until band measures 1”. Bind off loosely. Sew buttons in place. Weave in yarn ends.


Read NextTassel Fringe Blanket Cardigan
Your Recently Viewed Projects
Thanks for your comment. Don't forget to share!
Hippie Chick
Feb 27, 2018
This cardigan sweater is made with bamboo yarn. Has anybody reading this worked with bamboo yarn yet? I have heard about it but I have never seen it in person. Is is easy to work with? Is it similar in texture to an acrylic, wool, or cotton yarn? Im not sure I want to spend the extra money for bamboo.
mariellestowe 0094 714
Jul 13, 2022
It is easy to knit, soft to the touch as well I actually find it more comfortable than just plain cotton yarn.
achumley0003 31706 34
Aug 20, 2017
When I first learned to knit, this was one of the first patterns I attempted. Ambitious of me I know, but I really loved the cardigan. I used Lion Brand Wool-ease and I really loved the way it turned out. Honestly, it is a easy pattern. The only thing I would consider hard for a beginner is the cables and maybe some of the shaping. But, the cables really aren't that difficult to learn.
metafore921 197338 6
Jan 21, 2017
Why are most of your patterns for intermediate knitting today? It really sucks!!!
FireFightersMoM
Jun 30, 2017
Why would you leave a negative for such a beautiful pattern just because you don't have the skills to complete it? Di you check the pattern and see how well it's written? It's worth reviewing the pattern and seeing if the designer added a lot of photos to help you advance in your skills
carole molloy 0922 269
Feb 29, 2016
I love the look of this carigan, but like others I just cannot get the sleeves to work out......if there is anyone out there to advise I would be very happy.
connieschmittauer 9569649
Aug 23, 2015
Need Help! I still can not get the sleeve to turn out right. I followed the directions for the left sleeve and got it a little closer. But still running out of stitches before I can get all the decreases completed. Any help would be greatly appreciated.
connieschmittauer 9569649
Aug 20, 2015
I have started this sweater and did fine on the right front but now I've done the right sleeve and am stuck. Right after the setup, while follow Chart 3, it says "work 1 row even." If I do that, I'm not in the right place for shaping Raglan. I assumed the pattern means to work all 12 rows of Chart 3, then work one row even. But doing that leaves me binding off next two rows and then I'm not on the right side to start the dec. Also, moving ahead, as I got to the end, I didn't have enough stitches left to complete all the every other right side row decreases. Can someone help me understand where I've gone wrong?
MaggeeC
Jul 01, 2015
I loved making this sweater. I have made two, one for each daughter. I added a bit of length to the sleeve and the body to make it slightly longer. Will make more as it knits up quickly.
carole molloy 0922 269
Feb 29, 2016
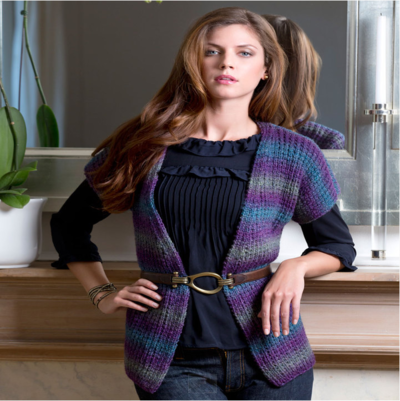
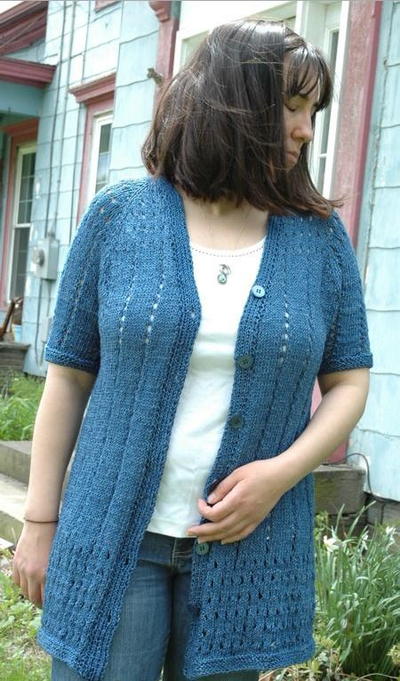
Surely this photo is not of the Italian Summer Cardigan....they are so different!
Pmarzahl
Jun 16, 2014
So far I'm going almost as much un-knitting as knitting; however, I've only knitted socks and hats, so this is clearly stepping outside the box for me. I have about 10" completed of the back thus far and it looks very cool. Not as much un-knitting now:) Can't wait to finish it!
Report Inappropriate Comment
Are you sure you would like to report this comment? It will be flagged for our moderators to take action.
Thank you for taking the time to improve the content on our site.