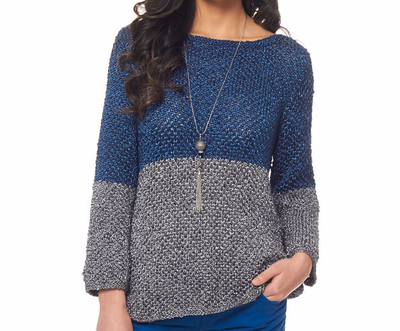
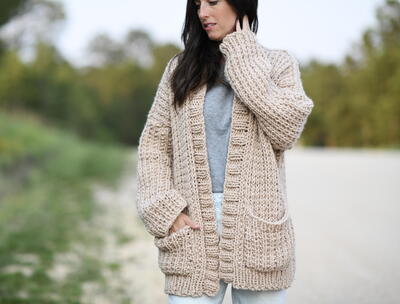
Must-Have Nautical Sweater

Take an adventure overseas with this classic knit sweater pattern that features a cozy, pullover design -- at least, that's what you'll feel like doing as soon as you slip it on. Knit in an ocean-blue tone that's divided by cream stripes, this Must-Have Nautical Sweater is perfect for any casual affair, from a trip to the store to going out boating with friends. Created mostly in the stockinette stitch, the intriguing design also features a corset-like, lace up sleeves created by crocheting a chain and weaving it through each sleeve.

Knitting Needle Size6 or 4 mm
Yarn Weight(3) Light/DK (21-24 stitches to 4 inches)
SIZES: Small (Medium, Large, XL)
MATERIALS
- 5 (6, 6, 7) skeins Tahki Yarns COTTON CLASSIC 100% mercerized cotton (1.75oz/50g; 108yd/110m) in color #3872 deep lavender (A) 2 (3, 3, 4) skeins in color #3001 white (B)
- One pair size 6 (4mm) needles OR SIZE TO OBTAIN GAUGE
- Stitch markers
- One size F-5 (3.75mm) crochet hook for CORDS and Sleeve Edging
- Yarn needle
- Pattern schematics
KNITTED MEASUREMENTS
Bust 34 (38, 42, 46)”/86 (97, 107, 117) cm
Length 18 (19, 20, 21)”/46 (48, 51,53) cm
ABBREVIATIONS
beg begin(ning)
cm centimeter
dec decrease(d)(s)(ing)
k knit
mm millimeters
p purl
RS right side
st(s) stitch(es)
WS wrong side
GAUGE: 20 sts and 24 rows = 4”/10 cm in St st and Stripe Sequence. TAKE TIME TO CHECK GAUGE
SPECIAL TECHNIQUES
SINGLE CROCHET (sc): Working from right to left, insert hook into the next stitch, yarn over, draw yarn through this stitch (2 loops on hook), yarn over, draw yarn through 2 loops on hook. Repeat in each stitch around.
PATTERN STITCHES
K1, p1 rib (multiple of 2 sts + 1)
Stockinette stitch (St st) Knit on RS, purl on WS.
Crochet Chain (ch)
Stripe Sequence: * In St st, work 2 rows B, 4 rows A; repeat from * for Stripe Sequence.
NOTE: When working Stripe Sequence, carry colors loosely up the side when not in use; do not cut and rejoin for each stripe.
BACK AND FRONT (both alike)
Using A, cast on 87 (97, 107, 117) sts.
(RS) Begin k1, p1 rib, end k1; work even until piece measures 4” from beg, decreasing 1 st on last WS row – 86 (96, 106, 116) sts remain.
Begin Stripe Sequence Pattern
(RS) Join B, change to Stripe Sequence; work even until piece measures 11 (11½, 12, 12½)” from beg, end with a WS row. Make a note of last row of Stripe Sequence worked.
Shape Armholes
(RS) Bind off 5 (6, 7, 8) sts at beg of next 2 rows – 76 (84, 92, 100) sts remain.
(RS) Dec 1 st each side every other row 4 (6, 7, 8) times – 68 (72, 78, 84) sts remain.
Work even until Armholes measure approximately 3” from beg of shaping, end after completing the second row of B stripe; break B.
Continuing in St st with A only for remainder of piece, work even until Armholes measure 7 (7½, 8, 8½)” from beg of shaping.
Bind off all sts loosely.
SLEEVES
Using A, cast on 47 (49, 51, 53) sts.
(RS) Begin k1, p1 rib, end k1; work even until piece measures 4” from beg, decreasing 1 st on last WS row – 46 (48, 50, 52) sts. Place a marker between 2 center sts.
Begin Stripe Sequence Pattern
(RS) Join B, change to Stripe Sequence and AT THE SAME TIME, begin Sleeve Opening for lacing as follows:
Dividing Row Work across to marker, join a second ball of B, work to end.
Working both sides at the same time, work even until piece measures approximately 10 (10½, 11, 11½)” from beg, end with the same row as BACK to underarm.
Shape Cap
(RS) Bind off 5 (6, 7, 8) sts at beg of next 2 rows (outside edges only, not at center opening) – 36 sts remain.
(RS) Dec 1 st each side every other row 7 times – 22 sts remain, 11 sts each side of center Sleeve Opening.
(RS) Dec 1 st each side every 4 rows 4 times – 7 sts remain each side and AT THE SAME TIME, when you have completed approximately 3” of Cap Shaping and the second row of B stripe to match BACK and FRONT, break B and continue in St st using A for remainder of piece.
Bind off remaining sts.
FINISHING
Block pieces to measurements. Sew Shoulder seams along bind-off edge for 2½ (3, 3½, 4)” from Armhole edge on each side. Place a marker ½” down from Shoulder seam, on both BACK and FRONT. Sew Sleeve and side seams. Set in SLEEVE, leaving ½” open at top of Armhole on each side of Shoulder seam (place edges of Sleeve Opening at markers on BACK and FRONT).
Edging for Sleeve Opening
With RS facing, using crochet hook and A, beginning at upper edge of rib, and working along Sleeve Opening edges, join yarn with a slip st; chain 1, work sc evenly up Opening, across 1” of Armhole at Shoulder seam, and down opposite side, working 1 sc in each B stripe and 3 sc in each A stripe. Fasten off.
LACING CORDS (make 2)
Using crochet hook and A, work a chains 40” long.
Fasten off.
Using yarn needle or hook, slip one LACING CORD under center sc at top of Shoulder seam of one SLEEVE; fold piece in half and tie a knot to secure; lace the 2 strands of cord down the sleeve opening, lacing under every 3rd sc. Tie a bow at the cuff (see photo on page 1). Repeat for opposite SLEEVE.
Using yarn needle, weave in all ends.
Read NextOversized Garter Stitch Sweater


Thanks for your comment. Don't forget to share!
jonferguson2002 81 63063
May 08, 2017
Leave a comment...Hi, I have knitted all the sections of the sweater, but the arms do not reach the top of the sweater. They are about an inch short, is the top part of the shoulder suppoed to be left open? Does the crocheted edging "close" this gap? All measurments are correct, and even looking at the pattern diagram, the arms look too short comared to the main body of the sweater. Has anybody completed this pattern and had the same issue? Thanks Jon
Report Inappropriate Comment
Are you sure you would like to report this comment? It will be flagged for our moderators to take action.
Thank you for taking the time to improve the content on our site.