This project was submitted by one of our readers, just like you.
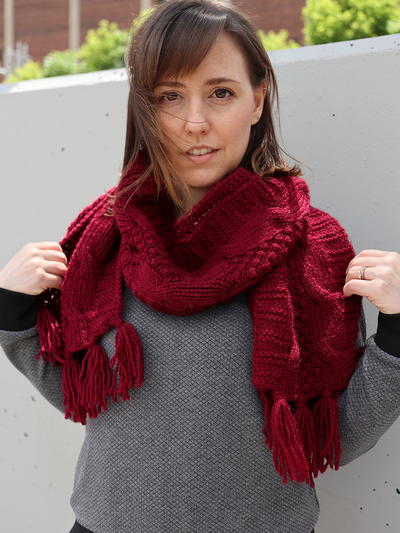
Step-by-Step Scalloped Scarf

Step-by-Step Scalloped Scarf
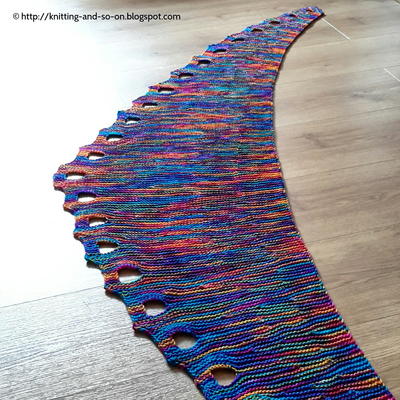
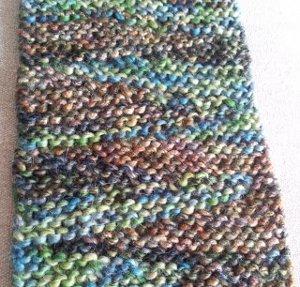
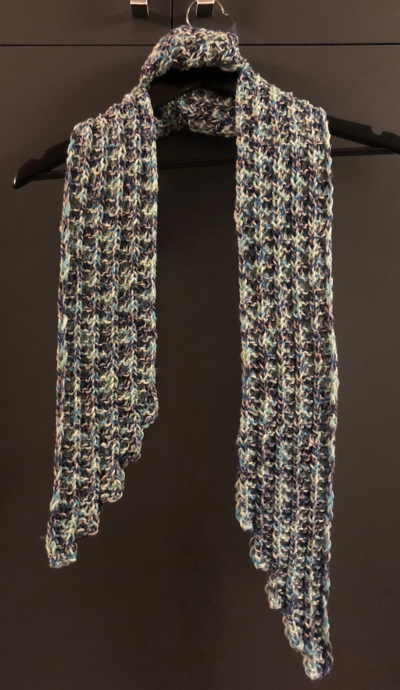
From the blogger: "This scarf uses what I call the ridge and garter stitch pattern (I’m sure there’s an official name for it) of K3P1 in such a way that it looks the same from both sides. I think it's perfect for scarves. I've been thinking about trying the pattern with this step technique for a while and finally found the perfect project for it. I found out it was someone's birthday and had little warning. I'm not sure how many hours I spent on it, a few for a couple of evenings. It went pretty fast once I got the "step" part!"

Knitting Needle Size6 or 4 mm
Yarn Weight(4) Medium Weight/Worsted Weight and Aran (16-20 stitches to 4 inches)
Materials List
- 4 mm needles (or other size as desired)
- One skein Lion Brand Flikka (or similar yarn)
Instructions
Note: if you prefer, you can slip the first stitch of every row instead of knitting. Therefore, it would be sl1 k2 p1 and then *k3p1*. This makes for a smooth edge.
-
Cast on 4 stitches
-
Row 1L: K3 P1
-
Row 2-5: K3P1
-
Row 6: K3 P1
-
Cast on 4 stitches (8)
-
Row 7-11: *K3P1*
-
Row 12: *K3P1*
-
Cast on 4 stitches (12)
-
Row 13-17: *K3P1*
-
Row 18: *K3P1*
-
Cast on 4 stitches (16)
-
Row 19-23: *K3P1*
-
Row 24: *K3P1*
-
Cast on 4 stitches (20)
-
You can keep following this pattern of adding four every six rows for a wider scarf or stop sooner for a narrower one). Repeat basic row: *K3P1* until you reach the desired length (don’t forget the step part will add length).
Instructions: Decreasing
Note: you can start the decrease so that the scarf is a parallelogram (just decrease on the opposite side of the increases) or so the scarf is a trapezoid (one short side and one long side as you can see in the photo).
-
Row 1: cast off 4 stitches; *K3P1* (16)
-
Repeat *K3P1* for 5 rows repeat this pattern, cast off four at the beginning of a row, and then knit five rows until no more stitches remain. The last off should be final 4 stitches.
-
Weave in ends. Done. No backing necessary.

Read NextGoddess Lace Ladder Scarf
Your Recently Viewed Projects
Thanks for your comment. Don't forget to share!
Lisa
Jul 20, 2019
The yarn for this pattern is Lion Brand Flikka, which is a #3 light worsted weight or DK yarn, not a #4 worsted weight yarn. I'm going to do it with worsted weight but a larger needle.
Report Inappropriate Comment
Are you sure you would like to report this comment? It will be flagged for our moderators to take action.
Thank you for taking the time to improve the content on our site.