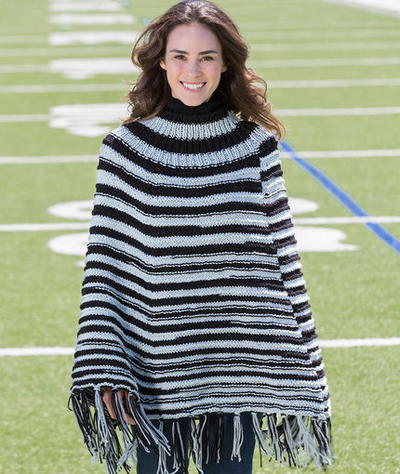
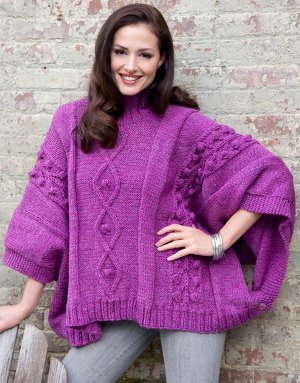
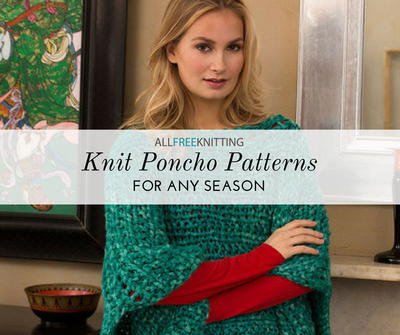
Favorite Fall Poncho

This cozy knit poncho pattern is sure to become your go-to autumn garment. A simply constructed body with a functional hood and decorative tasseled-fringe, the Favorite Fall Poncho is a must-knit for a number of reasons. Perfect for the intermediate knitter looking for the satisfaction of a larger-scale project without the difficulties of a knit sweater pattern, this basic wardrobe staple is sure to make many appearances in your weekday and weekend outfits. As an added bonus, there are sizing instructions for a matching kid's version!

Knitting Needle Size10 or 6 mm
Yarn Weight(5) Bulky/Chunky (12-15 stitches for 4 inches)
Gauge15 sts and 20 rows = 4 ins [10 cm] in stocking st.
Finished SizeTo fit Women 32 - 38 ins [81 - 97 cm] bust or Child 4 to 8 yrs old.
Materials List
- Patons® Shetland (100 g / 3.5 oz; 148 yd / 136 m) (03046 Stone Ragg) - Adult Size: 5 balls; Child Size: 4 balls
- Size 6 mm (U.S. 10) knitting needles or size needed to obtain tension
- Cable needle
Instructions
Note: The instructions are written for child’s size. If changes are necessary for women’s size the instructions will be written thus ( ).
RIGHT SIDE
**Cast on 98 (106) sts.
1st row: *K1. P1. Rep from * to end of row.
2nd row: *P1. K1. Rep from * to end of row.
These 2 rows form seed st pat.
Rep last 2 rows 1 (2) time(s) more.**
Women’s version only:
***1st row: (RS). K2. C3Bdec. Knit to last 5 sts. C3Fdec. K2. 104 sts.
2nd row: Purl.
3rd row: Knit.
4th row: Purl.
Rep last 4 rows 12 times more. 80 sts.
-
Shoulder shaping:
Next row: K2. C3Bdec. K31. C3Fdec. K1. Place marker between sts. K1. C3Bdec. K31. C3Fdec. K2. 76 sts
Work 3 rows stocking st.
Next row: K2. C3Bdec. K29. C3Fdec. K2. C3Bdec. K29. C3Fdec. K2.
Next row: Work 3 rows stocking st. 72 sts.
Cont dec 4 sts every following 4th row as before until there are 60 sts.***
Next row: Purl.
Next row: Knit. -
Neck Shaping:
Next 2 rows: P52. Turn. Sl1K. Knit to last 4 sts before marker. C3Fdec. K2. C3Bdec. Knit to last 5 sts. C3Fdec. K2.
Next 2 rows: P46. Turn. Sl1K. Knit to 4 sts before marker. C3Fdec. K2. C3Bdec. Knit to end of row.
Next 2 rows: P42. Turn. Sl1K. Knit to last 4 sts before marker. C3Fdec. K2. C3Bdec. Knit to last 5 sts. C3Fdec. K2.
Next 2 rows: P38. Turn. Sl1K. Knit to 4 sts before marker. C3Fdec. K2. C3Bdec. Knit to end of row.
Next 2 rows: P35. Turn. Sl1K. Knit to 4 sts before marker. C3Fdec. K2. C3Bdec. Knit to last 5 sts. C3Fdec. K2.
Girl’s Version only:
****1st row: (RS). K2. C3Bdec. Knit to last 5 sts. C3Fdec. K2. 96 sts.
2nd row: Purl.
Rep last 2 rows 21 times more. 54 sts. -
Shoulder shaping:
1st row: K2. C3Bdec. K18. C3Fdec. K1. Place marker. K1. C3Bdec. K18. C3Fdec. K2. 50 sts.
2nd and alt rows: Purl.
3rd row: Knit to 4 sts before marker. C3Fdec. K2. C3Bdec. Knit to end of row.
5th row: K2. C3Bdec. Knit to 4 sts before marker. C3Fdec. K2. C3Bdec. Knit to last 5 sts. C3Fdec. K2.
6th row: Purl.
Rep 3rd to 6th rows once more, then 3rd row once. 36 sts.**** -
Neck Shaping:
Next 2 rows: P33. Turn. Sl1K. Knit to last 4 sts before marker. C3Fdec. K2. C3Bdec. Knit to last 5 sts. C3Fdec. K2.
Next 2 rows: P27. Turn. Sl1K. Knit to 4 sts before marker. C3Fdec. K2. C3Bdec. Knit to end of row.
Next 2 rows: P21. Turn. Sl1K. Knit to 4 sts before marker. C3Fdec. K2. C3Bdec. Knit to last 5 sts. C3Fdec. K2.
Note: To avoid a hole when purling a slipped st, pick up the st below the slipped st and slip it onto left-hand needle. Purl this st tog with slipped st above.
Both Versions:
Next row: Purl across all sts on needle. 28 (47) sts.
Next row: Knit, dec 0 (9) sts evenly across. Leave rem 28 (38) sts on a st holder.
LEFT SIDE
Rep from ** to ** as given for Right Side.
Women’s Version only:
Rep from *** to *** as given for Right Side.
Next row: Purl.
Neck Shaping:
Next 2 rows: K2. C3Bdec. K21. C3Fdec. K2. C3Bdec. K18. Turn. Sl1P. Purl to end of row.
Next 2 rows: Knit to 4 sts before marker. C3Fdec. K2. C3Bdec. K14. Turn. Sl1P. Purl to end of row.
Next 2 rows: K2. C3Bdec. Knit to 4 sts before marker. C3Fdec. K2. C3Bdec. K11. Turn. Sl1P. Purl to end of row.
Next 2 rows: Knit to 4 sts before marker. C3Fdec. K2. C3Bdec. K7. Turn. Sl1P. Purl to end of row.
Next 2 rows: K2. C3Bdec. Knit to 4 sts before marker. C3Fdec. K2. C3Bdec. K7. Turn. Sl1P. Purl to end of row.
Girl’s Version only:
Rep from **** to **** as given for Right Side.
Next row: Purl.
-
Neck Shaping:
Next 2 rows: K2. C3Bdec. K9. C3Fdec. K2. C3Bdec. K11. Turn. Sl1P. Purl to end of row.
Next 2 rows: Knit to 4 sts before marker. C3Fdec. K2. C3Bdec. K7. Turn. Sl1P. Purl to end of row.
Next 2 rows: K2. C3Bdec. Knit to 4 sts before marker. C3Fdec. K2. C3Bdec. K3. Turn. Sl1P. Purl to end of row.
Note: To avoid a hole when knitting a slipped st, pick up the st below the slipped st and slip it onto left-hand needle. Knit this st tog with slipped st above.
Both Versions:
Next row: Knit to end of row, dec 0 (9) sts evenly across. Leave rem 28 (38) sts on a st holder.
FINISHING
Sew center front and back seam.
-
Hood:
With RS of work facing, knit 28 (38) sts from right st holder then knit 28 (38) sts from left st holder. 56 (76) sts.
Proceed as follows:
1st row: (WS). K1. (P1. K1) twice. Purl to last 5 sts. K1. (P1. K1) twice.
2nd row: P1. (K1. P1) twice. Knit to last 5 sts. P1. (K1. P1) twice.
Rep last 2 rows until Hood measures 11 (12) ins [28 (30.5) cm] ending with RS facing for next row. Break yarn leaving a long end for grafting.
Fold Hood in half. Divide rem sts onto 2 needles and graft center top seam. -
Tassels: (make 21)
Cut a piece of cardboard 4½ ins [11 cm] wide. Wind yarn around cardboard 15 times. Break yarn leaving a long end and thread end through a needle. Slip needle through all loops and tie tightly.
Remove cardboard and wind yarn tightly around loops ¾ inch [2 cm] below fold. Fasten securely. Cut through rem loops and trim ends evenly. Attach 20 tassels to Poncho along cast on edge, spaced evenly as illustrated.
Attach 1 tassel to top of Hood.
Abbreviations
- C3Bdec
- Slip next 2 sts onto cable needle and leave at back of work. K1. K2tog from cable needle.
- C3Fdec
- Slip next st onto cable needle and leave at front of work. K2tog. K1 from cable needle.
Read NextTranquil Dusk Poncho
Your Recently Viewed Projects
Thanks for your comment. Don't forget to share!
reid 7789897
Nov 11, 2017
I'm having a real problem with this neck shaping. On right side, after you're down to 60 sts--1st row of neck shaping indicates P52 and turn. What happens to the other 8 sts? When doing the left side there are a lot of short rows. What happens to the leftover stitches on the left neck side.
Lisa
Nov 30, 2020
In knitting all remaining stitch on short row shaping are eventually incorporated back into the pattern, typically for finishing. If you read instructions after the short rows, you can see where you are again instructed to work across the entire row, since the shaping is done at that point. I know this is late, may help someone else, happy knitting
paver2
Oct 20, 2017
I think, if I were to make this poncho, I would make the center front seam shorter to give one more room to put on and take off, especially for a child. I'm not sure if that would affect the way the hood fits on, since I haven't made it. It looks pretty close around the neck. It looks warm, though and stylish
Report Inappropriate Comment
Are you sure you would like to report this comment? It will be flagged for our moderators to take action.
Thank you for taking the time to improve the content on our site.