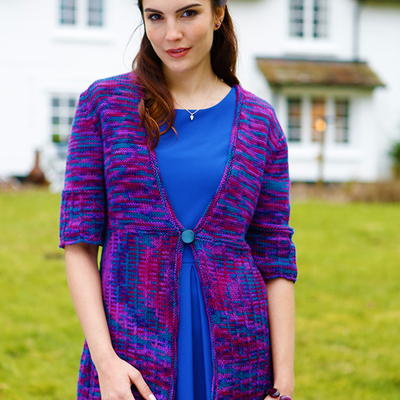
Walking Bird Cardigan
Knit the perfect autumn sweater with this fun knit cardigan pattern. This Walking Bird Cardigan will make you free and flighty as the leaves change. Sing all morning long with these cheery colors. You'll feel like you are flying south with with this bright palette. You don't need to make a winter migration to feel cozy and warm in this sweater. Others will flock to you to ask how you made this gorgeous seed stitch knitting pattern. Spread your wings with this intricate knit.

Knitting Needle Size9 or 5.5 mm, 10 or 6 mm, 10.5 or 6.5 mm, Circular Knitting Needles, Double-Pointed Knitting Needles (DPNs)
Yarn Weight(4) Medium Weight/Worsted Weight and Aran (16-20 stitches to 4 inches)
Materials:
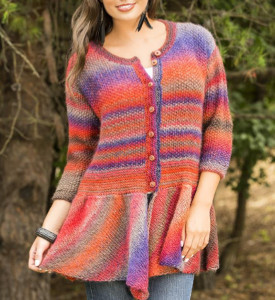
- Universal Yarn Classic Shades (70% acrylic, 30% wool; 100 g/197 yds) 723 Stained Glass – 6 (7, 7, 8, 8) Balls
- US Size 9 (4.5mm) and US Size 10 (5mm) 32” circular needles
- Set of DPNs for sleeves or size needed to obtain gauge
- US Size 10½ (6.5 mm) straight circular (for 3 needle bind off)
- Tapestry needle
- Seven 5/8” buttons
- Stitch holders
Gauge: 16 sts x 20 rows = 4” in St st using larger ndls
Measurements:
- Small (Medium, Large, 1X, 2X) (Sample shown in Small size)
- Bust, buttoned: 36½ (40½, 44½, 48½, 52½)"
- Length: 26½ (27, 27½, 28, 28¼)”
Instructions:
STITCH GUIDE
Seed Stitch (even number of sts) (worked flat)
Row 1 (RS):* K1, p1; rep from * to end of row
Row 2 (WS):* P1, k1; rep from * to end of row. Rep rows 1-2 for patt.
Seed Stitch (even number of sts) (worked in the rnd)
Rnd 1:* K1, p1; rep from * to end of rnd
Rnd 2:* P1, k1; rep from * to end of rnd. Rep rnds 1-2 for patt.
Kfbf: Knit into the front leg, then the back leg, then the front leg again of the next st – 2 sts inc’d.
Peplum
With larger ndl, cast on 2 sts. Increase Section.
Row 1 (RS): Wyib, sl 1, yo, kfbf, yo, k1 - 7 sts.
Row 2 (WS): Wyif sl 1, purl to end of row.
Row 3: Wyib sl 1, yo, knit to last st, yo, k1 – 2 sts inc’d. Rep Rows 2 & 3 above, until Peplum meas 8 ½ (8½, 8½, 9, 9)” along right hand edge.
Straight Section
Row 1 (RS): Beg at top edge of Peplum, w yip sl 1, ssk, knit to last st, yo, k1.
Row 2 (WS): Wyif, sl 1, purl. Rep Rows 1 & 2 above until there are 140 (156, 172, 188, 204) slipped sts along top edge of Peplum. Loosely bind off all sts.
Cardigan Body
With smallest ndl, beg at Right Front edge of Peplum, pick and knit 1 st in each slipped st along top edge of Peplum - 140 (156, 172, 188, 204) sts. Work in garter st (knit every row) until Body meas 3”. Change to middle ndl. Work even in Seed Stitch until Body meas 9 ½” (all sizes), ending with WS row.
Divide for Fronts and Back
Next row (RS): Work 31 (35, 37, 41, 45) sts inest patt for Right Front, bind off next 8 (8, 12, 12, 12) sts, place Right Front sts on holder, work next 62 (70, 74, 82, 90) sts in est patt for Back, bind off next 8 (8, 12, 12, 12) sts, place Back sts on holder, work in est patt to end of row – 31 (35, 37, 41, 45) sts rem for Left Front.
Left Front
Cont in est patt until Left Front meas 4½ (5, 5, 5½, 5½)” from division of Fronts and Back, ending with RS row.
Shape Left Front Neck
Bind off 4 (4, 5, 5, 5) sts at beg of next WS row. Bind off 2 sts at beg of next 2 WS rows. Bind off 1 st at beg of next 5 (5, 5, 6, 7) WS rows – 18 (22, 23, 26, 29) sts rem. Cont, if necessary, in est patt until Left Front meas 8½ (9, 9½, 9½, 9¾)” from division of Fronts and Back, ending with WS row. Place shoulder sts on holder.
Right Front
Place Right Front sts on middle ndl. Beg with WS row, cont in est patt until Right Front meas 4½ (5, 5, 5½, 5½)” from division of Fronts and Back, ending with WS row.
Shape Right Front Neck
Bind off 4 (4, 5, 5, 5) sts at beg of next RS row. Bind off 2 sts at beg of next 2 RS rows. Bind off 1 st at beg of next 5 (5, 5, 6, 7) RS rows – 18 (22, 23, 26, 29) sts rem. Cont, if necessary, in est patt until Left Front meas 8½ (9, 9½, 9½, 9¾)” from division of Fronts and Back, ending with WS row. Place shoulder sts on holder.
Back
Place Back sts on middle ndl. Work in est patt until Back meas 8½ (9, 9½, 9½, 9¾)” from division of Fronts and Back, ending with WS row.
Next row (RS): Work 18 (22, 34, 26, 29) sts in est patt, bind off center 26 (26, 28, 30, 32) sts, work in patt to end. Place shoulder sts on holders. Join Shoulder Seams. Place left Back shoulder sts & Left Front shoulder sts onto middle circ ndl. Using largest straight ndl, join Left Shoulder Seam using 3 ndl bind off. Rep for Right Shoulder seam.
Sleeves
Instructions are given assuming magic loop method is used. Dpns may also be used. With middle ndl, beg at underarm, pick up and knit 4 (4, 6, 6, 6) sts along armhole bind off, 60 (64, 64, 64, 64) sts evenly around armhole, and 4 (4, 6, 6, 6) sts long other side of armhole bind off – 68 (72, 76, 76, 76) sts. Pm and join to work in the rnd. Work 4 rnds even in Seed st.
Shape Sleeves
Dec rnd: K2tog, work in patt to last 2 sts, ssk – 2 sts dec’d. Rep Dec rnd every 4 (4, 4, 4, 4) rnds, 14 (17, 17, 12, 9) more times, then rep Dec rnd every 6 (-, 6, 6, 6) rnds, 1 (-, 1, 5, 7) more time(s) – 34 (36, 38, 40, 42) sts rem. Cont in patt, if necessary until Sleeve meas 14½ (15, 15½, 16, 16½)” from underarm. Change to smallest dpns. Knit 1 rnd, decreasing 3 (3, 5, 5, 5) sts evenly spaced on rnd. Work in garter stitch (purl 1 rnd, knit 1 rnd) for 1½”. Loosely bind off all stitches.
Finishing
Block all pieces.
Right Front Band
With smallest ndl and RS facing, beg at lower edge of waist band, pick up and knit 2 sts for every 3 rows along Right Front. Knit 3 rows. Mark 6 buttonholes, evenly spaced along Right Front Band, with first button hole ¼” from top of Band and last buttonhole ¼” from bottom of Band.
Buttonhole row (RS): Knit to first marked buttonhole, bind off 2 sts, rep for each marked buttonhole.
Next row (WS): Knit, casting on 2 sts over each 2-st bind-off gap. Cont in garter stitch until Front Band meas 1½” from pick-up edge. Loosely bind off all sts.
Left Front Band
With smallest ndl and RS facing, beg at lower edge of Waistband , pick up and knit 2 sts for every 3 rows. Work in garter st until Front Band meas 1½” from pick up edge. Loosely bind off all sts.
Neckline Band
With smallest ndl and RS facing, beg at Right Neck edge along top of Right Front Band, pick up and knit 1 st for each bound-off Neck st, and 3 sts for every 4 rows around entire Neck edge. Knit 3 rows. Mark Neckline buttonhole to line up with buttonholes on the Right Front Band.
Next row (RS): Knit to buttonhole marker, bind off 2 sts.
Next row (WS): Knit, casting on 2 sts over 2-st bind-off gap. Cont in garter st until Neckline Band meas 1½” from pick up edge. Loosely bind off all sts. Sew buttons on Left Front to correspond to buttonholes. Weave in ends.
Read NextMagical Top Down Cardigan
Your Recently Viewed Projects
Thanks for your comment. Don't forget to share!
lcarr
Apr 27, 2018
I love the look of this cardigan. It is loose fitting, and the peplum really adds style to it. It would be great with jeans and a tank top, or even just on its own with jeans or a skirt. I love the yarn choice too. Thanks for sharing this.
Tricia108
May 23, 2017
I had made a sweater like this previously and the instructions to this one are much easier. The great thing about this sweater is the bottom of it which the appearance of being gathered. It is a nice touch and it looks great as well. It really looks professional and more than one person will say, " Wow! You made that". I wound up giving the one I made to my girlfriend's daughter and that was made with the "harder" pattern. This one will be for me. Thank you.
Report Inappropriate Comment
Are you sure you would like to report this comment? It will be flagged for our moderators to take action.
Thank you for taking the time to improve the content on our site.