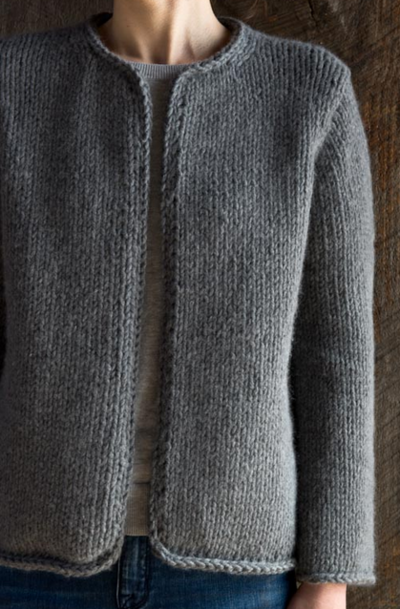
Beverly Hills Cardigan

Sit in style with this luxurious knit cardigan pattern. This Beverly Hills Cardigan will make you feel rich with its satin yarn and sophisticated pattern. This gorgeous knit is a must-have for your closet. This elegant cardigan has an intricate lace pattern worthy of envy. Wear this lavish knit to a ritzy event or a fancy dinner party. This beautiful cream color would look lovely with pearls or diamonds. Knit this extravagant piece at your leisure. Live richly in this refined lace cardigan.

Knitting Needle Size7 or 4.5 mm, 9 or 5.5 mm
Yarn Weight(4) Medium Weight/Worsted Weight and Aran (16-20 stitches to 4 inches)
Materials:
- Bernat Satin Silk (100 g/3.5 oz;182 m/200 yds) (04007) 5 (6, 6, 7, 8, 8) Balls
- Sizes 4.5 mm (U.S. 7) and 5 mm (U.S. 9) knitting needles or size needed to obtain tension
- 7 buttons
Gauge: 20 sts and 24 rows = 4 ins [10 cm] with larger needles in knot pat.
Measurements:
- Bust measurement
- Extra Small/Small 28 - 34" [71-86.5 cm]
- Medium 36 - 38" [91.5-96.5 cm]
- Large 40 - 42" [101.5-106.5 cm]
- Extra Large 44 - 46" [112-117 cm]
- 2/3 Extra-Large 48 - 54" [122-137 cm]
- 4/5 Extra-Large 56 - 62" [142-157.5 cm]
- Finished bust
- Extra Small/Small 36.5" [ 92.5 cm ]
- Medium 38.5" [ 98 cm ]
- Large 43.5" [ 110.5 cm ]
- Extra Large 50.5" [ 128.5 cm ]
- 2/3 Extra-Large 55.5" [ 141 cm ]
- 4/5 Extra-Large 62.5" [ 158.5 cm ]
STITCH GLOSSARY
Alt = Alternate.
Beg = Beginning.
Cont = Continue(ity).
Dec = Decrease.
Knot = P3tog, leaving sts on left-hand needle, now knit same 3 sts tog, then purl them tog again and slip sts off needle.
P1tbl= Purl next yfwd through back loop
Instructions:
Back
With smaller needles, cast on 85 (91-101-119-129-147) sts.
**1st row: (WS). Knit.
2nd row: Knit.
3rd row: K1. *K2tog. yfwd. Rep from * to last 2 sts. K2.
4th row: K1. *yfwd. K2tog. Rep from * to end of row.
5th and 6th rows: Purl.**
7th row: Knit, inc 6 (6-8-8-10-10) sts evenly across last row. 91 (97-109-127-139-157) sts. Change to larger needles and proceed in pat as follows:
1st row: (RS). Knit.
2nd row: Purl.
3rd row: K2. *Knot. K3. Rep from * to last 5 sts. Knot. K2.
4th to 6th rows: Beg with a purl row, work 3 rows in stocking st.
7th row: K5. *Knot. K3. Rep from * to last 8 sts. Knot. K5.
8th row: Purl. Rep last 8 rows for Knot Pat. Cont in Knot Pat until work from beg measures 13 (13-13-13-14-14) ins [33 (33-33-33-35.5-35.5) cm], ending with a WS row.
Shape armholes: Keeping cont of pat, cast off 7 (7-9-9-10-13) sts beg next 2 (2-2-4-4-4) rows. 77 (83-91-91-99-105) sts. Dec 1 st each end of next and every following alt row 5 (5-7-6-7-9) times more. 65 (71-75-77-83-85) sts. Cont even in pat until armhole measures 5½ (6-6½-7-7½-8) ins [14 (15-16.5-18-19-20.5) cm], ending with a WS row.
Shape back neck: Next row: Pat across 15 (18-18-19-21-22) sts (neck edge). Turn. Leave rem sts on a spare needle. Dec 1 st at neck edge on next 6 rows. 9 (12-12-13-15-16) sts. Cont even in pat until armhole measures 7½ (8-8½-9-9½-10) ins [19 (20.5-21.5-23-24-25.5) cm], ending with a WS row. Cast off. With RS facing, join yarn to rem sts and cast off next 35 (35-39-39-41-41) sts. Pat to end of row. Dec 1 st at neck edge on next 6 rows. 9 (12-12-13-15-16) sts. Cont even in pat until armhole measures 7½ (8-8½-9-9½-10) ins [19 (20.5-21.5-23-24.5-25.5) cm], ending with a WS row. Cast off.
Left Front
***With smaller needles, cast on 41 (45-49-57-63-73) sts. Work from ** to ** as given for Back.
7th row: Knit, inc 4 (3-5-6-6-5) sts evenly across last row. 45 (48-54-63-69-78) sts.*** Change to larger needles and proceed in pat as follows:
1st row: (RS). Knit.
2nd row: Purl.
3rd row: K2. *Knot. K3. Rep from * to last 1 (4-4-1-1-4) st(s). (Knot) 0 (1-1-0-0-1) time. K1.
4th to 6th rows: Beg with a purl row, work 3 rows in stocking st.
7th row: K5. *Knot. K3. Rep from * to last 4 (1-1-4-4-1) st(s). (Knot) 1 (0-0-1-1-0) time. K1.
8th row: Purl. Rep last 8 rows for knot pat. Cont in Knot Pat until work from beg measures 13 (13-13-13-14-14) ins [33 (33-33-33-35.5-35.5) cm], ending with a WS row.
Shape armhole: Keeping cont of pat, cast off 7 (7-9-9-10-13) sts beg next row. Work 1 row even in pat.
Sizes XL, 2XL/3XL and 4XL/5XL only: Rep last 2 rows once more.
All sizes: 38 (41-45-45-49-52) sts. Dec 1 st at armhole edge on next and every following alt row 5 (5-7-6-7-9) times more. 32 (35-37-38-41-42) sts.
Cont even in pat until armhole measures 3½ (4-4½-4½-5-5½) ins [9 (10-11-11-12.5-14) cm], ending with a RS row.
Shape neck edge: Next row: (WS). Cast off 12 (12-14-14-14-14) sts. Pat to end of row. Dec 1 st at neck edge on next 6 rows then on every following alt row 5 (5-5-5-6-6) times. 9 (12-12-13-15-16) sts. Cont even in pat until armhole measures same length as back, ending with a WS row. Cast off.
Right Front
Work from *** to *** as given for Left Front. Change to larger needles and proceed in pat as follows:
1st row: (RS). Knit.
2nd row: Purl.
3rd row: K4 (1-1-4-4-1). *Knot. K3. Rep from * to last 5 sts. Knot. K2.
4th to 6th rows: Beg with a purl row, work 3 rows in stocking st.
7th row: K1 (4-4-1-1-4). *Knot. K3. Rep from * to last 2 sts. K2.
8th row: Purl. Rep last 8 rows for Knot Pat. Cont in Knot Pat until work from beg measures 13 (13-13-13-14-14) ins [33 (33-33-33-35.5-35.5) cm] ending with a RS row.
Shape armhole: Keeping cont of pat, cast off 7 (7-9-9-10-13) sts beg next row.
Sizes XL, 2XL/3XL and 4XL/5XL only: Work 1 row even in pat. Cast off (9-10-13) sts beg next row.
All sizes: 38 (41-45-45-49-52) sts. Dec 1 st at armhole edge on next and every following alt row 5 (5-7-6-7-9) times more. 32 (35-37-38-41-42) sts.
Cont even in pat until armhole measures 3½ (4-4½-4½-5-5½) ins [9 (10-11-11-12.5-14) cm], ending with a WS row.
Shape neck edge: Next row: (RS). Cast off 12 (12-14-14-14-14) sts. Pat to end of row. Work 1 row even in pat. Dec 1 st at neck edge on next 6 rows then on every following alt row 5 (5-5-5-6-6) times. 9 (12-12-13-15-16) sts. Cont even in pat until armhole measures same length as back, ending with a WS row. Cast off.
Sleeves
Edging:****With larger needles cast on 6 sts.
1st row: (RS). K1. K2tog. yfwd. K2. (yfwd) twice to make 2 sts. K1.
2nd row: K2. K1tbl. K2tog. yfwd. K3.
3rd row: K1. K2tog. yfwd. K5.
4th row: Cast off 2 sts (1 st remains on right-hand needle). K2tog. yfwd. K3. Rep last 4 rows for Edging Pat.**** Cont in Edging Pat until work from beg (when slightly stretched) measures approx 10 (10-11-11-12-12) ins [25.5 (25.5-28-28-30.5-30.5) cm], ending on 3rd row of pat. Cast off all sts. With RS facing and larger needles, pick up and K49 (49-55-55-61-61) sts evenly across straight edge of edging. Work in Knot Pat as given for Back for 8 rows. Keeping cont of pat, inc 1 st each end of next and every following 8th (6th-6th-4th-4th-2nd) row to 65 (71-69-73-87-67) sts, taking inc sts into pat.
Sizes L, XL, 2XL/3XL and 4XL/5XL only: Inc 1 st each end of every following (8th-6th-6th-4th) row to (75-83-91-95) sts.
All sizes: Cont even in pat until sleeve measures 15 ins [38 cm] from lower edge of edging, ending with a WS row.
Shape top: Keeping cont of pat, cast off 4 (4-5-5-5-7) sts beg next 2 rows. Dec 1 st each end of next and every following alt row until there are 33 (41-41-51-59-55) sts, then on every row until there are 11 (11-11-13-13-13) sts. Cast off.
Finishing
Sew shoulder seams. Right Front edging:Work from **** to **** as given for Sleeve edging. Cont in Edging Pat until work from beg (when slightly stretched) measures length to fit along front edge, sewing straight edge in place as you knit and ending on 3rd row of pat. Cast off.
Left Front edging: Work as given for Right Front Edging.
Collar:With larger needles, cast on 12 sts.
1st row: (RS). Sl1K. (K2. yfwd. K2tog) twice. (yfwd) twice to make 2 sts. K2tog. K1.
2nd row: K3. P1tbl. (K2. yfwd. K2tog) twice. K1.
3rd row: Sl1K. (K2. yfwd. K2tog) twice. K1. (yfwd) twice to make 2 sts. K2tog. K1.
4th row: K3. P1tbl. K3. yfwd. K2tog. K2. yfwd. K2tog. K1.
5th row: Sl1K. (K2. yfwd. K2tog) twice. K2. (yfwd) twice to make 2 sts. K2tog. K1.
6th row: K3. P1tbl. K4. yfwd. K2tog. K2. yfwd. K2tog. K1.
7th row: Sl1K. (K2. yfwd. K2tog) twice. K6.
8th row: Cast off 3 sts (1 st rem on right-hand needle). K4. yfwd. K2tog. K2. yfwd. K2tog. K1. Rep last 8 rows for Pat until Collar (when slightly stretched) measures length to fit along neck edge, beg and ending at center of top edge of front edgings. Sew straight edge of Collar in position as you knit and end on an 8th row of Pat. Cast off.
Sew side and sleeve seams. Sew in sleeves. Mark positions for 7 buttons along left front edging having top button ½ inch [1 cm] down from neck edge, bottom button ½ inch [1 cm] above cast on edge and rem 5 buttons evenly spaced. Sew on buttons to correspond to markers. Use eyelet holes in right front edging for buttonholes.
Read NextSunday Best Cardigan
Your Recently Viewed Projects
Thanks for your comment. Don't forget to share!
quanahs 5032097
Apr 27, 2016
I love this elegant little sweater, the addition of the bobbles/knots give it a wonderful texture and allure. The yarn specified is an easy care acrylic, but I think it would be wonderful knit up in a wool silk blend. It would be a perfect sweater for the holidays too, knit in black or a festive color.
Ana Haar
Mar 20, 2016
sleeves cast 6 stiches 1st row ok, but I do not have enough stitches on 2nd row to K3 what did I miss?
Lisa
Apr 04, 2021
The second yfwd is done twice, which will provide the extra stitches to complete that row. It actually specifies this on the line that you are referencing.
mpower609
Jan 27, 2016
Thank you for including plus sizes in this beautiful sweater. Something I rarely see. I usually stick to hats, scarves and the like. Looking forward to trying it.
KathrynAllison
Jan 28, 2016
You're very welcome! I hope you enjoy the pattern! -Kathryn, Editor of AllFreeKnitting.com
pgardenssecret 763 7981
Feb 16, 2015
the directions for the KNOT is listed in the stitch glossary.
carolyn 4511393
Jun 26, 2014
This is very cute pattern, but I do not see how to make the "knot", please advise.
cottonhead 0712185
Jun 26, 2014
I like the pattern, but reading it through, there are no instructions for the 'knot' pattern Betty
Report Inappropriate Comment
Are you sure you would like to report this comment? It will be flagged for our moderators to take action.
Thank you for taking the time to improve the content on our site.