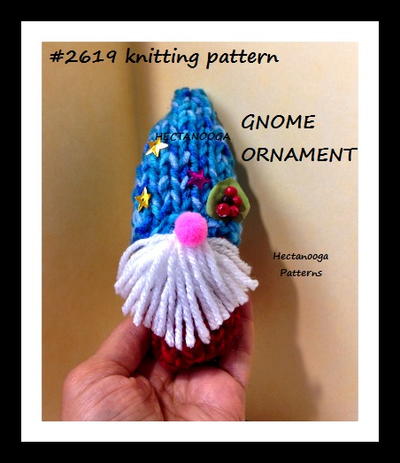
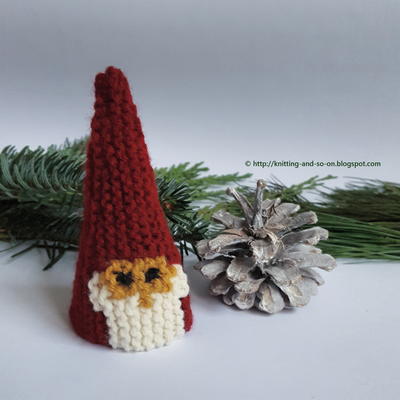
Santa Gnome Ornaments
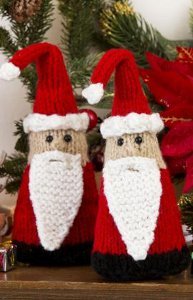
These little guys are so cute you'll want to keep them out year round. The Santa Gnome Ornaments are a cute way to add a homemade touch to your holiday decorations. These little mantle toppers look complicated, but are an easy Christmas ornament for you to make for yourself or give to others as gifts. Hang them on your tree or place them around the house. Wherever these little Santa Gnome Ornaments are, they'll put a smile on someone's face.

Knitting Needle Size7 or 4.5 mm
Yarn Weight(4) Medium Weight/Worsted Weight and Aran (16-20 stitches to 4 inches)
Materials:
- RED HEART® Super Saver®: 1 skein each, 0312 Black A, 0319 Cherry Red B, 0334 Buff C, 0316 Soft White D
- Susan Bates® Knitting Needles: 4.5 mm [US 7]
- Yarn needle
- Stitch markers
- One pair 6 mm safety eyes
- Fiberfill
GAUGE: 18 sts = 4” (10 cm), 24 rows = 4” (10 cm) in Stockinette Stitch. CHECK YOUR GAUGE. Use any size needles to obtain the gauge.
ABBREVIATIONS
K = knit
mm = millimeter
P = purl
st(s) = stitch(es)
tog = together
( ) = work instructions in parenthese as indicated
Special Stitches
Knit Increase – (K1, P1, K1, P1, K1) in next st (4 stitch increase).
M1 = Make 1 (Increase) – Lift strand between needles to left-hand needle and knit strand through the back loop, twisting the stitch to prevent a hole in the fabric.
SSK = Slip, slip, knit (Decrease) – Slip next 2 stitches as if to knit, insert point of left needle through front of stitches, knit these stitches together through back loop (1 stitch decrease).
Notes
1. Ornament is worked in one piece, beginning with the triangular base.
2. Beard and hat trim are worked separately and sewn to ornament.
3. If desired, ornament can be worked in rounds on double-pointed needles, to reduce the amount of seaming.
ORNAMENT
BASE
With A, cast on 2 sts.
Row 1: Purl across.
Row 2 (Right side): K1, M1, K1: 3 sts.
Row 3: Purl across.
Row 4: K1, M1, K1, M1, K1: 5 sts.
Row 5: Purl across.
Row 6: K1, M1, knit across to last st, M1, K1: 7 sts.
Row 7: Purl across.
Row 8: Knit across.
Row 9: Purl across.
Row 10: K1, M1, knit across to last st, M1, K1: 9 sts.
Row 11: Purl across.
Row 12: K1, M1, knit across to last st, M1, K1: 11 sts.
Row 13: Purl across.
Row 14: Knit across.
Row 15: Purl across.
Row 16: K1, M1, knit across to last st, M1, K1: 13 sts.
Row 17: Purl across.
Sides
Row 18: Cast on 13 sts, knit across: 26 sts.
Row 19: Cast on 13 sts, purl across: 39 sts.
Row 20: K13, (place marker, K13) across.
Row 21: Purl across, drop A.
Row 22: With B, K2tog. (knit across to 2 sts before marker, SSK, slip marker, K2tog) twice, knit to last 2 sts, SSK; 33 sts.
Row 23: Purl across.
Row 24: Knit across.
Rows 25-29: Repeat Rows 23 and 24 twice, then Row 23 once more.
Rows 30-37: Repeat Rows 22-29, drop B: 27 sts.
Rows 38-41: With C, repeat Row 22-24, then
Row 23 once more: 21 sts.
Row 42: K10, work Knit increase, knit across: 25 sts.
Row 43: P10, P5tog, purl across: 21 sts.
Row 44: Knit across.
Row 45: Purl across.
Row 46: Repeat Row 22, drop C: 15 sts.
Row 47: With B, purl across.
Row 48: Knit across.
Rows 49-53: Repeat Rows 47 and 48 twice, then Row 47 once more.
Row 54: Repeat Row 22: 9 sts.
Rows 55-61: Repeat Rows 47-53.
Row 62: (K2tog, K1) across: 6 sts.
Rows 63-69: Repeat Rows 47 and 48 twice, then Row 47 once more.
Cut yarn, leaving a long end for sewing. Thread yarn needle with end and weave through remaining stitches; draw up firmly; fasten securely.
Beard
With D, cast on 2 sts.
Row 1: Knit across.
Row 2 (Right side): K1, M1, K1: 3 sts.
Row 3: Purl across.
Row 4: Knit across.
Row 5: K1, M1, knit across: 4 sts.
Rows 6-17: Repeat Rows 3-5, 4 times: 8 sts.
Row 18: Knit across.
Row 19: Purl across.
Rows 20-25: Repeat Rows 18 and 19, 3 times.
Row 26: K4, M1, knit across: 9 sts.
Row 27: K3, bind off 3 sts, knit across: 6 sts.
Row 28: K3, cast on 4 sts, knit across: 10 sts.
Bind off all sts in knit, leaving a long end for
sewing.
Hat Trim
With D, cast on 3 sts.
Row 1: Purl across.
Row 2 (Right side): K1, work Knit increase, K1: 7 sts.
Row 3: P1, P5tog, P1: 3 sts.
Row 4: Knit across.
Repeat Rows 1-4 for pattern until piece measures long enough to fit around base of Hat.
Bind off all sts in knit.
Hat Pompom
With D, pick up and knit 1 st in tip of Hat.
Row 1 (Right side): Work Knit increase: 5 sts.
Row 2: P5tog.
Cut yarn, leaving a long end for sewing. Thread yarn needle with end and weave through remaining stitch; fasten securely
FINISHING
Following package directions, attach one safety eye on each side of nose.
Thread yarn needle with Beard long end. Using photo as a guide, sew beard to face.
Thread yarn needle with Hat Trim long end.
Using photo as a guide, sew hat trim around lower edge of hat.
With A, sew side edges of Base to cast-on edges of Sides.
With matching color yarn sew back seam, stuffing piece before finishing.
Finished Size 3½” (9 cm) wide (across base) x 8½” (22 cm) tall


Thanks for your comment. Don't forget to share!
Susan S
Aug 08, 2018
I can't resist these gnomes! Great way to practice increasing and decreasing while making cute little ornaments or decorations for the house. Just make sure to have a row counter handy.
paver2
Dec 11, 2016
Has anyone made these yet? I am a Santa nut and I already have quite a large collection but I like to add one each year. I am thinking this would be a ideal way to do it this year, they're so cute! The only thing is that I don't know whether to hang it on the tree or set it up with the rest of my Santas.
Report Inappropriate Comment
Are you sure you would like to report this comment? It will be flagged for our moderators to take action.
Thank you for taking the time to improve the content on our site.