Child's Foxy Tunic
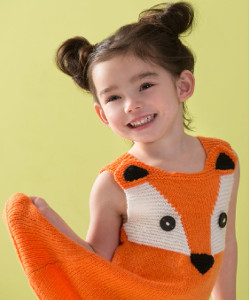
This adorable knit dress pattern is perfect for the animal lover in your family. This Child's Foxy Tunic will look great on any sharp, smart little girl. She'll love to romp around in this orange knit. Complete the cute little fox face in this pattern at your leisure. Your little fox can wear this dress all year round. When the weather gets colder, pair it with leggings and a blouse for an adorable ensemble. It could even make a cute homemade Halloween costume.

Knitting Needle Size6 or 4 mm
Yarn Weight(3) Light/DK (21-24 stitches to 4 inches)
Materials:
- RED HEART® Anne Geddes Baby™: 2 (2, 3, 3) balls 261 Tangerine A, 1 (1, 1, 1) ball 100 Lily B, 1 (1, 1, 1) ball 112 Nightnight C
- Susan Bates® Knitting Needles: 4mm [US 6]
- Stitch holders
- Stitch markers
- Two buttons (for eyes)
- Sewing needle and matching thread
- Yarn needle
Gauge: 22 sts = 4” (10 cm); 34 rows = 4” (10 cm) in Stockinette st (knit on right side, purl on wrong side). 22 sts = 4” (10 cm); 44 rows = 4” (10 cm) in Garter st (knit every row)
Measurements: Directions are for size 2 years. Changes for sizes 4 years, 6 years, and 8 years are in parentheses.
- Finished Chest: 24 (26, 28, 30)” (61 (66, 71, 76) cm)
- Finished Length: 18 (19, 20, 21)” (45.5 (48.5, 51, 53.5) cm)
Instructions:
Special Stitches
M1 = Make 1 (Increase) – Lift strand between needles to left-hand needle and knit strand through the back loop, twisting it to prevent a hole.
sk2p = Slip next stitch as if to knit to right needle, k2tog, lift slipped st over the k2tog st and off needle.
ssk = Slip next 2 stitches, one at a time as if to knit, to right needle, insert point of left needle through front of sts, knit these sts together through back loop.
Notes
1. Tunic is made from two main pieces: Back and Front.
2. Color changes on Front create the face of fox. Use separate balls of yarn for each section of color. Wind B into two separate balls before beginning face. Twist strands when changing color, to prevent leaving holes.
3. Inner ears and nose are worked separately and sewn to face.
Back
With A, cast on 88 (94, 100, 104) sts. Work in Garter st (knit every row) for 14 (16, 18) rows.
Decrease Row (right side): K1, ssk, knit to last 3 sts, k2tog, k1—86 (92, 98, 102) sts. Work even in Stockinette st (knit on right side, purl on wrong side) for 7 rows. Repeat Decrease Row—84 (90, 96, 100) sts. Repeat last 8 rows 9 more times—66 (72, 78, 82) sts. Work even in Stockinette st until piece measures 12¼ (12½, 13, 13¼)” (31 (32, 33, 33.5) cm) from beginning. Work even in Garter st for ¾ (1, 1, 1¼)” (2 (2.5, 2.5, 3) cm); end with a wrong side row.
Shape Armholes
Row 1 (right side): Bind off 3 (4, 5, 6) sts, knit to end of row—63 (68, 73, 76) sts.
Row 2: Bind off 3 (4, 5, 6) sts, knit to end of row—60 (64, 68, 70) sts.
Row 3: Bind off 2 sts, knit to end of row—58 (62, 66, 68) sts.
Row 4: Bind off 2 sts, knit to end of row—56 (60, 64, 66) sts.
Rows 5–12: K1, ssk, knit to end of row—48 (52, 56, 58) sts. Work even in Garter st until armholes measure 4½ (5, 5½, 6)” (11.5 (12.5, 14, 15) cm) from beginning; end with a wrong side row.
Right Shoulder Strap
Row 1 (right side): K14 (14, 15, 15), place remaining 34 (38, 41, 43) sts on a holder for back neck and left shoulder strap—14 (14, 15, 15) sts remain on needle for right shoulder strap.
Row 2: Knit.
Row 3: Knit to last 3 sts, k2tog, k1—13 (13, 14, 14) sts.
Rows 4 and 5: Repeat Rows 2 and 3—12 (12, 13, 13) sts. Work even in Garter st until right shoulder strap measures 3 (3½, 4, 4½)” (7.5 (9, 10, 11.5) cm). Bind off.
Left Shoulder Strap
Return stitches on holder to needle, ready to work a right side row.
Row 1 (right side): With right side facing, join A to beginning of sts, bind off first 20 (24, 26, 28) sts for back neck, knit to end of row—14 (14, 15, 15) sts remain on needle for left shoulder strap.
Row 2: Knit.
Row 3: K1, ssk, knit to end of row—13 (13, 14, 14) sts.
Rows 4 and 5: Repeat Rows 2 and 3—12 (12, 13, 13) sts. Work even in Garter st until left shoulder strap measures same as right shoulder strap.
Front
With A, cast on 88 (94, 100, 104) sts. Work in Garter st (knit every row) for 14 (16, 18) rows.
Decrease Row (right side): K1, ssk, knit to last 3 sts, k2tog, k1—86 (92, 98, 102) sts. Work even in Stockinette st (knit on right side, purl on wrong side) for 7 rows. Repeat Decrease Row—84 (90, 96, 100) sts. Repeat last 8 rows 9 more times—66 (72, 78, 82) sts. Work even in Stockinette st until piece measures 12¼ (12½, 13, 13¼)” (31 (32, 33, 33.5) cm) from beginning; end with a wrong side row. Cut A.
Begin Colorwork for Face of Fox
Row 1 (right side): With B, k28 (31, 33, 35) for first side of face, place marker; with A, k10 (10, 12, 12) for nose, place marker; with B, k28 (31, 33, 35) for 2nd side of face.
Row 2: With B, knit to first marker, slip marker; with A, purl to next marker, slip marker; with B, knit to end of row.
Row 3: With B, k1, M1, knit to 2 sts before marker, k2tog, slip marker; with A, knit to next marker, slip marker; with B, ssk, knit to last st, M1, k1.
Rows 4–7 (9, 11, 13): Repeat last 2 rows 2 (3, 4, 5) more times.
Row 8 (10, 12, 14): With B, knit to first marker, slip marker; with A, purl to next marker, slip marker; with B, knit to end of row.
Shape Armholes
Row 1 (right side): With B, bind off 3 (4, 5, 6) sts, knit to 2 sts before marker, k2tog, slip marker; with A, knit to next marker, slip marker, ssk, knit to end of row—61 (66, 71, 74) sts.
Row 2: Bind off 3 (4, 5, 6) sts, knit to marker, slip marker; with A, purl to next marker slip marker; with B, knit to end of row—58 (62, 66, 68) sts.
Row 3: With B, knit to 2 sts before marker, k2tog, slip marker; with A, knit to next marker, slip marker; with B, ssk, knit to end of row—56 (60, 64, 66) sts.
Row 4: With B, knit to marker, slip marker; with A, purl to next marker, slip marker; with B, knit to end of row.
Rows 5–12: Repeat last 2 rows 4 times, removing markers as you work the last row— 48 (52, 56, 58) sts.
Row 13: With B, knit to 1 st before first A-colored st; with A, knit to next B-colored st, with A, knit one B-colored st; with B, knit to end of row—12 (12, 14, 14) A-colored sts for nose and 18 (20, 21, 22) B-colored sts on each side of nose.
Row 14: With B, knit to first A-colored st; with A, purl to next B-colored st; with B, knit to end of row.
Rows 15–30: Repeat last 2 rows 8 more times—28 (28, 30, 30) A-colored sts for nose and 10 (12, 13, 14) B-colored sts on each side of nose. Cut A and both balls of B. With right side facing, rejoin A at beginning of sts. Work even in Garter st for 1 (1¼, 1½, 1¾)” (2.5 (3, 4, 4.5) cm); end with a wrong side row.
Left Ear
Row 1 (right side): K15 (15, 17, 17), place remaining 33 (37, 39, 41) sts on a holder for front neck and right ear—15 (15, 17, 17) sts remain on needle for left ear.
Row 2: K2tog, knit to end of row—14 (14, 16, 16) sts.
Row 3: Knit.
Rows 4 and 5: Repeat Rows 2 and 3—13 (13, 15, 15) sts.
Rows 6–15 (15, 17, 17): K2tog, knit to end of row—3 sts remain.
Row 16 (16, 18, 18): Sk2p—1 st. Fasten off.
Right Ear
Return stitches on holder to needle, ready to work a right side row.
Row 1 (right side): With right side facing, join A to beginning of sts, bind off first 18 (22, 22, 24) sts for front neck, knit to end of row—15 (15, 17, 17) sts remain on needle for right ear.
Row 2: Knit.
Row 3: K2tog, knit to end of row—14 (14, 16, 16) sts.
Rows 4 and 5: Repeat Rows 2 and 3—13 (13, 15, 15) sts.
Rows 6–15 (15, 17, 17): K2tog, knit to end of row—3 sts remain.
Row 16 (16, 18, 18): Sk2p—1 st. Fasten off.
Inner Ears (make 2)
With C, cast on 10 (10, 12, 12) sts.
Row 1: Knit.
Rows 2–9 (9, 11, 11) (decrease rows): K1, ssk, knit to end of row—2 sts remain.
Row 10 (10, 12, 12): K2tog—1 st. Fasten off.
Nose
With C, cast on 12 (12, 14, 14) sts.
Row 1: Knit.
Rows 2–11 (11, 13, 13) (decrease rows): K1, ssk, knit to end of row—2 sts remain.
Row 12 (12, 14, 14): K2tog—1 st. Fasten off.
Finishing
With yarn needle and C, using photograph as a guide to placement, sew nose and inner ears to face of fox. With sewing needle and matching thread, sew buttons to face for eyes. Sew side seams. Sew shoulder straps behind ears to secure. Weave in ends.


Read NextBaby Red Riding Hood
Your Recently Viewed Projects
Thanks for your comment. Don't forget to share!
Susan S
Aug 08, 2018
Well, this takes me back to the days when I used to make my daughters' Halloween costumes instead of buying them. And by adding a blouse underneath it can be worn through the winter.
Report Inappropriate Comment
Are you sure you would like to report this comment? It will be flagged for our moderators to take action.
Thank you for taking the time to improve the content on our site.