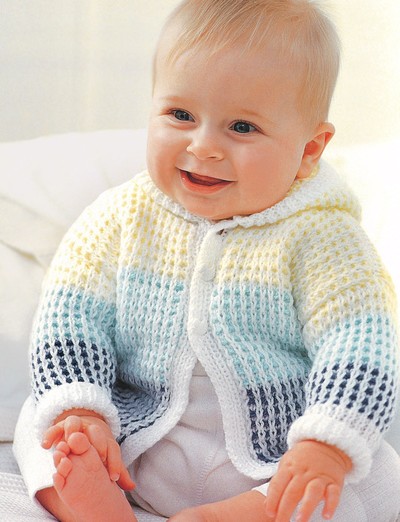
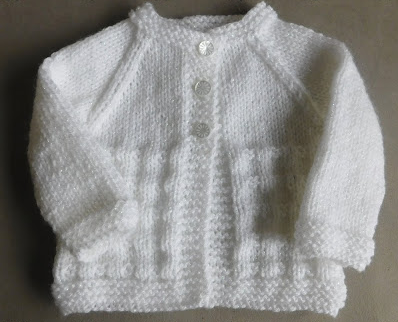
Baby's Flower Lace Cardigan

Charming lace details combine with darling flower embroidery to create a baby cardigan pattern your family is sure to treasure for years. Baby's Flower Lace Cardigan is an heirloom-quality pattern you'll love knitting from cast-on to cast-off. This pretty baby cardigan is perfect for everyday use or dressier family functions. Baby will love how soft this pretty cardigan is, and you'll love its one-of-a-kind value.

Knitting Needle Size3 or 3.25 mm, 6 or 4 mm
Yarn Weight(3) Light/DK (21-24 stitches to 4 inches)
Materials:
- Astra (50 g/1.75 oz;147 m/161 yds)
- Main Color (MC)(White)
- 0-6 months - 2 balls
- 6-12 months - 2 balls
- 12-18 months - 3 balls
- 18-24 months - 3 balls
- Contrast A (Pink) 1 ball for all sizes.
- Small quantity of Contrast B (Lilac) for embroidery
- Sizes 3¼ mm (U.S. 3) and 4 mm (U.S. 6) knitting needles or size needed to obtain tension
- Cable needle
- 5 buttons
MEASUREMENTS
Chest Measurements
0-6 mons 16 ins [41 cm]
6-12 mons 18 ins [46 cm]
12-18 mons 20 ins [51 cm]
18-24 mons 22 ins [56 cm]
Finished Measurments
0-6 mons 19½ ins [49 cm]
6-12 mons 21½ ins [54 cm]
12-18 mons 23½ ins [60 cm]
18-24 mons 25½ ins [65 cm]

Yrn = yarn round needle
Special Abbreviations:
C2B = slip next st onto cable needle and leave at back of work. K1, then K1 from cable needle.
C2F = slip next st onto cable needle and leave at front of work. K1, then K1 from cable needle.
Cr2R = slip next st onto cable needle and leave at back of work. K1, then P1 from cable needle.
Cr2L = slip next st onto cable needle and leave at front of work. P1, then K1 from cable needle
M1 = make one st by picking up horizontal loop lying before next st and working into back of it.
INSTRUCTIONS
The instructions are written for smallest size. If changes are necessary for larger sizes, the instructions will be written thus ( ).
BACK
With smaller needles and A, cast on 57 (63-71- 77) sts.
1st row: (RS). K1. *P1. K1. Rep from * to end of row.
Break A and join MC.
Cont using MC only as follows:
2nd row: Purl.
3rd row: K1. *P1. K1. Rep from * to end of row.
4th row: P1. *K1. P1. Rep from * to end of row.
Last 2 rows form (K1. P1) ribbing.
Work a further 5 (5-7-7) rows ribbing, ending with WS facing for next row.
Next row: (WS). Rib 7 (7-8-8) sts. *M1. Rib 7 (8-9-10) sts. Rep from * to last 8 (8-9-9) sts. M1. Rib 8 (8-9-9) sts. 64 (70-78-84) sts.
Change to larger needles and proceed in pat as follows:
1st row: (RS). P3 (6-3-6). *C2B. P5. Rep from * to last 5 (8-5-8) sts. C2B. P3 (6-3-6).
2nd row: K3 (6-3-6). *P2. K5. Rep from * to last 5 (8-5-8) sts. P2. K3 (6-3-6).
These 2 rows form pat.
Cont in pat until Back from beg measures 10 (11-12-12½) ins [25.5 (28-30-32) cm], ending with RS facing for next row.
Cast off, placing markers either side of center 24 (26-28-30) sts to mark back neck edge.
LEFT FRONT
With smaller needles and A, cast on 28 (30-34- 38) sts.
1st row: (RS). *K1. P1. Rep from * to last 2 sts. K2.
Break off A and join MC.
Cont using MC only as follows:
2nd row: K1. Purl to end of row.
3rd row: *K1. P1. Rep from * to last 2 sts. K2.
4th row: *K1. P1. Rep from * to end of row.
Last 2 rows form (K1. P1) ribbing.
Work a further 5 (5-7-7) rows ribbing, ending with WS facing for next row.
Next row: (WS). Rib 5 (5-5-7) sts. *M1. Rib 6 (5-6-8) sts. Rep from * to last 5 (5-5-7) sts. M1. Rib 5 (5-5-7) sts. 32 (35-39-42) sts.
Change to larger needles and proceed in pat as follows:
1st row: (RS). P3 (6-3-6). (C2B. P5) 1 (1-2-2) time(s). C2B. P10. (Cr2R. Cr2L) twice. P2.
2nd row: K2. P1. K2. P2. K2. P1. K10. P2. (K5. P2) 1 (1-2-2) time(s). K3 (6-3-6).
3rd row: P3 (6-3-6). (C2B. P5) 1 (1-2-2) time(s). C2B. P7. K2tog. P1. yrn. K1. P2. C2F. P2. K1. P2.
4th row: K2. P1. K2. P2. (K2. P1) twice. K7. P2. (K5. P2) 1 (1-2-2) time(s). K3 (6-3-6).
5th row: P3 (6-3-6). (C2B. P5) 1 (1-2-2) time(s). C2B. P6. K2tog. P1. yrn. P1. (Cr2L. Cr2R) twice. P2.
6th row: K3. P2. K2. P2. K4. P1. K6. P2. (K5. P2) 1 (1-2-2) time(s). K3 (6-3-6).
7th row: P3 (6-3-6). (C2B. P5) 1 (1-2-2) time(s). C2B. P5. K2tog. P1. yrn. P3. C2F. P2. C2F. P3.
8th row: K3. P2. K2. P2. K5. P1. K5. P2. (K5. P2) 1 (1-2-2) time(s). K3 (6-3-6).
These 8 rows form pat.
Cont in pat until Left Front from beg measures 5¼ (6-6¼-6¾) ins [13 (15-16-17) cm], ending with RS facing for next row.
Shape front: Place marker at beg of last row to mark beg of front shaping.
Next row: (RS). Pat 8 (11-15-18) sts. P2tog. C2B. Pat 20 sts. 31 (34-38-41) sts.
Next row: Pat 20 sts. P2. K1. Pat to end of row.
Cont working dec 22 sts in from front edge, as set by last 2 rows, dec 1 st at front slope edge on next and every following alt row until 23 (23- 25-27) sts rem.
Sizes 0-6 and 6-12 months only:Work 1 row even.
Dec 1 st at beg of next and following 2 (0) alt rows. 20 (22) sts.
All Sizes: Cont even in pat until Left Front measures same length as Back to shoulders, ending with RS facing for next row. Cast off.
RIGHT FRONT
With smaller needles and A, cast on 28 (30-34- 38) sts.
1st row: (RS). K2. *P1. K1. Rep from * to end of row.
Break A and join MC.
Cont using MC only as follows:
2nd row: Purl to last st. K1.
3rd row: K2. *P1. K1. Rep from * to end of row.
4th row: *P1. K1. Rep from * to end of row.
Last 2 rows form (K1. P1) ribbing.
Work a further 5 (5-7-7) rows in ribbing, ending with WS facing for next row.
Next row: (WS). Rib 5 (5-5-7) sts. *M1. Rib 6 (5-6-8) sts. Rep from * to last 5 (5-5-7) sts. M1. Rib 5 (5-5-7) sts. 32 (35-39-42) sts.
Change to larger needles and proceed in pat as follows:
1st row: (RS). P2. (Cr2R. Cr2L) twice. P10. C2B. (P5. C2B) 1 (1-2-2) time(s). P3 (6-3-6).
2nd row: K3 (6-3-6). (P2. K5) 1 (1-2-2) time(s). P2. K10. P1. K2. P2. K2. P1. K2.
3rd row: P2. K1. P2. C2F. P2. K1. yrn. P1. Sl1K. K1. psso. P7. C2B. (P5. C2B) 1 (1-2-2) time(s). P3 (6-3-6).
4th row: K3 (6-3-6). (P2. K5) 1 (1-2-2) time(s). P2. K7. (P1. K2) twice. P2. K2. P1. K2.
5th row: P2. (Cr2L. Cr2R) twice. P1. yrn. P1. Sl1K. K1. psso. P6. C2B. (P5. C2B) 1 (1-2-2) time(s). P3 (6-3-6).
6th row: K3 (6-3-6). (P2. K5) 1 (1-2-2) time(s). P2. K6. P1. K4. P2. K2. P2. K3.
7th row: P3. C2F. P2. C2F. P3. yrn. P1. Sl1K. K1. psso. (P5. C2B) 2 (2-3-3) times. P3 (6-3- 6).
8th row: K3 (6-3-6). (P2. K5) 2 (2-3-3) times. P1. K5. P2. K2. P2. K3.
These 8 rows form pat.
Cont in pat until Right Front from beg measures 5¼ (6-6¼-6¾) ins [13 (15-16-17) cm], ending with RS facing for next row.
Shape front: Place marker at end of last row to mark beg of front shaping.
Next row: (RS). Pat 20 sts. C2B. P2togtbl. Pat 8 (11-15-18) sts. 31 (34-38-41) sts.
Next row: Pat to last 23 sts. K1. P2. Pat 20 sts.
Cont working dec 22 sts in from front edge, as set by last 2 rows, dec 1 st at front slope edge on next and every following alt row until 23 (23- 25-27) sts rem.
Sizes 0-6 and 6-12 months only:Work 1 row even.
Dec 1 st at end of next and following 2 (0) alt rows. 20 (22) sts.
All Sizes: Cont even in pat until Right Front measures same length as Back before shoulders, ending with RS facing for next row. Cast off.
SLEEVES
With smaller needles and A, cast on 29 (31-33- 37) sts.
1st row: (RS). K1. *P1. K1. Rep from * to end of row.
2nd row: Purl.
Break A and join MC.
3rd row: (RS). K1. *P1. K1. Rep from * to end of row.
4th row: P1. *K1. P1. Rep from * to end of row.
Last 2 rows form (K1. P1) ribbing.
Work a further 5 (5-7-7) rows in ribbing, ending with WS facing for next row.
Next row: (WS). Rib 2 (3-1-3) st(s). *M1. Rib 4 (3-3-3) sts. Rep from * to last 3 (4-2-4) sts. M1. Rib 3 (4-2-4) sts. 36 (40-44-48) sts.
Change to larger needles and proceed in pat as follows:
1st row: (RS). P3 (5-7-9). (C2B. P5) 4 times. C2B. P3 (5-7-9).
2nd row: K3 (5-7-9). (P2. K5) 4 times. P2. K3 (5-7-9).
These 2 rows form pat.
Cont in pat, shaping sides by inc 1 st at each end of next and every following 4th row until there are 46 (52-58-64) sts, taking inc sts into reverse stocking st.
Cont even in pat until Sleeve from beg measures 5½ (5¾-6¼-7) ins [14 (14.5-16-18) cm], ending with RS facing for next row.
Cast off.
FINISHING
Sew shoulder seams.
Button Band: With smaller needles and MC, cast on 7 sts.
1st row: (RS). K2. P1. K1. P1. K2.
2nd row: K1. (P1. K1) 3 times.
Rep these 2 rows until band, when slightly stretched, fits up left front edge to shoulder and then across to center back neck, sewing in place as you work and ending with RS facing for next row. Cast off.
Mark positions for 5 buttons on this band with first to come ½ inch [1 cm] up from cast-on edge, last to come ½ inch [1 cm] below beg of front shaping and rem 3 buttons evenly spaced between.
Buttonhole Band: Work as given for Button Band with the addition of 5 buttonholes to correspond with button markers.
Make buttonhole (RS): K2. P1. K1. yfwd. K2tog. K1.
Sew ends of bands tog at center back neck.
Place center of cast-off edge of Sleeves to shoulder seams, then sew Sleeves to Back and Fronts. Sew side and sleeve seams. Sew on buttons to correspond to buttonholes.
Embroider flowers onto Fronts as illustrated.
With A, embroider flowers by working 9 lazy daisy stitches radiating out from one point.
With B, embroider straight stitch stems and lazy daisy stitch leaves.


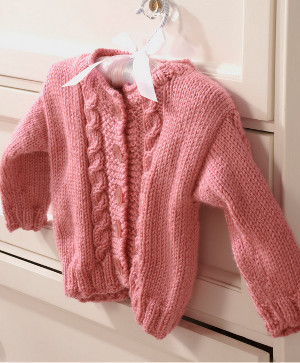
Read NextPink Princess Cardigan
Your Recently Viewed Projects
Thanks for your comment. Don't forget to share!
lisadnash 6756051
May 29, 2021
I have found a way through the front shaping, not sure it is how they intended but it looks ok, keep the lace pattern correct decrease from the purl before it, after a while you will cross the one set of cable, I then continued this line as a single knit to enable it to move with the decreases, I also dropped the decrease at armhole which didn't make sense where it was either
LENNYZIC 4228417
Sep 08, 2015
I am having problems with the front instructions. When it comes to "shape the fronts" the dec. doesn't make sense. Pattern 20 sts C2B, P2togtbl, Pattern 18 sts. Decreasing this way the cables will eventually come together. Is this correct?
ddlb57 7074824
Dec 02, 2015
I too am having problems with the front, did you get the answers to do this? please let me know thanks
suepret 8590600
Jul 25, 2017
i am also having problems with left front at armhole shapeing any corrections yet
Lisa
Jan 21, 2021
There is a better picture of the front on the yarnspiartions website, it does show that the cables do come together and intertwine on the front of the cardigan, it's called the Patons Pretty Cardigan 0=6 months on their website.
Ahmckoy 5477922
Jul 31, 2015
I agree with Dulcie. I am about to give up too because of the front instructions. Please ca some one clarify the decreases 22 stitches in!
mariefreer 9180966
Jun 07, 2015
is there anyone out there, that knows if this Pattern for the Baby's Flower Lace Cardigan has been corrected ??? As I would like to knit this Cardigan,
dulcietrowbridge 7 709410
Jun 04, 2015
To complete the front left, I need to know whether you continue decreasing on the underarm side or whether you do it only the one time "Cont working dec 22 sts in from front edge, as set by lasts 2 rows, dec 1 st at front slope edge on next and every following alt row..." Do you do both dec at the same time? The first dec just narrows the space between the ribs along the non-sloping edge." Please clarify this for me.
kingdavidmeg 72595 14
Mar 24, 2015
Yes, I started it, but then I realized the back had only 2 rows for the able pattern which only gives 1/2 of the cable pattern. The front part has 8 rows (after you switch to the larger needle). Would you please review this and correct it?
kingdavidmeg 72595 14
Mar 24, 2015
I started to knit it-our correspondence is not coming up on the page. I can only see what is showing in the box.
Editor JD
Sep 08, 2014
Hi Knitters, Thank you for notifying us of missing pattern information. Please find the updated abbreviations above. -Editors of AllFreeKnitting
DEBWARNER 8959002
Sep 06, 2014
I agree with both comments posted Cr R and Cr L are missing from the glossary I looked at tutorials online and there were several methods given The ones I found to work the best are Cr R - k tog but don't drop the sts k the st st righthand st of the ktog the drop both Cr L - k into the back of nd st but don't drop k into back of both st nd st and one preceding it then drop both My biggest problem now is the dec of the left front Can someone explain the instruction Cont working dec sts in from front edge as set by lasts rows dec st at front slope edge on next and every following alt row Do you do both dec at the same time The first dec just narrows the space between the ribs along the non-sloping edge…Read More The dec along the sloping edge doesn't work because the st on the WS don't match those on the RS once the dec begins PLEASE can someone decipher these instructions for me
jefferylizliz 4516 445
May 17, 2015
This is my biggest problem too, it is driving me crazy I think that I will have to give up ....
dianam1980 4964583
Sep 05, 2014
I've just finished this baby cardigan, with a bit of hassle i got left and right in reverse of what picture looks like, i've ripped it back to beginning of shaping have tried different ways to get design to front but to no avail. Wrecking my head, so i think i leave as is. If anyone could help be much appreciated.
Jackyrowan 2330913
Jul 18, 2014
Some of the abbreviations are missing so I was unable to knit this garment, very disappointed.
Report Inappropriate Comment
Are you sure you would like to report this comment? It will be flagged for our moderators to take action.
Thank you for taking the time to improve the content on our site.