Sunshine Knit Baby Socks
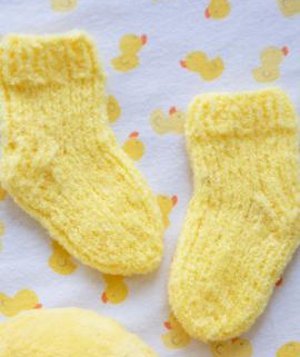
Keep baby's tootsies warm and covered in the Sunshine Knit Baby Socks. These happy yellow knit baby socks are perfect for post-bath time and pre-bedtime changing routines. These tiny little socks require just one ball of Red Heart Plus Baby Yarn in Lemon, so they knit up fairly quickly. The Sunshine Knit Baby Socks make a great baby shower present for any mother-to-be.

Knitting Needle Size6 or 4 mm, Double-Pointed Knitting Needles (DPNs)
Yarn Weight(5) Bulky/Chunky (12-15 stitches for 4 inches)
Materials:
- RED HEART® Plush Baby™: 1 ball 9251 Lemon
- Susan Bates® Double-pointed needles: one set 4mm [US 6]
- Yarn needle
- Stitch marker
GAUGE: 18 sts = 4” [10 cm]; 24 rows = 4” [10 cm] in St st with larger needles.
CHECK YOUR GAUGE. Use any size needles to obtain the gauge
Directions are for size 6 months
Special Stitches
K2tog = Knit 2 sts together.
P2tog = Purl 2 sts together.
SSK = Slip next 2 stitches, one at a time as if to knit, to right needle, insert point of left needle through front of sts, knit these sts
together through back loop.
WYIB =With yarn in back.
WYIF = With yarn in front.
SOCK (Make 2)
Cuff
Cast on 20 sts. Divide sts evenly around needles. Join to work in rounds, being careful not to twist sts. Place marker for beginning of round.
Round 1: *K1, p1, repeat from * around.
Repeat Round 1 until piece measures 1” [2.5 cm] from beginning.
Leg
Next Row: Work in Stockinette st (knit every row) until leg measures 2½” [6 cm] from beginning.
Divide sts around needles as follows:
Needle 1: 5 sts.
Needle 2: 10 sts.
Needle 3: 5 sts.
Heel Flap
Knit across needles #1 and #2.
Working on needle #2 only, and starting with a wrong side row
Row 1 (Wrong Side): Slip 1 wyif, p9.
Row 2 (Right Side): *Slip 1 wyib, k1; repeat
from * across row.
Repeat Rows 1-2, 3 times more.
Heel
Continuing on needle #2 only.
Row 1 (Wrong Side): Slip 1 wyif, p4, p2tog, p1, turn.
Row 2 (Right Side): Slip 1 wyib, k1, ssk, k1, turn.
Row 3: Slip 1 wyif, p1, p2tog, p1, turn.
Row 4: Slip 1 wyib, k2, ssk, k1, turn
Row 5: Slip 1 wyif, p3, p2tog, turn.
Row 6: Slip 1 wyib, k2, ssk—4 sts remain.
Do not turn.
Gusset
With right side facing, using needle #2, pick up and knit 5 sts along the edge of the Heel Flap. Using new needle, knit across needle #3 and needle #1 combining sts onto one needle. Using another needle, pick up and knit 5 sts along opposite side of Heel Flap, then knit across first 2 sts of heel. The two needles hold 7 sts each and third needle holds 10 sts—24 sts. The new beginning round is at the center of the heel (between the two needles that have 7 sts each).
Work Heel Gusset decrease rounds as follows
Round 1
New Needle 1: Knit to last 3 sts, k2tog, k1.
New Needle 2: Knit all sts.
New Needle 3: K1, ssk, knit to end.
Round 2: Knit all sts.
Repeat Rounds 1-2 until 20 sts remain—5 sts
on needles #1 and #3, 10 sts on needle #2.
Foot
Work even until foot measures 2½” [6 cm] from picked up Gusset sts.
Shape Toe
Round 1
Needle 1: K to last 3 sts, k2tog, k1.
Needle 2: K1, ssk, k to last 3 sts, k2tog, k1.
Needle 3: K1, ssk, k to end.
Round 2: Knit all sts.
Repeat rounds 1-2, 1 time more.
Repeat round 1 only until 8 sts remain—2 sts on needles #1 and #3, 4 sts on needle #2.
Using needle #3, knit across needle #1 so that there are 2 needles, each with 4 sts.
FINISHING
Graft toe sts together as explained below, weave in ends and block lightly.
Grafting
Thread yarn needle with long length of yarn. Hold the two needles in the left hand with wrong sides together. Keeping the yarn needle and yarn under the points of the knitting needles, graft the stitches together as follows:
*1. Insert yarn needle through first st of front needle as if to knit and slip the st off.
2. Insert needle through 2nd st of front needle as if to purl, but leave the st on the needle.
3. Insert yarn through first st on back needle as if to purl and slip the st off.
4. Insert yarn through 2nd stitch on back needle as if to knit, but leave st on needle. Repeat from * until all the sts are joined.
Take care to draw yarn up so that gauge of grafting equals gauge of knitting. Fasten off. Weave in ends on wrong side.

Read NextCandy Shoppe Baby Booties
Your Recently Viewed Projects
Thanks for your comment. Don't forget to share!
h2ocolor2001 27558 94
Sep 10, 2017
The pattern needs to be rewritten and number of stitches adjusted. Once you get to the heel flap the number of stitches is off. I had to k2tog in order to end with the correct amount of stitches.
FireFightersMoM
Jul 17, 2017
Have you always wanted to learn to knit socks? Here is the perfect pattern to start or improve your skills. Always a good idea to start on a small pattern I personally think to learn on. Here you go, make several and donate to the local hospital or birthing center.
jennastipanovic 96 57621
Jul 13, 2016
I'm a beginner and never made socks. I'm stuck. at the end of the heel flap section, I have 10 stitchs, But at the end of the fist row of the heel section, there's only instructions for 8 stitches. I don't know how I was supposed to get to 8 stitches. when I do this row as written, I end up still having two stitches left on my needle and I don't know what to do with them, or if a line was left out. Hope some one can help me out.
Report Inappropriate Comment
Are you sure you would like to report this comment? It will be flagged for our moderators to take action.
Thank you for taking the time to improve the content on our site.