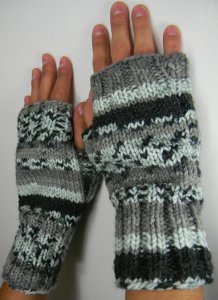
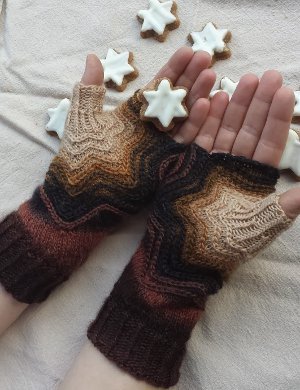
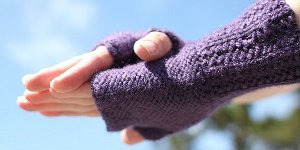
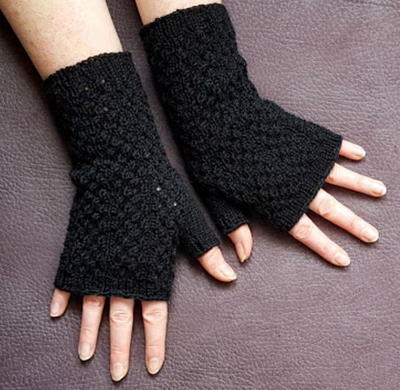
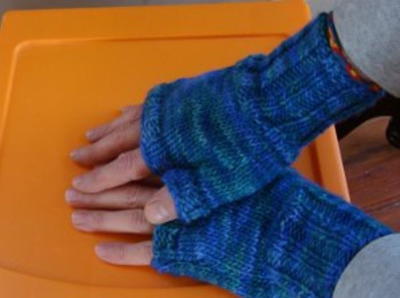
How to Knit Fingerless Gloves (in Two Hours)
Learn how to knit fingerless gloves in a short amount of time with this easy step-by-step tutorial.

If you've ever wondered how to knit a pair of fingerless mittens, this is the pattern for you. Courtesy of this free knitting pattern from Onix Terevinto, you'll be able to whip up a pair of your very own Two Hour Fingerless Gloves in a short amount of time.
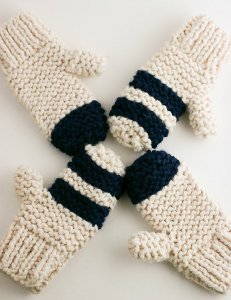
Keep hands and wrists extra toasty while driving just by donning these stylish and colorful mitts. If you've got some extra yarn lying around, patterns for gloves like this one are a great stash buster and quick knit!
This is a great project for the cold months. You can knit these in a couple of hours, depending on your skill level I used worsted wool and straight knitting needles #6. You can adjust the pattern for circular needles. Make two. This size fits a regular size hand.
If you love these knitting patterns, be sure to subscribe to our newsletter to get amazing knitting patterns like these delivered to your inbox every day!

Knitting Needle Size6 or 4 mm
Yarn Weight(4) Medium Weight/Worsted Weight and Aran (16-20 stitches to 4 inches)
Pattern
Cuff
CO 36 sts
(K2, p2), repeat for about 3 inches.
Palm
Row 1: (K9, m1), repeat ( ) across (40 sts)
Row 2: P all sts
Row 3: K all sts
Thumb Increasing
Row 1: K18, kfb, k2, kfb, k18
Row 2: P all sts
Row 3: K all sts
Row 4: P all sts
Row 5: K18, kfb, k4, kfb, k18
Rows 6-8: Repeat rows 2-4
Row 9: K18, kfb, k6, kfb, k18
Rows 10-12: Repeat rows 2-4
Row 13: K18, kfb, k8, kfb, k18
Rows 14-16: Repeat rows 2-4
Row 17: K18, kfb, k10, kfb, k18
Row 18: P all sts
Row 19: K all sts
Working the Thumb
Row 20: K18 and slip those sts to a holding needle. K14 sts and leave them on the needle. Then slip the remaining 18 sts to the other holding needle.
The following rows will be knit from the 14 sts still on the needle.
Row 21: P all sts
Row 22: K all sts
Rows 23-26: (K2, p2), repeat ( ) across.
Bind off
Remaining Palm & Finishing
Pick up 18 sts from one of the holding needles.
Row 1: P all sts
Row 2: K all sts
Rows 3-6: (K2, p2), repeat ( ) across
Bind off.
Repeat this for the other 18 sts on the other holding needle.
Sew seams together using your preferred method.
Up Next:
More Fingerless Glove Knitting Patterns
What's the quickest pattern you've ever knit?
Read NextBasic Knit Hand Warmer
Your Recently Viewed Projects
Thanks for your comment. Don't forget to share!
Lisa
Dec 31, 2017
I have made these but it took far longer than 2 hours because I had to fix the mistakes as I went. What I believe is the problem is that the pattern seems to have originally written to be made in the round and was incorrectly translated to be worked flat. There are no complicated adjustments just a few common sense ones.
Castrily 3383119
Dec 30, 2017
After realizing the pattern is wrong, I spent 20 minutes adjusting and they are beautiful. I'm on a third pair. so quick and easy. worth the extra effort.
linda25g 7827967
Dec 24, 2017
yes this pattern is badly written! however it doesn't need some of the complicated adjustments already given. Read increase rows as purl rows, increase a stitch by 'purling' into front and back of stitch. T work the thumb, knit 32 stitches (18 plus the 14 for thumb), turn andwork 14 stitches as given for thumb, when thumb is long enough (I did 6 rows of rib) cast off. Then rejoin wool to the 18 stitches on your left needle, knit to end. Continue with 36 stitches to end. Creates a perfect thumb.
patsysdaycare 1158 687
Oct 04, 2017
no!!! you cannot k 2 rows in a row and have a st stitch!! pattern needs adjusted
mado
Jul 02, 2017
Stay away from this pattern I am an expert knitter terrible info I would say no star
mulberrygalprinces s
Feb 20, 2017
I admit I am not an expert knitter but there is something very wrong with this pattern. I tried it three times and that's it. In the time I played with this I could have crocheted a pair. I have made a lot doing that but though knitting a pair would e different. Different it was!!
craftedbyfox
Jan 14, 2017
Although the project says easy be aware if you are a beginner knitter as the instructions are very difficult to follow, it states no gauge and you need to measure the knitting rather than following fixed rows. There are rows where if you follow the pattern you would have 2 knit rows together and so you need a certain skill level to be able to predict what the project will look like before following it. Although I am a fairly advanced knitter it took me longer than 2 hours as I made a few mistakes and had to rewrite parts of the pattern whilst knitting. There are many more fingerless glove patterns on this site that are much more suitable for novice knitters.
Lisa
Oct 22, 2018
There are several errors in the pattern and even more on here as corrections. I would not recommend this pattern to a beginner, there are too many mistakes and a beginner might think its their fault when it doesn't turn out correctly.
emi
Dec 03, 2016
The basic idea is probably good, but this pattern needs to be adjusted for smaller hands. After reworking a few times, It came out better just working straight to the end without increases, not bothering with the thumb shaping, just leave a thumb opening in the seam.
3cats2love
Jan 16, 2017
I knitted a pair of fingerless gloves like what you described, from another pattern. It had just a thumb opening in the seam so the fit was not as important. I also think it's good to have the thumb free if you are typing or doing other hand work (like knitting!).
annbethbrown 13550 87
Jan 17, 2016
I think it will take a lot longer than two hours to complete,maybe five at my pace, but they are just right for me.
pjb 7689571
Dec 12, 2015
Is there a corrected version of the pattern? Is the thumb row increase and second increase row the same, as in amount of sts in the rows?
dube3 4612357
Feb 16, 2015
I changed my needle sizes to 3.75 for the ribbing and then4 mm for the body. It makes for a smaller glove that fits better
diny62000 1577640
Jan 02, 2015
I am up to the point where you place the last remaining 18 stitches on a second holding needle. (and yes I have several purl rows showing where the increases were). At this point my yarn is at the end of the needle where the 18 stitches are. How do I get to back to the thumb section to begin the "work the thumb"? Do I pull it out of the other end of the yarn ball? Or am I supposed to just take it around (rs or ws) to where thumb is and continue.???? I almost want to put the thumb on the holding needle and do the sides first.
Lisa
May 05, 2015
Usually you would join a new ball and start knitting from where you are directed to in the pattern. The way the pattern is written you can't knit the sides first, in order for the pattern to turn out accordingly and for the thumb to be properly attached, you must work it first as directed in the pattern. Hope this helps.
knotthemama
Dec 17, 2014
why can't I print the 2 hr fingerless gloves. When I click on print the instructions disappear and page becomes blank. Anyone else have this issue?
Editor JD
Dec 18, 2014
Hi knotthemama, We just clicked through to the pattern PDF and have verified that the print function still works. Please click through to the pattern, right click on the PDF, and then select print. You should see a preview of the pattern page before you click OK. Hope this helps! -Editors of AllFreeKnitting
louisevoss 7021831
Dec 14, 2014
Pattern is definitely wrong as someone said below - it's missing some purl rows otherwise wouldn't be stockinette stitch. I just switched some purl and knit rows and it was fine. Easy pattern.
kinivan06 8826295
Oct 28, 2014
The directions do NOT match the picture of the fingerless gloves. The picture clearly shows the glove to be knit in the stockinet stitch; however the directions would have a row showing purled stitches every time an increase was made.
Editor JD
Oct 30, 2014
Hi kinivan06 8826295, The picture we have shown is the picture that the designer has provided. We encourage you to upload your own picture of the finished product! Happy knitting! -Editors of AllFreeKnitting
kookashay
Sep 07, 2014
I've just cast off the thumb stitch. I'm a beginner; not sure how to proceed from there. I know normally when you cast off, you cut the working yarn and pull it through, but I can't do that here because there's more work to finish up. How do I move on to the remaining work to finish it after having finished the thumb? Thank you!
Lisa
Sep 27, 2014
you will cut the yarn and pull it throught just to finish the thumb. After you have completed the thumb, you go back to the stitches on the holding needle and put them back on the knitting needle and follow the directions for these stitches until they are cast off and repeat this for the second holding needle and sew accordingly to make up. you are basically ending in one part of the pattern and restarting the other two, this is so each necessary part is knit separately to be sewn together later. Hope this helps. Happy knitting.
pdpictureshurst 13 75264
Sep 05, 2014
I would like very much to knit these gloves, but I find that the pattern is missing some purl rows. Please make it more clear which rows are increase rows for the thumb and include a purl row. If you could lay it out row by row that would be great. Thanks, Suzy
Editor JD
Sep 08, 2014
Hi pdpictureshurst 1375264, We suggest contacting the designer of this pattern if you're having trouble. Thanks!
ritakontny 8205413
Aug 23, 2014
Hello! I love this pattern but it was a little big for my hands. What is the best way to make it smaller?
Lisa
Aug 25, 2014
The best way to make this pattern smaller would be to go down in yarn weight by one and change the needles size to accommodate the change in yarn. hope this helps.
ritakontny 8205413
Aug 21, 2014
I hope my comment made it on here. I do not see it yet. It is about the part of the second holding needle. Do you knit those last 18 stitches before putting them on the holder or not. Since we do on the first 18 I assume we do but I want to be certain. Thank you, rita
Lisa
Aug 25, 2014
No, those stitches are going straight to the holder without being worked. Hope this helps.
ritakontny 8205413
Aug 21, 2014
Just one question. The second part under the 5th decrease.after putting 18 stitches on a holder and Then knitting 14 more and leaving them on the needle do we knit the last 18 and put them on a second holding needle or just put them on without knitting them?? Thank you! I love this pattern so I want to be sure I finish it right!
Lisa
Aug 25, 2014
No, you do not knit them-they go straight to the holder without being worked. Hope this helps.
fsherwood 6113206
Jul 20, 2014
What are the misprints on this pattern? Also, after binding off the thumb section, what do I do with the yarn? Cut it off? Also how do I pick up and knit the remainder of the stitches to finish the mitt?
Lisa
Aug 25, 2014
There are no misprints in the pattern, it is all there and correct-I've made dozens of these. After you cast off, you continue with the pattern, after you cast off the thumb, you still have stitches being held on the other holder, just continue with the pattern as instructed.
petservices 348251 8
Jul 05, 2014
I can't get the pattern to come up I would like to make them Winnie
Editor AH
Jul 07, 2014
Click "Click here for knitting pattern," and a PDF with the pattern should open in a new browser window. We just tested the link and it is working correctly. Editors of AllFreeKnitting
gaylepotgieter 679 0794
Jul 05, 2014
Thank you .Its just what I need for our cold Winter here in SA. special for computer. Gayle
Editor AH
Jul 03, 2014
This quick pattern would make a great last-minute gift.
Lisa
Jul 13, 2014
you generally do not cut the yarn unless the pattern states to. using several holding needles means that while on stitches are on a holder you will be using the others, so you wouldn't cut the yarn until the first cast off. hope this helps.
knitbysuzette 2870 211
Mar 12, 2014
Even taking into consideration the minor misprints on the pattern, this is an awesome pattern that even a beginner knitter can make. :)..I have made over 6 pair of these and have not had to change a thing.
kmartin4452 211017 5
Feb 13, 2014
Do you actually have to cut the yarn to pick up the stitches from the holding needles? Can't wait to get started
Lisa
Jul 13, 2014
you generally do not cut the yarn unless the pattern states to. using several holding needles means that while on stitches are on a holder you will be using the others, so you wouldn't cut the yarn until the first cast off. hope this helps.
kmartin4452 211017 5
Feb 13, 2014
Can't wait to get started. Do you cut the yarn before you work the yarn on the stitch holders?
kmartin4452 211017 5
Feb 13, 2014
Do you have to cut the yarn to pick up the stitches from the holding needles?cant wait to get started.
myj697 2587542
Dec 13, 2013
Dear Onix Terevinto, please make corrections to this pattern. New knitters are having a hard time. The corrections would make this pattern an excellent one.
brood 4510614
Nov 09, 2013
I ended up liking the stitch pattern and used it to bind off as well, If you want stockinette, just be sure to increase on the knit row and purl on the back side. The pattern actually works as in the picture, if you make sure to remain in stockinette when you are increasing. I think that is the error, but the pattern is also nice when you knit the purl row and come up with a raised stitch. It would make a nice place to contrast with another color for a striped effect. This size seems to work well for my hand. I wear a medium size woman's glove, for comparison. I have finished one and will duplicate it, errors and all, but for the next pair I will make the adjustments mentioned above.
brood 4510614
Nov 07, 2013
Thanks for the corrections and comments. I thought it was me, but not realize that it is the pattern and found the changes helpful. I may adapt it further and actually the stitch that the pattern created is kind of interesting, but I too noticed that the picture is of stockinette. I will see if I can get by with what I have done. It was going great until I got to shaping the thumb. Bobbi
Lisa
Oct 29, 2013
It really amazes me to come on here everyday and see so many people blame the shortcomings of their skills, their computers etc. for things not going their way. Enough already-All Free Knitting simply hosts the links to free patterns for people to use-it is not up to them to control Ravelry or make changes to someone else's creations-if you have issues or find errors, you should contact the creator directly-they are the ones that need to know there is a problem.
Member 6234380
Oct 02, 2013
I said the comment was not very nice as all patterns are donated for free and no one is forcing you to knit them
neeruamnite 055350 5
Oct 01, 2013
I haven't knitted these gloves yet but I was wondering if all you knitters were aware of the fact that knitting needles are not sized the same way in every country, like clothes and shoes they vary in numbers Hope this can help Maureen
beachkoz
Oct 17, 2013
Does the millimeter size help? I know European needles are numbered differently than American, but I would think if the millimeter is known it would be easy to translate. No?
Member 6234380
Oct 18, 2013
Hi Beachcoz Most of the needle conversion charts list all 3, there are many online. This one is set out well http://www.laughinghens.com/knitting-needle-sizes.asp Maureen
tiffyanntoo 619165 8
Sep 25, 2013
I've knitted for years but can't understand this pattern. When you follow it you are not doing a stockinette stitch as it is shows in the picture. You have a bump as there are two knit rows together? I gave up - sorry. t
kassandrarahl 2729 053
Sep 26, 2013
This pattern needs major corrections Good foundation but it's taken me forever to get everything together the way it should be Here's what I did differently Cast on stitches K P until piece is for me that was rows Next row is a knit row I knitted one stitch then did an increase on the next stitches knit until stitches from end stitch from end I increased and finished the row Next purl row knit row purl row Knit stitches increase k increase knit to end of row Purl row knit row purl row Knit stitches increase k increase knit to end of row Purl row knit row purl row Knit stitches increase k increase knit to end of row Purl row knit row purl row Knit stitches increase k increase knit to end Purl row knit row purl row Optional th increase I have long hands so I've done this…Read More Knit stitches increase k increase knit to end Purl row Knit stitches put on a holding needle Knit leave them on the needle Knit and put on a second holding needle Work thumb center needle Purl row knit row do rows of k p ribbing and bind off Holding needle purl row knit row purl row k p ribbing for rows bind off Repeat for second holding needle Good luck all
StacyV
Aug 12, 2015
Thank you for putting the corrections in this pattern for those of us that struggle to begin with!!! I for one am grateful! Thank you a thousand times...
Maurorless
Oct 01, 2013
This coomment is for Kassanadra, who provided the corrections. Thank you for saving me hours of frustration and blaming myself for being too stupid to read a pattern. A generous thing to do.
dec0115 8723253
Sep 02, 2013
why weren't the directions corrected???
Maurorless
Oct 01, 2013
"This comment wasn't very nice!!????" Exactly what was NOT nice about it? I'm glad you said something. I think Ravelry should insist that ALL patterns submitted should have been test knitted and errors corrected. I have spent hours trying to figure out what I was doing wrong only to find that the directions were incorrect. It's very frustrating. I don't think your comment was rude, or "not very nice". It was upfront and honest and I agree with you. Maybe the person who commented that your response "wasn't very nice" is just being touch today;-) Keep sending honest comments!!
rockycreekscotties
Jul 21, 2013
This is a nice pattern and works well on #6 circular needles. You have to modify it a bit as once you finish the K2P2, then all of your other rows are knit rows until you get to the thumb. Someone posted above that there is a mistake in the pattern - and there is - you just have to remember if you are knitting on straight needles to knit a row, pearl a row. Once I figured out the mistake in the pattern, things went good.
atsrks 3819571
Jul 04, 2013
Made one of these and it was way too big. Please suggest a smaller version. Thanx
Allycee
Dec 18, 2012
These gloves are huge. For a smaller hand, cast on 26 stitches instead of 36. Then where it says "knit 18", knit 13 instead. The rest of the pattern can be followed with these substitutions. Also, only do 4 increases, not 5. And remember , in order not to get that ridge...you will need to change where it says "knit 1 row, purl 1 row, knit 1 row" - - it should instead be "purl 1 row, knit 1 row, purl 1 row." A lot of modifications needed. But I DO LOVE THIS PATTERN regardless.
madtrapper20 32634 18
Apr 17, 2013
why didn't you use smaller needles if they turned out big? so for a woman's size you think I should put 26 sts instead of 36? thanks.
craggdavis 7512626
Nov 06, 2012
My granddaughter loves these for riding. I knit both pairs at the same time on long needles until I got to the thumbs. It saves counting. I now have orders for more pairs. Thanks for posting.
ktbndry 2342354
Oct 17, 2012
Sorry did not read the first part of instructions. Found what I need.
ktbndry 2342354
Oct 17, 2012
In new version of 2 needle pattern does increase one still mean in front and back or YO method?
ktbndry 2342354
Oct 17, 2012
I would like to try the pattern, but do not know what is meant by a holding needle. Please explain. Thank you
Allycee
Dec 18, 2012
I didn't know what that was either! So I just used another needle of the same size. You don't have to actually move the stitches onto a separate needle...just count on using four needles of the same size - - 2 for "holding" and 2 to work with. I used one metal set and one wooden set so I could tell which were which.
Perfidious Vixen
Sep 28, 2012
Thank you thank you thank you for posting this pattern! This is very similar to one I used to make years ago, but can't find my copy of the magazine and didn't want to go "by guess and by gosh" as I'm not the patient type. It is getting cold at night here, but my furnace has issues at the moment and it's not warm enough for a wood fire... so it was either knit some of these or give up my internet addiction to Ask.com! Thanks again!
Julie
Feb 15, 2012
The pattern as written above does not produce the picture shown. In the rows after the increases, it is written as knit one row, purl one row, knit one row, followed by knitting a row w/ increases. When knitted with those instructions, there is a ridge on the outside of the glove after every increase row. The rows following the increase row should be PURL one row, KNIT one row, PURL one row, followed by the knitted increase row. The double pointed instructions or the two needle instructions by lyndasings below are accurate.
lyndasings
Feb 18, 2012
Thanks for that reassurance, Julie Tena! I was hoping it would work for someone other than me!
Allycee
Dec 18, 2012
You are totally right, it does leave a ridge. I like a ridge at the first knuckle but not repeatedly at each increase on the hand. Thanks for the workaround. I sorta figured it out as I went along but found myself having to rip out. Also, don't you find that the size of the glove is way too big for most women's hands? I had to take it down from 36 cast-on to a 26 or 28 cast-on to fit my hand, and then reconfigure the entire pattern from there.
lyndasings
Dec 17, 2011
OK here's the definitive version I would delete my previous version but I don't know how If anyone finds any problem with this one I apologize Two Hour Fingerless Gloves adapted for circular or double point needles Materials worsted weight yarn mm needles set of four or one circular needle with very short cord Do all increases by knitting into front and back of same stitch Cast on stitches Divide onto three needles and join being careful not to twist Rows to work in k p ribbing Row k in next stitch increase k in next stitch increase k in next stitch increase k in next stitch increase k there are now stitches Row first increase start of shaping thumb knit stitches onto one needle in next stitch increase k in next stitch increase and keep these stitches on the second needle for the thumb knit the remaining stitches onto the…Read More third needle Rows Knit Row knit in next stitch increase k in next stitch increase second increase makes stitches on second needle knit Rows Knit Row Knit in next stitch increase k in next stitch increase third increase makes stitches on second needle knit Row Knit Row Knit in next stitch increase k in next stitch increase fourth increase total of stitches on second needle knit Row Knit Row Knit stitches and place on a stitch holder or a holding needle knit stitches and keep on the needle transfer remaining stitches onto another stitch holder Divide the stitches onto three needles and join Continue with thumb Row working the thumb only Knit Row Work in k p ribbing Bind off Row Return the stitches on the first stitch holder to the needle Join the yarn and knit across the stitches then knit across the stitches from the other holder dividing the stitches onto three needles Row Knit Rows Work the four rows in k p ribbing and bind off Turn inside out Thread the yarn tail at the thumb onto a yarn needle and weave the yarn down the thumb on the inside There is likely to be a hole at the base of the thumb and this is when you close it Thread the other yarn tail onto a yarn needle and weave in on the inside And you're done No seams to sew
elisekt
Dec 27, 2011
I didn't have trouble until the thumb where it says to cast off. Do you cut the yarn then somehow join and continue knitting? or just bind off and continue. However if you keep on there will be a hole.
lyndasings
Jan 01, 2012
Yes, cut the yarn when you cast off the thumb, but leave a long enough tail that you can thread onto a needle when the rest of the glove is finished. Reattach the yarn to knit the stitches that were on the holder. I do this by making a loop that I knit together with the first stitch, always leaving long enough tails to permit sewing the hole together at the base of the thumb and then weaving in the tail on the back of the work. Hope this helps.
yasmin1 2251477
Dec 07, 2012
Row 37: Knit 18; k 18 Divide the stitches onto three needles. (12 12 12) Row 38 Knit. Rows 39, 40, 41, 42: Work the four rows in k2 p2 ribbing and bind off.
lyndasings
Dec 17, 2011
Well, I have finished a pair of the two hour fingerless gloves. It did not take two hours, it took my spare time for three days while over and over again I came across things in the pattern that just did not work! Many "froggings" and doings over. But I do now have a pair that works. For example, five increases for the thumb makes the glove too big, even with 4 increases it is a bit loose. 14 stitches for the thumb does not work in k2 p2 ribbing, which requires a multiple of 4 stitches. I am going to re-edit the pattern I posted below and will post it again when I am done!
Allycee
Dec 18, 2012
It took me waaaay longer than two hours. Less time of course when I cast on fewer stitches to fit my smaller hand.
lyndasings
Dec 16, 2011
I suggest copying the adapted patterns below onto a new text document. Then do a search for the word "Row" and add hard returns before the word "Row" so that each row is printed on a separate line of text. Easier to follow, and to check off when done. (When comments are uploaded onto the site they do not retain their careful formatting!)
lyndasings
Dec 16, 2011
Same Fingerless gloves pattern adapted for circular or double point needles Hope this helps Materials worsted weight yarn mm needles set of four or one circular needle with very short cord Do all increases by knitting into front and back of same stitch Cast on stitches Divide onto three needles and join being careful not to twist Rows work in k p ribbing Row k in next stitch increase k in next stitch increase k in next stitch increase k in next stitch increase k there are now stitches Row start of shaping thumb knit stitches onto one needle in next stitch increase k in next stitch increase and keep these stitches on the second needle knit the remaining stitches onto the third needle Rows Knit Row knit in next stitch increase k in next stitch increase knit Rows Knit Row Knit in next stitch increase k in next stitch increase…Read More knit Row - Knit Row Knit in next stitch increase k in next stitch increase knit Row - Knit Row Knit in next stitch increase k in next stitch increase knit Row - Knit Row Knit stitches and place on a stitch holder or a holding needle knit stitches and keep on the needle transfer remaining stitches onto another stitch holder Divide the stitches onto three needles and join Continue with thumb Row - working the thumb only knit Row - work in k p ribbing Bind off Thread the tail onto a yarn needle and weave in on the inside Row Return the stitches on the second stitch holder to the needle Join the yarn and knit across the stitches Row Knit across the same stitches adding the stitches from the other stitch holder and dividing the stitches among the three needles Row knit Rows - work the four rows in k p ribbing and bind off Thread the yarn tail onto a yarn needle and weave in on the inside And you're done No seams to sew
lyndasings
Dec 16, 2011
Two needle fingerless gloves Clarified Here's what worked for me Materials worsted weight yarn mm needles split-ring markers Do all increases by knitting into front and back of same stitch Cast on stitches Rows work in k p ribbing Row k in next stitch increase k in next stitch increase k in next stitch increase k in next stitch increase k there are now stitches Row start of shaping thumb knit place marker in next stitch increase k in next stitch increase place marker knit Row Purl Row Knit Row Purl Row Knit slip marker in next stitch increase k in next stitch increase slip marker knit Row Purl Row Knit Row Purl Row Knit slip marker in next stitch increase k in next stitch increase slip marker knit Row Purl Row Knit Row Purl Row Knit slip marker in next stitch increase k in next stitch increase slip marker knit…Read More Row Purl Row Knit Row Purl Row Knit slip marker in next stitch increase k in next stitch increase slip marker knit Row Purl Row Knit Row Knit stitches and place on a stitch holder or a holding needle knit stitches and keep on the needle transfer remaining stitches onto another stitch holder Row working the thumb only purl one row stitches only Row Knit one row Row - work in k p ribbing Bind off leaving a long enough end of yarn for sewing thumb seam Row Return the stitches on the second stitch holder to the needle Join the yarn and knit across the stitches Row Purl across the stitches Rows - work the four rows in k p ribbing and bind off Row Transfer the stitches on the holder to the needle Join the yarn and finish as in rows - above Bind off Sew side seam and thumb seam and weave in ends securely on the inside
wildflowerquilts 6 744126
Feb 08, 2012
I have tried to download this pattern but not successful. Is it possible for you to email it to me. This looks like the perfect pattern the way you put it together. I have been looking for a pattern like this. Thank you for your time in re-doing this pattern.
lyndasings
Dec 15, 2011
I too found the pattern confusing. It seems to work OK if every instruction "knit one row, purl one row, knit one row" is changed to "purl one row, knit one row, purl one row". If followed as written you end up with horizontal stripes of reverse stockinette stitch. It would help to have the rows numbered so the reader knows exactly what to do. I have not finished the first one yet, but I think I will definitely start over on double pointed needles-- seams are a waste of time when an item can easily be knitted without them! I don't think I have ever seen circular needles with a short enough cord for gloves, so it will be dp needles.
virginianne 585595 7
Dec 10, 2011
Thank God, I thought I was going nuts trying to do the gloves and have the other one look alike, I had to make it up as I went along, sure do not look like the picture! Looks like most are having trouble. Virginianne
JennyBee1
Nov 11, 2011
@mabrahams 0326193, I suggest that you try posting your question to our sites Facebook page. It is monitored by the editor and is a great resource for helpful tips and suggestions from our Facebook friends; perhaps they can offer some guidance! Here is the link: http://www.facebook.com/AllFreeKnitting
janereardon 566648 2
Nov 07, 2011
This pattern is terrible. The picture is really nice. But if I followed the pattern it would be a mess so I just winged it! Please proof before posting!!!
denisue
Nov 06, 2011
It doesn't make sense to me.. K row increase 4 sts,, "Purl 1 row, K another row Thumb increase Knit 18... ? If I just K a row before how can I K the next in Stockenett or do you add on the P rows. How many rows between each thumb addition? And are increases only in K rows
NicoleWard11 42684 75
Oct 24, 2011
What kind of yarn would be good for this I'm a novie and I don't know for sure what kind to use.
jella1226 7469028
Sep 04, 2011
Just printed this pattern it is the best... I love the large print ... Cant wait to start knitting...
JessiCAN
Jun 06, 2011
@dsov50 4717156: This pattern is available for download as a PDF. In order to view this file, you may need to install the most recent version of Adobe Acrobat Reader on your computer. You can download the Reader for free at this web address: http://get.adobe.com/reader/ Hope this helps! --Editors of AllFreeKnitting
dsov50 4717156
Jun 04, 2011
Wanted to print the pattern for the two hour fingerless gloves and had a problem getting it to come up. Was really disappointed that I couldn't get the pattern. Looked like they would be fun to make.
Crisdel
Feb 26, 2011
love to make this pattern on a round needle with finer yarn. could you send me directions? I want to wear them to hide age spots and excema yet not be too warm. thank you so much. I am a revived knitter and learning all over again. God bless you
noreensweet1 25497 40
Feb 13, 2011
this is great even for beginners i am looking for these gloves with the finger tips cut off like the thumb just as easy to follow. i know i can follow other gloves but it is too hard is there any patterns out there, thank you nor
almatremblay 01643 10
Jan 13, 2011
I have tried numerous times to get the pattern for th 2 hours fingerless gloves.....WHAT DO I HAVE TO DO THE GET THE PATTERN?
cillyn
Jan 13, 2011
I finally finished a glove and did corrections from the pattern. At the end of each increase where it says knit 1 row then it goes into the next increase with knitting 18, I just didn't knit the row before each increase in the directions. Using # 6 needles instead of 9 really made alot of difference. Good luck to you all making these. They really come out very nice.
addie
Jan 13, 2011
@rmetzke 3688980--I take it back, back, back! I am sorry. reading the pattern it made sense to me, knitting it, I knew what was meant, but it makes no sense if you have not knit a lot of mitten thumbs before. I apologize for my stupid response to you!--------From mittens I have done, thumb increases are every other row----she must mean that, but it is hard to know---you are absolutely, right.----also putting the thumb sts on a holder and knitting all of the other sts, back and forth, to the end (following the pattern) then coming back to the thumb sts and finishing the thumb, is pretty standard and saves you from an extra seam. again-I apologize! addie
addie
Jan 12, 2011
@rmetzke 3688980 What are you talking about? You are going to scare off new knitters from a clear, easy pattern. See if this is clear? The pattern DOES say the first row is done in knit and to increase over this row, then to P the next row. If you do come across a pattern that is not clear... On single points, St st means k 1 row, p 1 row, k 1 row, p 1 row, etc. After the ribbing, the pattern is in St st, starting with a knit row (which is pretty typical). So... Finish rib then.. In St st, knit, increasing sts evenly, across row. Then, what is the 2nd row in St st? P, so purl the next row. I am just sayin'. addie
cillyn
Jan 12, 2011
Are there any correntions that should be on the pattern other thsan using number 6 needles? Before the thumb increase should the knit row be the thumb increase? There shouldn't be TWO knit rows should there? I made the pattern with #9 needles and it was enormous. It's a nice pattern but someone should try and make it and put the corrections on the pattern. Thanks. Cillyn
elisekt
Jan 08, 2011
I thought this would be an easy project, I didn't understand the directions.
rmetzke 3688980
Jan 08, 2011
I don't know why size 9 needles were used as the pattern calls for size 6. I made one mitt last night in record time. Although I don't like 2 seams, especially at the thumb. I may try making these on circular needles & put the thumb stitches on a holder & finish at the end. My comment on the instructions is I found the k1 row, p1 row, k1 row confusing after finishing a knitted increase row. Either this should read p1 row, k1 row, p1 row or clarified that the increase row is the first k1 row called for in the pattern. For the person asking how much yarn it takes, a 4 oz. skein is more than enough. I used a 6 oz. sport weight & probably only used 2 oz. or less.
Crafter 15993
Dec 28, 2010
Very nice fingerless gloves pattern! This is going to be my first time and I can't wait to get started! Thanks for this lovely pattern!
kitty rooney
Dec 24, 2010
I made one of the gloves from this pattern. Size 9 needles makes this mitt that only a giant would wear. I changed to a size 7 and they are so large, I wish I could include the pictures I took of it. These are giantic. I would not recommend making these. I used worsted weight as suggested. What a waste of my time.
shewolf3 4505052
Dec 23, 2010
your pattern on these fingerless gloves looks great! Only one thing wrong it doesn't say how much wool you need to knit these? Can you please correct this so that when I buy some yarn I will know how much I need. Thanks, Susan
Crafter 15993
Nov 09, 2010
Very nice fingerless gloves! I will try this as my first fingerless gloves project. Thank you for the pattern! <3
Report Inappropriate Comment
Are you sure you would like to report this comment? It will be flagged for our moderators to take action.
Thank you for taking the time to improve the content on our site.