Cozy Textured Pullover
This thick, nubby, delicious sweater is the next best thing to a big bear hug. The Cozy Textured Pullover is the perfect knit pullover sweater pattern for a cold, dreary day. Its thick, bumpy texture is pillow soft, leaving you feeling all warm and gooey inside. The Cozy Textured Pullover has beautiful cable and ribbing detail, which adds to its simple elegance. If you don't already have a favorite sweater, this is about to be it.
Knitting Needle Size13 or 9 mm, 15 or 10 mm
Yarn Weight(6) Super Bulky/Super Chunky (4-11 stitches for 4 inches)
Materials:
- 792-381 Lion Brand Homespun Thick and Quick Yarn: Barley - 3 4, 4 Balls
- Lion Brand Knitting Needles- Size 13 [9 mm]
- Lion Brand Knitting Needles- Size 15 [10 mm]
- Lion Brand Cable Needles (Set of 2)
- Lion Brand Split Ring Stitch Markers
- Lion Brand Large-Eye Blunt Needles (Set of 6)
- Matching smooth yarn for sewing, if desired
Measurements:
Adult (Multiple Sizes) XS/S (M/L, 1/2X)
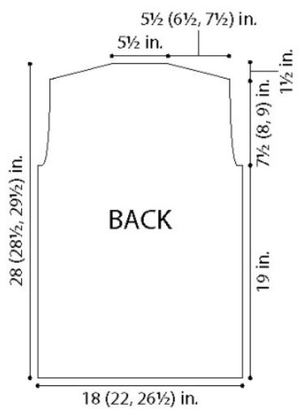
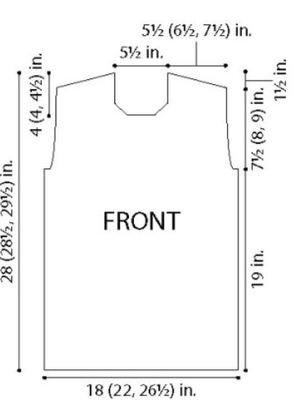
Finished Chest: 36 (44, 53) in. (91.5 (112, 134.5) cm)
Finished Length: 28 (28 1/2, 29 1/2) in. (71 (72.5, 75) cm)
Abbreviations:
beg = begin(s)(ning)
k = knit
k2tog = knit 2 together
p = purl
p2tog = purl 2 together
rem = remain(s)(ing)
rep = repeat(s)(ing)
RS = right side
St st = Stockinette stitch
st(s) = stitch(es)
WS = wrong side
Gauge: 9 1/2 sts = 5 in. (12.5 cm) + 10 rows = 4 in. (10 cm) in St st (k on RS, p on WS) with larger needles.
12 sts = about 5 in. (12.5 cm) in Center Cable pattern.
BE SURE TO CHECK YOUR GAUGE. When you match the gauge in a pattern, your project will be the size specified in the pattern and the materials specified in the pattern will be sufficient. If it takes you fewer stitches and rows to make a 4 in. [10 cm] square, try using a smaller size hook or needles; if more stitches and rows, try a larger size hook or needles.
Stitch Explanation:
5/5 LC (5 over 5 left cross)
Slip 5 sts to cable needle and hold in front, k5, then k5 from cable needle.
kfb (knit in front and back)
Knit next st without removing it from left needle, then k through back of same st - 1 st increased.
M1P (make 1 st as if to purl)
An increase worked by lifting the horizontal strand lying between the needles and placing it onto the left needle. Purl this new stitch through the back loop - 1 st increased.
PATTERN STITCH
K1, p1 Rib (worked over an odd number of sts)
Row 1 (RS): K1, *p1, k1; rep from * to end of row.
Row 2: K the knit sts and p the purl sts. Rep Row 2 for K1, p1 Rib.
Notes:
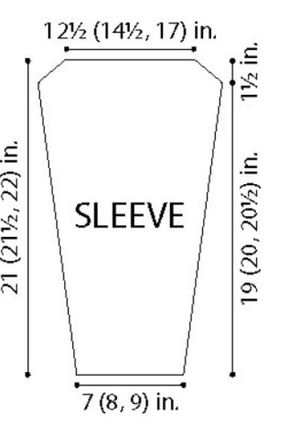
- Pullover is worked in 4 pieces: Back, Front and 2 Sleeves.
- When you see 'as established' in the instructions, this means to continue in the current pattern st.
Instructions
 BACK
BACK
With smaller needles, cast on 33 (41, 49) sts.
Work in K1, p1 Rib until piece measures 3 in. (7.5 cm) from beginning, end with a RS row.
Note: End with a RS row means that the last row you work should be a RS row.
Change to larger needles.
Increase Row (WS): P17 (21, 25), M1P, p16 (20, 24) - 34 (42, 50) sts at the end of this row.
Work in St st (k on RS, p on WS) until piece measures about 19 in. (48.5 cm) from beg, end with a WS row.
Shape Armholes
Row 1 (RS): Bind off 1 (2, 3) st(s), k to end of row - 33 (40, 47) sts at the end of this row.
Row 2: Bind off 1 (2, 3) sts, p to end of row - 32 (38, 44) sts at the end of this row.
Rows 3 and 4: Rep last 2 rows once more - 30 (34, 38) sts at the end of Row 4.
Work even in St st until armholes measure 7 1/2 (8, 9) in. (19 (20.5, 23) cm), end with a WS row.
Shape Shoulders
Row 1 (RS): Bind off 5 (6, 7) sts, k to end of row - 25 (28, 31) sts.
Row 2: Bind off 5 (6, 7) sts, p to end of row - 20 (22, 24) sts.
Rows 3 and 4: Rep last 2 rows once more- 10 sts at the end of Row 4.
Bind off.
FRONT
 With smaller needles, cast on 33 (41, 49) sts.
Work in K1, p1 Rib until piece measures 3 in. (7.5 cm) from beginning, end with a WS row.
Beg Center Cable Pattern
Change to larger needles.
Set-Up Row (RS): K5 (7, 9), kfb, k5 (7, 9), place marker (pm), M1P, k10, M1P, pm, k12 (16, 20) - 36 (44, 52) sts at the end of this row.
Row 1 (WS): P to marker, slip marker (sm), k1, p10, k1, sm, p to end of row.
Row 2: K to marker, sm, p1, k10, p1, sm, k to end of row.
Row 3: P to marker, sm, k1, p10, k1, sm, p to end of row.
Rows 4 and 5: Rep Rows 2 and 3.
Row 6 (Cable Row): K to marker, sm, p1, 5/5 LC, p1, sm, k to end of row.
Row 7: Rep Row 3.
Rows 8-19: Rep Rows 2 and 3.
Row 20 (Cable Row): Rep Row 6.
Rep Rows 7-20 until piece measures 19 in. (48.5 cm) from beg, end with a WS row.
Shape Armholes
Row 1: Bind off 1 (2, 3) sts, work in pattern as established to end of row - 35 (42, 49) sts.
Row 2: Bind off 1 (2, 3) sts, work in pattern as established to end of row - 34 (40, 46) sts.
Rows 3 and 4: Rep last 2 rows once more - 32 (36, 40) sts at the end of this row.
Work even in pattern as established until armholes measure 5 (5 1/2, 6) in. (12.5 (14, 15) cm), end with a WS row.
Shape Neck
Row 1 (RS): K13 (15, 17) sts, join a 2nd ball of yarn and bind off next 6 sts for front neck, k to end of row - 13 (15, 17) sts on each side.
Work both sides at the same time using separate balls of yarn.
Row 2: On first side: P to last 3 sts, p2tog, p1; on 2nd side: p1, p2tog, p to end - 12 (14, 16) sts on each side.
Row 3: On first side: K to last 3 sts, k2tog, k1; on 2nd side: K1, k2tog, k to end - 11 (13, 15) sts on each side.
Row 4: Rep Row 2 - 10 (12, 14) sts on each side.
Work even in St st with separate balls of yarn until piece measures same as Back to shoulder shaping, end with a WS row.
Shape Shoulders
Row 1 (RS): On first side: Bind off 5 (6, 7) sts, k to end of side; on 2nd side: k to end of side.
Row 2: On first side: Bind off 5 (6, 7) sts, p to end of side; on 2nd side: p to end of side - 5 (6, 7) sts on each side.
Row 3: Bind off all sts on first side; k to end of 2nd side.
Row 4: Bind off all sts on rem side.
SLEEVES (make 2)
 With smaller needles, cast on 13 (15, 17) sts.
Work in K1, p1 Rib until piece measures 4 in. (10 cm) from beg, end with a WS row.
Change to larger needles.
Increase Row (RS): (K3, kfb) 3 times, k to end of row - 16 (18, 20) sts.
Work even in St st for 7 rows.
Next Row (Increase): K1, kfb, k to last 2 sts, kfb, k1 - 18 (20, 22) sts.
Rep last 8 rows 3 (4, 5) more times - 24 (28, 32) sts when all increases have been completed.
Work even in St st until piece measures 19 (20, 20 1/2) in. (48.5 (51, 52) cm) from beg, end with a WS row.
Shape Cap
Row 1 (RS): Bind off 2 sts, k to end of row - 20 (26, 30) sts at the end of this row.
Row 2: Bind off 2 sts, p to end of row - 20 (24, 28) sts at the end of this row.
Rows 3 and 4: Rep last 2 rows - 16 (20, 24) sts at the end of Row 4.
Bind off.
FINISHING
Note: Use smooth yarn for sewing, if desired. Sew left shoulder seam.
Neckband
From RS with smaller needles, pick up and k47 (47, 49) sts evenly spaced around neck edge. Work in K1, p1 Rib for 2 in. (5 cm). Sew right shoulder seam including neckband. Sew in Sleeves. Sew side and Sleeve seams. Weave in ends.
Every effort has been made to have the knitting and crochet instructions accurate and complete. We cannot be responsible for variance of individual knitters and crocheters, human errors, or typographical mistakes.