Glamorous Statement Poncho
It's easy for a knit poncho to look cozy and homey, but hard for one to look absolutely fabulous. This Glamorous Statement Poncho does just that. The bulky yarn's golden sheen gives it an air of sophistication unseen in most knitting patterns. This pattern is ridiculously mindless because the pattern repeats quite a bit, so if you're an experienced enough knitter, you can whip this up while watching TV. It also works splendidly with work events or other formal gatherings. Knit a couple in different colors so you have one to match any outfit.
Knitting Needle Size19 or 15 mm
Yarn Weight(6) Super Bulky/Super Chunky (4-11 stitches for 4 inches)
Gauge1 stitches, 2 rows, 3 inches. stockinette stitch
Materials:
- RED HEART® Boutique Sashay Boho™ 1943 Caravan - 7 balls
- Susan Bates® Knitting Needles: 15 mm [US 19]
- Yarn needle
Measurements:
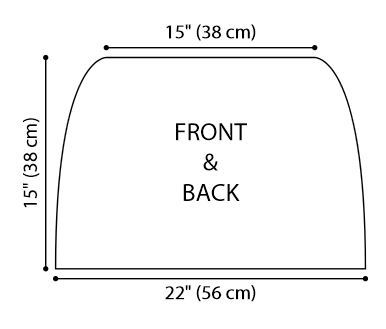
Length: 15” (38 cm)
Neck edge: 30” (76 cm)
Bottom edge: 44” (112 cm)
Abbreviations:
cm = centimeters
k = knit
k2tog = knit 2 sts together
p = purl
st(s) = stitch(es)
* or ** = repeat whatever follows the * or ** as indicated.
Gauge: 6 sts = 4” (10 cm); 8 rows = 4” (10 cm) in Lacy Honeycomb pattern. CHECK YOUR GAUGE. Use any size needles to obtain the gauge.
Notes:
Poncho is worked in rows. The 2 pieces (Front and Back) are sew together. When casting on, leave a 25” (64 cm) tail for seaming. When sewing Front and Back pieces together, use the “edge st” for seaming.
SPECIAL TECHNIQUE
Cable Cast-On
- Make a slip knot on the left needle.
- Insert the right needle knitwise into the stitch on the left needle.
- Wrap the yarn around the right needle as if to knit.
- Draw the yarn through the first stitch to make a new stitch, do not drop the stitch from the left needle.
- Slip the new stitch to the left needle.
- 2 stitches are on the left needle.
- Insert the right needle between the two stitches on the left needle.
- Wrap the yarn around the right needle as if to knit and pull the yarn through to make a new stitch.
- Place the new stitch on the left needle.
- Insert the right needle in between the last two stitches on the left needle and continue adding stitches until you have the total number desired.
SPECIAL STITCHES
K2tog = Knit 2 sts together (decrease).
YO = Wrap yarn around right needle (increase).
PATTERN STITCH
Lacy Honeycomb Pattern (multiple of 3 sts + 1)
Row 1 (Wrong Side): P1, *k1, p2; repeat from * to end.
Row 2: K1, *yo, k1, k2tog; repeat from * to end.
Row 3: P1, *p1, k1, p1; repeat from * to end.
Row 4: K1, *k2tog, yo, k1; repeat from * to end.
Repeat Rows 1-4 for Lacy Honeycomb pattern.
Instructions
PONCHO
Front and Back (make 2 pieces)
Cast on 33 sts using Cable Cast-On (see Special Technique).
Row 1 (Right Side): K1 (edge st), p across row to last st, k1 (edge st).
Next Row (Wrong Side): K1, (edge st), work Row 1 of Lacy Honeycomb pattern to last st, k1 (edge st).
Work first and last stitch in St st for “edge sts”, work remaining stitches in Lacy Honeycomb pattern.
Continue as established until piece measures approximately 15” (38 cm) from cast on edge, ending with Row 4 of pattern.
Next Row (Wrong Side) Decrease: K1, (edge st), k1, *k2tog, k1; repeat from * to last st, k1 (edge st) – 23 sts.
Next Row (Right Side): Bind off all stitches knitwise.
FINISHING
Join Front and Back pieces together using yarn needle and Mattress st. Sew the “edge sts” together creating a neat, invisible seam. Weave in ends.
