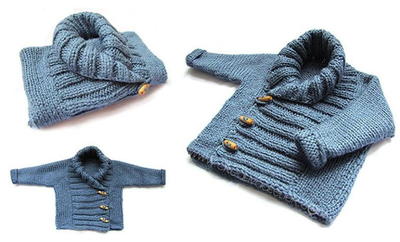
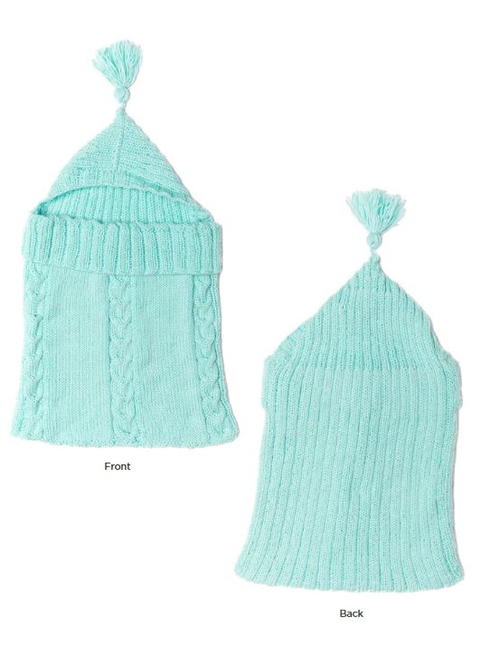
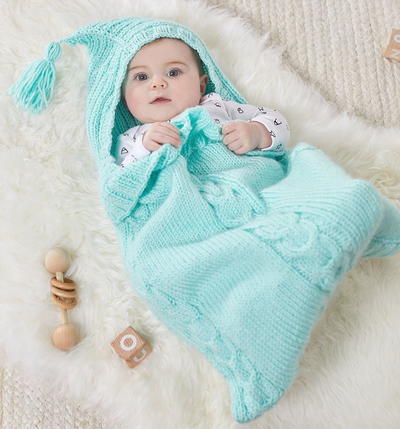
Cabled Baby Cocoon Pattern
We don't know what's cuter about this knit baby bunting pattern: the chunky cables or the little tassel on top!

Not sure what to knit for the next baby shower you're attending? This Cabled Baby Cocoon Pattern is a great option. You just know that baby is going to get a billion blankets and sweaters, but a knit baby bunting pattern is a unique kind of knit that both mommy and baby will adore. This pattern teaches you how to make a baby sleeping bag pattern with beautiful horseshoe cables and a cute little hood to keep baby's head warm. While we love it in blue, it would look just as cute in pink for a little girl or yellow for a surprise baby.

Knitting Needle Size8 or 5 mm, 9 or 5.5 mm
Yarn Weight(4) Medium Weight/Worsted Weight and Aran (16-20 stitches to 4 inches)
Gauge15 sts = 4" (10 cm); 21 rows = 4" (10 cm) in St st using larger needles. 20 sts = 4" (10 cm) in Back Rib pattern, slightly stretched, using larger needles. CHECK YOUR GAUGE. Use any size needles to obtain the gauge
Materials List
- RED HEART® Soft Essentials Baby™ yarn: 3 balls 6624 Sweet Mint
- RED HEART® Pom & Tassel MakerTM, optional
- Susan Bates® Knitting Needles: 5.5mm [US 9] and 5mm [US 8]
- Cable needle
- Stitch markers
- Yarn needle
Instructions
Sizes
Directions are for newborn size; changes for 3 month and 6 month are in parentheses.
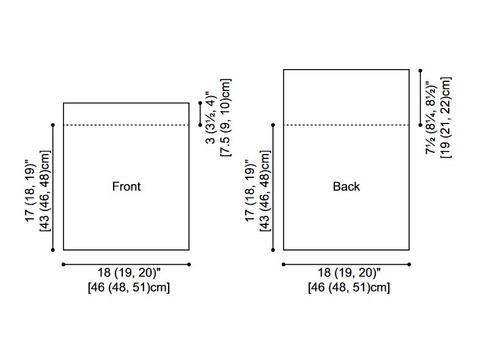
Finished Width: 18 (19, 20)" [46 (48, 51) cm]
Finished Length: 17 (18, 19)" [43 (46, 48) cm], excluding Hood
Notes
-
Bunting is worked in two pieces, Front and Back. Pieces are sewn together. Last row of Back is folded in half and joined to make Hood.
See diagram. -
Front is worked in St st and cable st. Back is worked in rib pattern.
Pattern Stitches
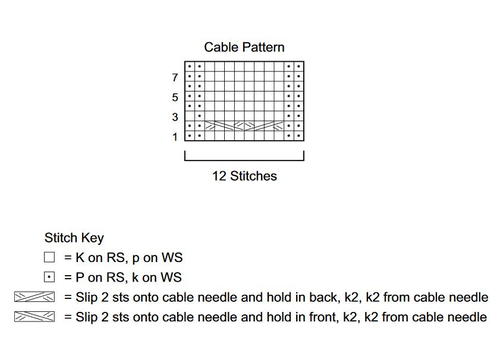
Cable Pattern (worked over 12 sts)
Row 1 (Wrong Side): K2, p8, k2.
Row 2: P2, slip next 2 sts to cable needle and hold in back of work, k2, k2 from cable needle, slip next 2 sts to cable needle and hold in front of work, k2, k2 from cable needle, p2.
Rows 3, 5 and 7: K2, p8, k2.
Rows 4, 6 and 8: P2, k8, p2.
Repeat Rows 1-8 for Cable Pattern.
See cable chart.
Cocoon
-
FRONT
With larger needles, cast on 82 (84, 86) sts. Knit 2 rows.
Row 1 (Wrong Side): K4, place marker, beginning with Row 1, work Cable pat over next 12 sts, place marker, k19 (20, 21), place marker, work Cable pat over next 12 sts, place marker, k19 (20, 21), place marker, work Cable pat over next 12 sts, place marker, k4.
Working Cable pat over marked 12 sts and remaining sts in St st, slipping markers every row, work until piece measures 17 (18, 19)" [43 (46, 48)cm] from beginning, end with a wrong side row.
Knit across all sts of next row, decreasing 4 (1, 3) sts evenly – 78 (83, 83) sts.
Ribbed Edge
Row 1 (Wrong Side): [P3, k2] across to last 3 sts, p3.
Row 2: [K3, p2] across to last 3 sts, k3.
Repeat Rows 1-2 until Ribbed Edge measures 3 (3½, 4)" [7.5 (9, 10)cm].
Bind off in pattern. -
BACK
With larger needles, cast on 88 (93, 98) sts. Knit 1 row.
Row 1 (Right Side): K3, [p2, k3] across.
Row 2: P3, [k2, p3] across.
Repeat Rows 1-2 until piece measures 17 (18, 19)" [43 (46, 48) cm] from beginning, end with a right side row. Knit 1 row.
Hood
Decrease Row 1 (Right Side): *K1, k2tog, p2; repeat from * to last 3 sts, k1, k2tog – 70 (74, 78) sts remain.
Row 1: [P2, k2] to last 2 sts, p2.
Row 2: [K2, p2] to last 2 sts, k2.
Repeat Rows 1-2 until Hood measures 5½ (6¼, 6½)" [14 (16, 16.5) cm] from Decrease Row 1, end with a wrong side row.
Decrease Row 2 (Right Side): *K2tog, p2, k2, p2; repeat from * to last 6 (10, 6) sts, k2tog, p2, k2, [p2, k2] 0 (1, 0) time – 61 (65, 68) sts remain.
Next Row: [P2, k2] 1 (2, 1) times, *p1, k2, p2, k2; repeat from * to last st, p1.
Next Row: *K1, p2, k2, p2; repeat from * to last 5 (9, 5) sts, k1, [p2, k2] 1 (2, 1) times.
Next Row: [P2, k2] 1 (2, 1) times, *p1, k2, p2, k2; repeat from * to last st, p1.
Decrease Row 3 (Right Side): *K1, p2, k2tog, p2; repeat from * to last 5 (9, 5) sts, k1, [p2, k2tog] 1 (2, 1) times – 52 (55, 58) sts remain.
Next Row: [P1, k2] across to last st, p1.
Next Row: [K1, p2] across to last st, k1.
Repeat last 2 rows twice more.
Decrease Row 4 (Wrong Side): [P1, k2tog] across to last st, p1 – 35 (37, 39) sts remain.
Bind off. -
FINISHING
With wrong sides together, fold bind-off row of Hood in half and sew together with seam on right side.
Sew Front and Back pieces together along lower edge. Fold ribbed edge of Front over to right side. Sew side seams together from lower edge to beginning of hood, catching both layers of folded ribbed edge and Front piece in seam.
Hood Ribbed Edge
With smaller needle, cast on 58 (63, 68) sts.
Row 1 (Wrong Side): [P3, k2] across to last 3 sts, p3.
Row 2: [K3, p2] across to last 3 sts, k3.
Repeat Rows 1-2 until Ribbed Edge measures 1½" [4cm]. Bind off in pattern.
Sew one long edge of Ribbed Edge along edges of Hood, beginning and ending at edge of Front. Weave in ends.
Tassels
Wrap yarn around 4½" [11cm] cardboard 25 times. Cut a piece of yarn 10" [25cm] long and thread doubled onto yarn needle. Insert needle under all strands at upper edge of cardboard. Pull tightly and knot securely near strands. Cut yarn loops at lower edge of cardboard.
Cut a piece of yarn 8" [20cm] long and wrap tightly around loops 1" [2.5cm] below top knot to form Tassel neck. Knot securely; thread ends onto needle and weave ends to center of Tassel. Trim Tassel ends evenly
Read Next75+ Free Baby Knitting Patterns
Your Recently Viewed Projects
Thanks for your comment. Don't forget to share!
Lisa
Dec 05, 2020
got so excited to see a bunting made with worsted weight yarn, then I read the pattern and found out that the yarn is a #5 chunky, my next grandbaby is due in June in Georgia, so bulky yarn is not a suitable choice, ho well, the hunt continues.
Report Inappropriate Comment
Are you sure you would like to report this comment? It will be flagged for our moderators to take action.
Thank you for taking the time to improve the content on our site.