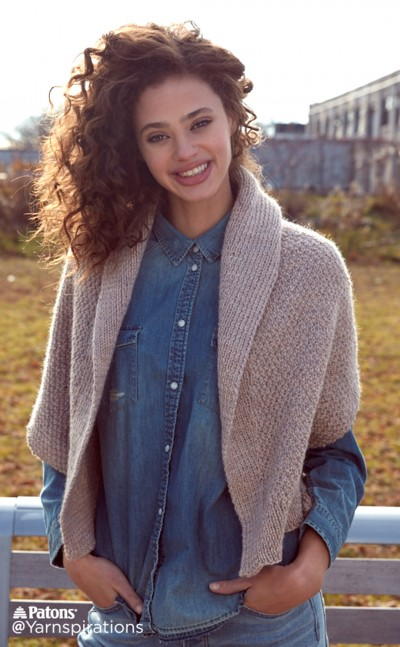
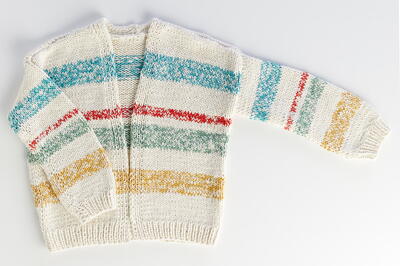
Downton Abbey Cardigan
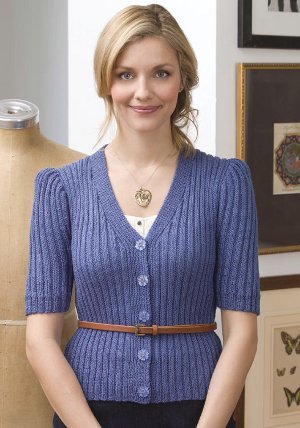
Adapted and updated from a vintage knitting pattern from the 1900s, this classic cardigan can easily be dressed up or down depending on the occasion. Just slip this slim, ribbed Downton Abbey Cardigan on with your favorite pair of jeans and you're ready for a relaxing walk down by the beach. Have fun playing around with buttons to create a unique piece that will fit flawlessly into your wardrobe.

Knitting Needle Size3 or 3.25 mm, 5 or 3.75 mm, Circular Knitting Needles
Yarn Weight(2) Fine (23-26 stitches to 4 inches)
Directions are for size Small; changes for sizes Medium, Large, XLarge and XXLarge are in parentheses.
Finished Bust: 28 (32, 36, 40, 44)”.
Finished Length: 20½ (21, 2½, 24, 25½,)”.
Materials:
RED HEART® “LusterSheen®”: 3 (4, 4, 5, 5) skeins 0824 Medium Blue.
Circular Knitting Needles: 3.25mm [US 3] and 3.75mm [US 5] 29” long.
Stitch markers, stitch holders, five 7/8”-diameter buttons (bohemian glass retro buttons)
yarn needle.
GAUGE: 24 sts = 4”; 28 rows = 4” in K1, p2 rib slightly stretched. CHECK YOUR GAUGE. Use any size needles to obtain the gauge given.
Note: Sweater is worked back and forth in rows. Circular needles are used to accommodate large number of stitches.
K2, p2 Rib (Multiple of 4 + 2 sts)
Row 1 (Right Side): K2, * p2, k2; repeat from * to end.
Row 2: P2, * k2, p2; repeat form * to end.
Repeat Rows 1 – 2 for K2, p2 rib.
Body
With smaller needles, cast on 254 (282, 310, 338, 366) sts.
Row 1 (Right Side): Work in K1, p1 rib over first 14 sts for right front band, place marker, work in K2, p2 rib across row to last 14 sts, place marker, k1, p1 rib to end for left front band.
Keeping first and last 14 sts in K1, p1 rib, and sts between markers in K2, p2 rib throughout, work even until piece measures 1”, end by working a wrong side row.
Next Row (Buttonhole Row): Rib 5 sts, bind off 4 sts, work in pattern as established across.
Next Row: Cast on 4 sts over bound off sts from previous row.
Work in pattern as established and repeat Buttonhole Row every 2½” for 5 buttonholes AND AT THE SAME TIME when piece measures 4” from beginning, change to larger needles. Continue even until piece measures 12 (12, 13,
14, 15),” end by working a wrong side row.
Divide for Front and Back
Next Row: Work across first 70 (78, 84, 92, 98) sts for Right Front, bind off next 4 (6, 8, 10, 10) sts, work across 110 (120, 134, 144, 160) sts for Back, place remaining
70 (78, 84, 92, 98) sts for Left Front on holder.
Next Row:
Bind off 4 (6, 8, 10, 10) sts, work across remaining 106 (114, 126, 134, 150) Back sts; place remaining 70 (78, 84, 92, 98) sts for Right Front on holder.
Back
Working on sts for Back only, bind off 2 sts at beginning of next 4 (6, 8, 10, 12) rows, then dec 1 st at beginning and end of every right side row 5 (5, 6, 5, 8) times–88 (92, 98, 104, 110) sts. Work even until armhole measures 8 (8½, 9,
9½, 10)”, end by working a wrong side row.
Shape Back Neck and Shoulders
Next Row: Work across first 34 (36, 38, 40, 42) sts, bind off next 20 (20, 22, 24, 26) sts for back neck, work to end of row. Working on these * 34 (36, 38, 40, 42) sts, bind off 5 sts at neck edge twice–24 (26, 28, 30, 32) sts. Place sts
on a holder. Join yarn to remaining sts and repeat from *.
Right Front
Shape Armhole and Neck
Slip 70 (78, 84, 92, 98) sts from holder for Right Front to larger needles. Join yarn to wrong side and bind off first 4 (6, 8, 10, 10) sts, work in pattern to end of row–66 (72, 76, 82, 88) sts.
Next Row (Dec): Work across 14 band sts, dec 1 st after marker, work in pattern to end of row.
Repeat Dec Row every other row 9 (11, 14, 16, 22) times more, then every 4th row 8 (8, 7, 7, 5) times more AND AT THE SAME TIME shape armhole as follows: dec 1 st at armhole edge every right side row 10 (12, 12, 14, 14) times –38 (40, 42, 44, 46) sts. Work even until armhole measures 8½ (9, 9½, 10, 10½)” end by working a wrong side row Next Row (Right Side): Work across 14 band sts, slip remaining 24 (26, 28, 30, 32) sts to holder. Work band sts
for 2¾ (2¾, 3, 3¼, 3¼)”. Slip sts to holder.
Left Front
Shape Armhole and Neck
Slip 70 (78, 84, 92, 98) sts from holder for Left Front to larger needles. Join yarn to right side at armhole edge and bind off first 4 (6, 8, 10, 10) sts, work in pattern as established to 2 sts before marker, k2tog, work to end of
row–66 (72, 76, 82, 88) sts. Continue to dec 1 st before marker every other row other row 9 (11, 14, 16, 22) times more, then every 4th row 8 (8, 7, 7, 5) times more AND AT THE SAME TIME shape armhole as follows: dec 1 st
every right side row at armhole edge 10 (12, 12, 14, 14) times –38 (40, 42, 44, 46) sts.
Work even until armhole measures 8½ (9, 9½, 10, 10½)” end by working a wrong side row.
Next Row (Right Side): Work across 14 band sts, slip remaining 24 (26, 28, 30, 32) sts to holder. Work band sts for 2¾ (2¾, 3, 3¼, 3¼)”. Slip sts to holder.
Sleeves (make 2)
With smaller needles, cast on 74 (78, 82, 86, 94) sts. Work in K2, p2 rib 1½ (1½, 1½, 2, 2)”, end by working a wrong side row.
Next Row (Right Side): Inc 1 st in each purl rib across row–92 (97, 102, 107, 117) sts.
Shape Sleeve
Change to larger needles, and work K2, p3 rib shaping sleeve by inc 1 st at the beginning and end of every right side row 5 (5, 6, 6, 7) times–102 (107, 114, 119, 131) sts.
Work even until piece measures 4½ (4½, 5, 5, 5½)”, end by working a wrong side row.
Shape Cap
Next Row: Bind off 4 (6, 8, 10,10) sts at the beginning of next 2 rows–94 (95, 98, 99,111) sts. Dec 1 st at beginning and end of every right side row twice– 90 (91, 94, 95, 107)sts. Work even until piece measures 10 (10½, 11½, 12,
13)”, end by working a wrong side row. Bind off 4 sts at beginning of every row 12 times. Bind off remaining 42 (43, 46, 47, 59) sts.
Make Pleats
With right side facing, find center 3 knit rib sts on right side of sleeve. Beginning at bind off edge, sew rib sts together for 2”, sewing down rib along adjoining purl sts. Make 6 pleats on either side of center pleat. (13 pleats total).
Shoulder Pads (Make 2)
With smaller needles, cast on 26 sts. Work in St st until piece measures 2” end by working a wrong side row. Bind off. Fold piece in half and sew cast on edge to bind off edge gathering slightly. Sew in top of sleeve seam.
FINISHING
Join shoulders with 3-Needle Bind off as follows:
Slip sts from first half onto knitting needle. With wrong sides facing, and points of both needles pointing to the right, use spare needle to * knit the first st from the front needle together with the first st from the back needle. Knit the next
st from each needle in the same manner, then bind off 1 st.
Repeat from * until all sts have been bound off. Fasten off last st. Repeat for back neck band. Sew in place.
SLEEVE
Set in sleeves. Sew sleeve seams. Sew on buttons to
correspond to buttonholes. Weave in yarn ends.
Find the patterns for this cardigan here:
If you like the Downton Abbey Cardigan, be sure to check out more adorable cold weather knits here.
Your Recently Viewed Projects
Thanks for your comment. Don't forget to share!
achumley0003 31706 34
Oct 22, 2017
I love Downtown Abbey and I really love all of the beautiful outfits the outfits the cast wears. This cardigan would be perfect for any occasion, and I really love the slightly puffy shoulders. This is one of those pieces you can wear with anything.
quanahs 5032097
Mar 21, 2016
There's lots of knitting in this cardigan with the small needles and the fine yarn, but it looks like its worth it. Its a beautiful sweater with a perfect fit. For printing, I like to copy and paste to notepad because I generally don't need the photos, just the instructions. I save the file to my desk top so its easy to access or print.
McKnitter
Feb 02, 2013
Don't bother copy & pasting this "Downton Abbey Cardigan" pattern. Just go to Red Heart's site and search for "Grandstand Cardi Knitting Pattern". You can get a pdf version there. WHY does AllFreeKnitting insist on changing the pattern name? Now whenever I see "This image courtesy of (website)" under a pic, I know to go check that website for the pattern.
sdpd
Feb 02, 2013
I have had very good luck with the patterns from these sites by using the ctrl/c, going to a Word document, and ctrl/v to cut and paste--not so much luck with any other method. I hope this helps you.
dlramage11 1943804
Jan 27, 2013
I have tried to copy/paste and to right click to print. Nothing seems to work. Please respond with directions to print that will work. Thank you.
sdpd
Feb 02, 2013
You have to highlight before using CTRL/C and CTRL/V--but that is what works! Just making sure you understand, not being mean. I hope you enjoy this pattern, as I believe I will!
McKnitter
Feb 02, 2013
Go to Red Heart's site and search for "Grandstand Cardi Knitting Pattern". You can get a pdf version there.
jandy2000 5815577
Jan 22, 2013
Just right click in the body of the pattern you want to print and choose the print option.
GARDENGATE52 04731 69
Jan 22, 2013
Hi, some people don't know how to cut copy and paste. I have always had to do this on this website. I think the site should add a print icon however.
apjdunstan 7799939
Jan 22, 2013
It is very annoying to be sent to links to "free patterns" when there is no means of printing out the instructions. I am certainly not about to sit in front of my computer to knit a sweater! Why even bother to post the pattern online without providing either a means of printing it to paper or providing a PDF file to download and print? VERY POOR PLANNING!
silocreek 2285905
Jan 22, 2013
All you have to do is highlight the text and then copy it and paste it into microsoft word or the program of your choice. It can then be printed from there. Hope this helps.
Report Inappropriate Comment
Are you sure you would like to report this comment? It will be flagged for our moderators to take action.
Thank you for taking the time to improve the content on our site.