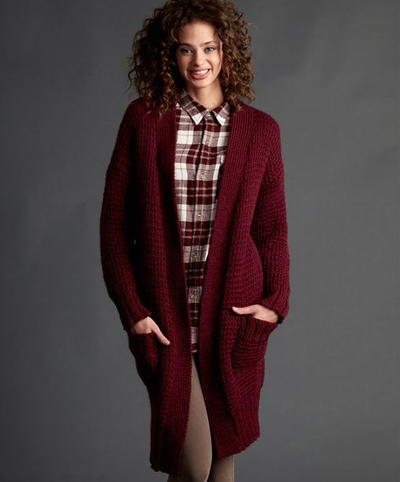
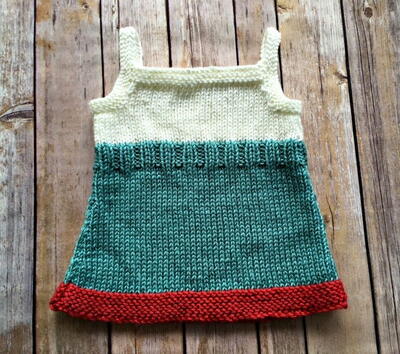
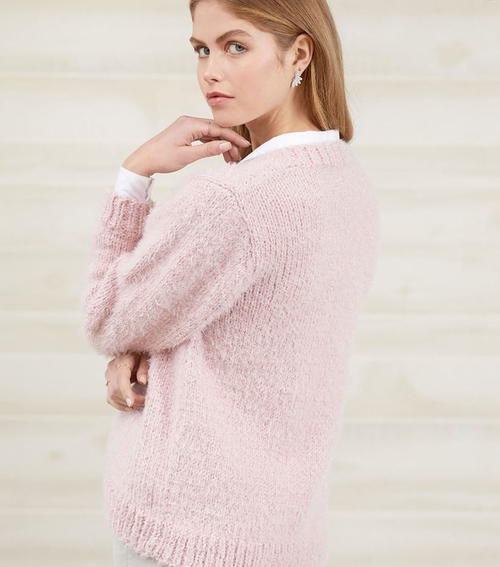
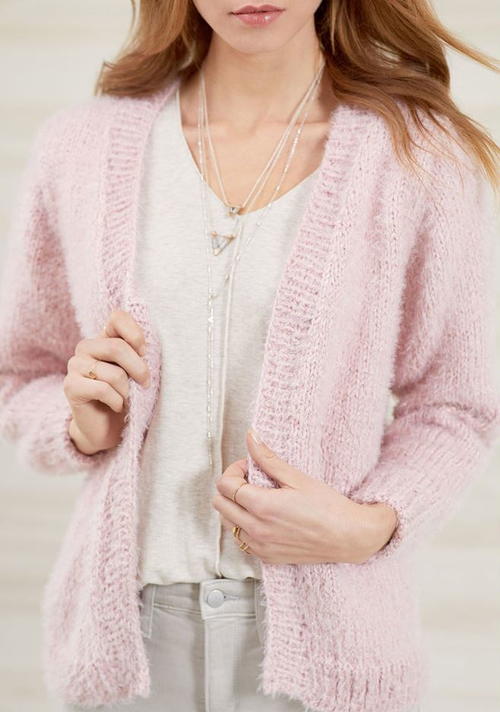
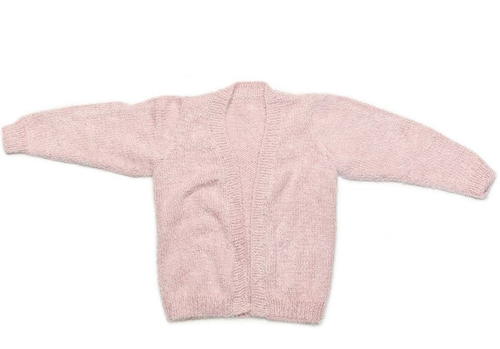
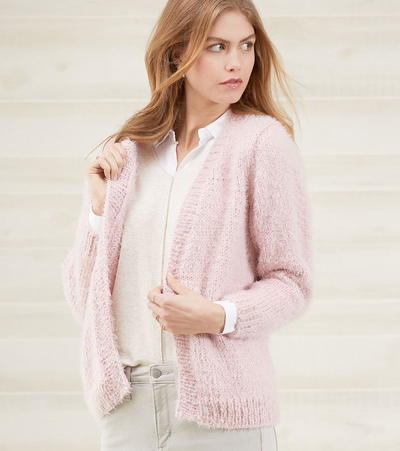
No-Button Knitted Cardigan
This blush pink free ladies' knitting pattern is great for a casual layer over your outfit.

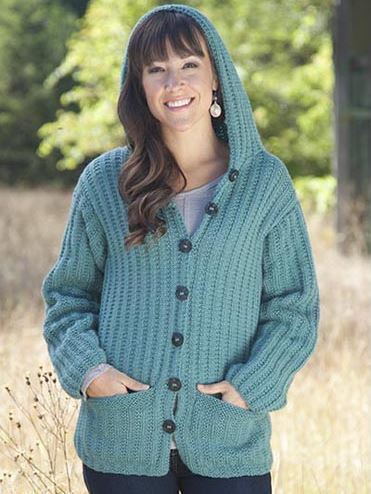
The No-Button Knitted Cardigan simply screams "cozy." The Hygge yarn from Red Heart creates a soft halo around the work, giving it a casual and comforting feel that's appropriate at home or at work. Because there are no buttons to fuss with, making up this cardigan is a much simpler and relaxing process, and it's easy to shrug on or off depending on how much warmth you need. Additionally, the simple stockinette design of this pattern makes it mindless enough to work up while watching your favorite TV show or listening to an audiobook.

Knitting Needle Size10.5 or 6.5 mm, Circular Knitting Needles
Yarn Weight(5) Bulky/Chunky (12-15 stitches for 4 inches)
Gauge15 sts = 4" (10 cm); 16½ rows = 4" (10 cm) in Stockinette Stitch. CHECK YOUR GAUGE. Use any size needles to obtain the gauge
Materials List
- RED HEART® Hygge™ yarn: 6 (7, 8, 8, 9, 10) balls 8724 Powder
- Susan Bates® Knitting Needles: 6.5 mm [US 10½]
- Susan Bates® Circular Knitting Needle: 6.5 mm [US 10½], 29" (73.6 cm) long
- Stitch markers
- Yarn needle
Cardigan
Sizes
Directions are for size Small; changes for sizes Medium, Large, X-Large, 2X and 3X are in parentheses.
Finished Bust/Chest Measurement: 36 (40, 44, 48, 52, 56)" [91.5 (101.5, 112, 122, 132, 142) cm]
Length: 24 (24½, 25½, 26, 27, 27½)" [61 (62, 65, 66, 68.5, 70) cm]
Notes
-
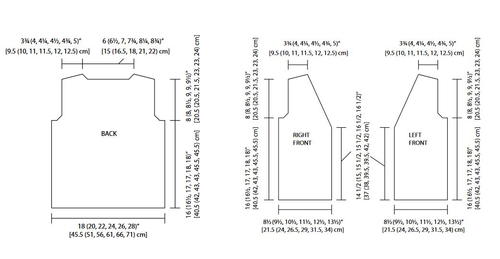
Cardigan is worked in 5 pieces (back, 2 fronts, 2 sleeves) and then seamed together. Front/Neck band is picked up and knitted after assembly.
-
Shaping for Front neck and armholes are worked at same time.
-
When increasing on right side rows: K1, M1L, knit to last stitch, M1R, k1.
-
When decreasing, work as follows on right side rows: K1, ssk, knit to last 3 sts, k2tog, k1: and as follows as wrong side rows: P1, p2tog, purl to last 3 sts, p2tog tbl, p1.
Special Abbreviations
-
p2tog tbl: (1 st decrease) Purl 2 sts together through the back loops.
-
M1R: (1 st increase) Bring the tip of the left-hand knitting needle under the strand between stitches from back to front. Knit this loop.
-
M1L: (1 st increase) Bring the tip of the left-hand knitting needle under the strand between stitches from front to back. Knit through the back of the loop.
-
ssk: (1 st decrease) Slip next two stitches knitwise to right needle, insert point of left needle through front of sts, knit these sts together through back loop.
Cardigan
-
BACK
Cast on 67 (73, 81, 89, 97, 105) sts.
Row 1 (Right Side): *K1, p1; repeat from * to last st, k1.
Row 2: *P1, k1; repeat from * to last st, p1.Repeat last 2 rows until piece measures 2½ (2½, 3, 3, 3½, 3½)" [6.5 (6.5, 7.5, 7.5, 9, 9) cm] from beginning, ending after a wrong side row.
Change to St st and work until piece measures 16 (16½, 17, 17, 18, 18)" [40.5 (42, 43, 43, 45.5, 45.5) cm] from beginning, ending after a wrong side row.
Shape Armholes
Bind off 5 (6, 6, 7, 8, 9) sts at the beginning of the next 2 rows – 57 (61, 69, 73, 81, 87) sts remain on last row worked.
Decrease Row (Right Side): K1, ssk, knit to last 3 sts, k2tog, k1 – 2 sts decreased – 55 (59, 67, 71, 79, 85) sts
.Decrease 1 st along each side edge every row for 3 (3, 5, 6, 7, 8) more times – 49 (53, 57, 61, 65, 69) sts remain on last row worked.
Work in St st until Armholes measure 8 (8, 8½, 9, 9, 9½)" [20.5 (20.5, 21.5, 23, 23, 24) cm], ending after a wrong side row.
Shape Back Neck and Shoulders
Mark center 21 (23, 25, 27, 29, 31) sts for neck.
Next Row (Right Side): Bind off 5 (5, 5, 6, 6, 6) sts, work to marked center sts, join second ball of yarn, bind off center 21 (23, 25, 27, 29, 31) sts for back neck, knit to end of row.
Next Row: Working both sides at the same time with separate balls of yarn, bind off 5 (5, 5, 6, 6, 6) sts, purl to end of left shoulder, purl across sts of right shoulder – 9 (10, 11, 11, 12, 13) sts remain on each shoulder.
Next Row: Bind off 4 (5, 5, 5, 6, 6) sts, work to last 3 sts, k2tog, k1 for right shoulder; k1, ssk, knit to end of row for left shoulder. Next Row: Bind off 4 (5, 5, 5, 6, 6) sts at beginning of row, purl across left shoulder sts, purl across right shoulder sts.
Bind off remaining 4 (4, 5, 5, 5, 6) sts at beginning of next 2 rows. -
LEFT FRONT
Cast on 32 (34, 38, 42, 46, 48) sts.
Row 1 (Right Side): *K1, p1; repeat from * across.Repeat last row until piece measures 2½ (2½, 3, 3, 3½, 3½)" [6.5 (6.5, 7.5, 7.5, 9, 9) cm] from beginning, ending after a wrong side row.
Change to St st and work until piece measures 14½ (15, 15½, 15½, 16½, 16½)" [37 (38, 39.5, 39.5, 42, 42) cm] from beginning, ending after a wrong side row. Place a marker at end of this row to indicate start of neck shaping.
Shape Front Neck and Armhole
Note: Read ahead as multiple shaping happens at the same time.
Sizes Small and Medium ONLY
Next Row (Right Side): Knit to last 3 sts, k2tog, k1 – 1 st decreased for neck.
Next Row: Purl across.Knit 1 row, purl 1 row.
Repeat last 4 rows 9 (9, x, x, x, x) more times. AT SAME TIME, when piece measures same length as Back to armhole, bind off 5 (6, x, x, x, x) sts at beginning of next right side row for armhole.
Decrease 1 st at armhole edge every row 4 (4, x, x, x, x) more times.
Sizes Large, 1X, 2X and 3X ONLY
Next Row: Knit to last 3 sts, k2tog, k1 – 1 st decreased for neck.
Next Row: Purl across.
Next Row: Knit to last 3 sts, k2tog, k1 – 1 st decreased for neck.
Next Row: Purl across.Knit 1 row, purl 1 row.
Repeat last 6 rows x (x, 5, 5, 6, 5) more times, then work decrease row x (x, x, 1, x, 1) more time. AT SAME TIME, when piece measures same length as Back to armhole, bind off x (x, 6, 7, 8, 9) sts at beginning of next right side row for armhole.
ecrease 1 st at armhole edge every row x (x, 5, 6, 7, 8) more times.
ALL SIZES
Continuing to decrease at neck edge as established, work until piece measures same length as Back to shoulder, ending after a wrong side row – 13 (14, 15, 16, 17, 18) sts remain on last row worked.
Shape Shoulder
Next Row (Right Side): Bind off 5 (5, 5, 6, 6, 6) sts, knit to end.
Next Row: Purl across.
Next Row: Bind off 4 (5, 5, 5, 6, 6) sts, knit to end.
Next Row: Purl across.Bind off remaining 4 (4, 5, 5, 5, 6) sts. -
RIGHT FRONT
Cast on 32 (34, 38, 42, 46, 48) sts.
Row 1 (right side): *P1, k1; repeat from * across.
Repeat last row, until piece measures 2½ (2½, 3, 3, 3½, 3½)" [6.5 (6.5, 7.5, 7.5, 9, 9) cm] from beginning, ending after a wrong side row.
Change to St st and work until piece measures 14½ (15, 15½, 15½, 16½, 16½)" [37 (38, 39.5, 39.5, 42, 42) cm] from beginning, ending after a wrong side row. Place a marker at the beginning of this row to indicate start of neck shaping.
Shape Front Neck and Armhole
Note: Read ahead as multiple shaping happens at the same time.
Sizes Small and Medium ONLY
Next Row (Right Side): K1, ssk, knit to end – 1 st decreased for neck.
Next Row: Purl across.Knit 1 row, purl 1 row.
Repeat last 4 rows 9 (9, x, x, x, x) more times. AT SAME TIME, when piece measures same length as Back to armhole, bind off 5 (6, x, x, x, x) sts at beginning of next wrong side row for armhole.
Decrease 1 st at armhole edge every row 4 (4, x, x, x, x) more times.
SIZES Large, 1X, 2X and 3X ONLY
Next Row (Right Side): K1, ssk, knit to end – 1 st decreased for neck.
Next row (wrong side): Purl across.Next row (right side): K1, ssk, knit to end – 1 st decreased for neck.
Next row (wrong side): Purl across.Knit 1 row, purl 1 row.
Repeat last 6 rows x (x, 5, 5, 6, 5) more times, then work decrease row x (x, x, 1, x, 1) more time. AT SAME TIME, when piece measures same length as Back to armhole, bind off x (x, 6, 7, 8, 9) sts at beginning of next wrong side row for armhole.
Decrease 1 st at armhole edge every row x (x, 5, 6, 7, 8) more times.
ALL SIZES
Continuing to decrease at neck edge as established, work until piece measures same length as Back to shoulder, ending after a right side row – 13 (14, 15, 16, 17, 18) sts remain on last row worked.
Shape Shoulder
Next Row (Wrong Side): Bind off 5 (5, 5, 6, 6, 6) sts, purl to end.
Next Row: Knit across.
Next Row: Bind off 4 (5, 5, 5, 6, 6) sts, purl to end.
Next Row: Knit across.Bind off remaining 4 (4, 5, 5, 5, 6) sts.
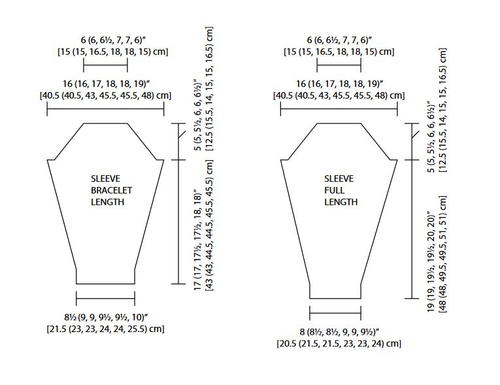
Bracelet Length Sleeves
Cast on 31 (33, 33, 35, 35, 37) sts.
Row 1 (Right Side): *K1, p1; repeat from * to last st, k1.
Row 2: *P1, k1; repeat from * to last st, p1.
Repeat last 2 rows until piece measures 2½ (2½, 3, 3, 3½, 3½)" [6.5 (6.5, 7.5, 7.5, 9, 9) cm] from beginning, ending after a wrong side row and increasing 1 st in center of final rib row – 32 (34, 34, 36, 36, 38) sts.
Knit 1 row, purl 1 row.
Continuing in St st, increase 1 st at each end every 4 rows 14 (14, 13, 12, 12, 11) times, then every 2 rows x (x, 2, 4, 4, 6) times – 60 (60, 64, 68, 68, 72) sts on last row worked.
Work until sleeve measures 17 (17, 17½, 17½, 18, 18)" [43 (43, 44.5, 44.5, 45.5, 45.5) cm] from beginning, ending after a wrong side row.
Shape Cap
Bind off 5 (6, 6, 7, 8, 9) sts at the beginning of next 2 rows – 50 (48, 52, 54, 52, 54) sts remain on last row worked.
Decrease 1 st each end every right side row 4 (4, 6, 7, 8, 9) times – 42 (40, 40, 40, 36, 36) sts remain on last row worked.
Decrease 1 st each end every row 6 (4, 4, 3, 1, 5) times – 30 (32, 32, 34, 34, 26) sts remain on last row worked.
Bind off 2 sts at beginning of next 4 (6, 4, 4, 4, 2) rows – 22 (20, 24, 26, 26, 22) sts remain on last row worked.
Bind off remaining sts.
FULL LENGTH SLEEVES
Cast on 29 (31, 31, 33, 33, 35) sts.
Row 1 (Right Side): *K1, p1; repeat from * to last st, k1.
Row 2: *P1, k1; repeat from * to last st, p1.
Repeat last 2 rows until piece measures 2½ (2½, 3, 3, 3½, 3½)" [6.5 (6.5, 7.5, 7.5, 9, 9) cm] from beginning, ending after a wrong side row and increasing 1 st in center of final rib row – 30 (32, 32, 34, 34, 36) sts.
Knit 1 row, purl 1 row.
Continuing in St st, increase 1 st at each end every 6 rows 2 (4, x, x, x, x) times, each end every 4 rows 13 (10, 16, 16, 15, 14) times, and then every 2 rows x (x, x, 2, 2, 4) times – 60 (60, 64, 68, 68, 72) sts on last row worked.
Work until sleeve measures 19 (19, 19½, 19½, 20, 20)" [48 (48, 49.5, 49.5, 51, 51) cm] from beginning, ending after a wrong side row.
Shape Cap
Bind off 5 (6, 6, 7, 8, 9) sts at the beginning of next 2 rows – 50 (48, 52, 54, 52, 54) sts remain on last row worked.
Decrease 1 st each end every right side row 4 (4, 6, 7, 8, 9) times – 42 (40, 40, 40, 36, 36) sts remain on last row worked.
Decrease 1 st each end every row 6 (4, 4, 3, 1, 5) times – 30 (32, 32, 34, 34, 26) sts remain on last row worked.
Bind off 2 sts at the beginning of the next 4 (6, 4, 4, 4, 2) rows – 22 (20, 24, 26, 26, 22) sts remain on last row worked.
Bind off remaining sts. -
FINISHING
Sew shoulder seams. Set in sleeves. Sew side and underarm seams.
Front and Neck Band
With right side facing and using circular needle, join yarn at lower right front edge, pick up and knit 45 (47, 49, 49, 53, 53) sts along right front edge to first marker, 39 (39, 41, 43, 43, 45) sts from marker to right shoulder, 25 (27, 29, 31, 33, 35) across back neck, 39 (39, 41, 43, 43, 45) from left shoulder to second marker and 45 (47, 49, 49, 53, 53) to bottom of left front edge – 193 (199, 209, 215, 225, 231) sts.
Row 1 (Wrong Side): *P1, k1; repeat from * to last st, p1.
Row 2: *K1, p1; repeat from * to last st, k1.
Repeat last 2 rows twice and then repeat Row 1 once more.
Bind off in ribbing.
Weave in ends. -
-
Abbreviations
- k
- knit
- k2tog
- knit 2 sts together
- p
- purl
- p2tog
- purl 2 sts together
- St st
- Stockinette stitch
- st(s)
- stitch(es)
- tbl
- through the back loop
- tog
- together
- [ ]
- work directions in brackets the number of times specified
- * or **
- repeat whatever follows the * or ** as indicated.
Up Next:
Your Recently Viewed Projects
Thanks for your comment. Don't forget to share!
clairegummer 70170 15
Apr 16, 2020
I'm a little confused by the full length sleeve directions. I've finished the cuff (wrong side, 30 stitches) The next directions say Increase 1 st at each end every 6 rows. (The 6th row would be a wrong side) However in the notes its states When increasing on right side.. Do I start the increase on row 6 (wrong side) or row 5(right side) ? Thanks.
Lisa
Feb 07, 2021
You will increase on the 6th row, as specified in the pattern, the note you refer to does not specify that all increases occur on a right side row, it just gives specific directions for when/if they do.
kskaiess
Feb 14, 2020
Just found out and have accessed the diagrams now so ignore my previous mail please!
kskaiess
Feb 14, 2020
Is there any way to get clearer pictures of the schematics? They are too blurred to read and I want to check the measurements.
evvie45 0349070
Feb 06, 2020
How can I save this pattern? .
Kristina K
Feb 10, 2020
Hi Evvie, in order to save this pattern to your knitting patterns, click the gray button above the picture with the plus sign that says "Save." If you're interested in saving this pattern to your computer, you can simply highlight the instructions, right click, hit "copy," open up a word processing document, right click and hit "paste" within the document, and save the pattern to your computer. We hope this helps! Happy knitting! -Editors of AllFreeKnitting
Report Inappropriate Comment
Are you sure you would like to report this comment? It will be flagged for our moderators to take action.
Thank you for taking the time to improve the content on our site.