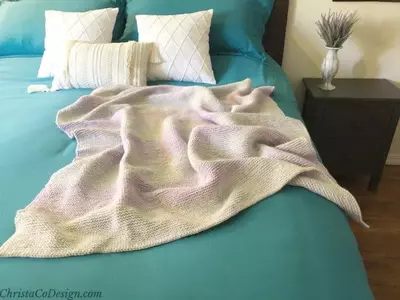
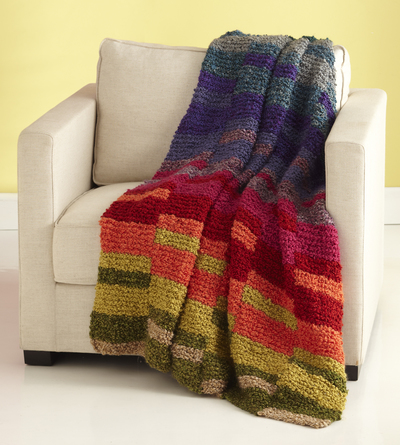
Mitered Squares Afghan
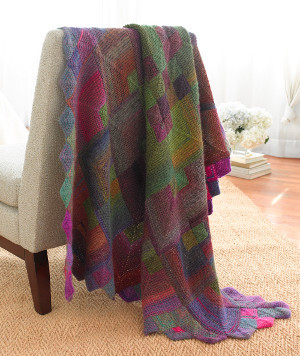
Subtle changes in color make this knitted afghan pattern a perfect addition to your home. Throw this Mitered Squares Afghan over the back of a chair or couch and your room will give your room instant charm. This knit blanket pattern is a little challenging, but with a little patience you’ll have a beautiful new decorative piece that will warm you inside and out on a cold day.

Knitting Needle Size8 or 5 mm
Yarn Weight(4) Medium Weight/Worsted Weight and Aran (16-20 stitches to 4 inches)
Size:
About 50 x 62 in. (127 X 157.5 cm)
Materials:
-
LION BRAND® AMAZING® (Art. #825)
- #212 Mauna Loa (A) 5 balls
- #200 Aurora (B) 5 balls
- #203 Wildflowers (C) 4 balls
- #209 Vineyard (D) 4 balls
- #202 Rainforest (E) 3 balls
- or colors of your choice
- LION BRAND® knitting needles size 8 (5 mm)
- LION BRAND® stitch markers
- LION BRAND® large-eyed blunt needle
Gauge:
16 sts + 30 rows = 4 in. (10 cm) in Garter st (k every row).
BE SURE TO CHECK YOUR GAUGE.
When you match the gauge in a pattern, your project will be the size specified in the pattern and the materials specified in the pattern will be sufficient. If it takes you fewer stitches and rows to make a 4 in. [10 cm] square, try using a smaller size hook or needles; if more stitches and rows, try a larger size hook or needles.
Note:
1. Afghan is made from 5 Panels; Top Panel, Lower Panel, 2 Side Panels, and Center Panel. The Panels are sewn together following the Assembly Diagram.
2. Each Panel is made from mitered diamonds. Smaller diamonds are worked first. Then stitches are picked up across 2 sides of adjoining diamonds to join them tog and beg working the next row of diamonds.
3. The instructions will tell you how many sts to pick up along a specific edge. Be sure to pick up sts as evenly spaced as possible.
4. Follow the Assembly Diagram for placement of each Diamond and arrangement of Panels.
Lower Panel:
Border Panel (make 5)
Diamond 1
With A, cast on 19 sts.
Row 1 (WS): Knit.
Row 2: K8, k3tog, k1, place marker (pm), k7 – 17 sts at the end of this row.
Row 3: Knit.
Row 4: Knit to 3 sts before marker, k3tog, remove marker, k1, pm, knit to end – 15 sts at the end of this row.
Rep Rows 3 and 4 until 3 sts rem. Do not replace marker when working last row.
Last Row (WS): K3tog.
Fasten off.
Diamonds 2 and 3
Work same as Diamond 1.
Diamond 4
Joining Row (RS): With RS facing and A, pick up and k9 sts across left edge of Diamond 1, cast on 1 st, pick up and k9 sts across right edge of Diamond 2 – 19 sts at the end of this row.
Beg with Row 1, work same as Diamond 1.
Diamond 5
Joining Row (RS): With RS facing and A, pick up and k9 sts across left edge of Diamond 2, cast on 1 st, pick up and k9 sts across right edge of Diamond 3 – 19 sts at the end of this row.
Beg with Row 1, work same as Diamond 1.
Diamond 6
Joining Row (RS): With RS facing and A, pick up and k9 sts across left edge of Diamond 4, cast on 1 st, pick up and k9 sts across right edge of Diamond 5 – 19 sts at the end of this row.
Beg with Row 1, work same as Diamond 1.
Diamond 1B
Joining Row (RS): With RS facing and B, pick up and k27 sts across left edge of first Border Panel, pm, cast on 1 st, pick up and k27 sts across right edge of 2nd Border Panel – 55 sts at the end of this row.
Row 1 (WS): Knit.
Row 2: Knit to 1 st before marker, k3tog, knit to end – 53 sts at the end of this row.
Rep Rows 1 and 2 until 19 sts rem. Change to E and rep Rows 1 an2 until 3 sts rem.
Last Row (WS): K3tog.
Fasten off.
Diamond 2B
Work same as Diamond 1B, picking up sts across left edge of 2nd Border Panel and right edge of 3rd Border Panel.
Diamond 3B
Work same as Diamond 1B, picking up sts across left edge of 3rd Border Panel and right edge of 4th Border Panel.
Diamond 4B
Work same as Diamond 1B, picking up sts across left edge of 4th Border Panel and right edge of 5th Border Panel.
Diamond 5C
Joining Row (RS): With RS facing and C, pick up and k27 sts across left edge of Diamond 1B, pm, cast on 1 st, pick up and k27 sts across right edge of Diamond 2B – 55 sts at the end of this row.
Beg with Row 1, work same as Diamond 1B.
Diamond 6C
Work same as Diamond 5C, picking up sts across left edge of Diamond 2B and right edge of Diamond 3B.
Diamond 7C
Work same as Diamond 5C, picking up sts across left edge of Diamond 3B and right edge of Diamond 4B.
Diamond 8D
With D, work same as Diamond 5C, picking up sts across left edge of Diamond 5C and right edge of Diamond 6C.
Diamond 9D
With D, work same as Diamond 5C, picking up sts across left edge of Diamond 6C and right edge of Diamond 7C.
Diamond 10E
Joining Row (RS): With RS facing and E, pick up and k27 sts across left edge of Diamond 8D, pm, cast on 1 st, pick up and k27 sts across right edge of Diamond 9D – 55 sts at the end of this row.
Row 1 (WS): Knit.
Row 2: Knit to 1 st before marker, k3tog, knit to end – 53 sts at the end of this row.
Rep Rows 1 and 2 until 19 sts rem.
Change to D and rep Rows 1 and 2 until 3 sts rem.
Last Row (WS): K3tog.
Fasten off.
Top Panel:
Make same as Bottom Panel.
Side Panel:
(make 2)
Make 6 Border Panels for each Side Panel.
Diamonds 1B–4B
Work same as Diamonds 1B–4B of Lower Panel.
Diamond 5B
Joining Row (RS): With RS facing and B, pick up and k27 sts across left edge of 5th Border Panel, pm, cast on 1 st, pick up and k27 sts across right edge of 6th Border Panel – 55 sts at the end of this row.
Beg with Row 1, work as Diamond 1B.
Diamond 6C
Joining Row (RS): With RS facing and C, pick up and k27 sts across left edge of Diamond 1B, pm, cast on 1 st, pick up and k27 sts across right edge of Diamond 2B – 55 sts at the end of this row.
Beg with Row 1, work same as Diamond 1B.
Diamond 7C
Work same as Diamond 6C, picking up sts across left edge of Diamond 2B and right edge of Diamond 3B.
Diamond 8C
Work same as Diamond 6C, picking up sts across left edge of Diamond 3B and right edge of Diamond 4B.
Diamond 9C
Work same as Diamond 6C, picking up sts across left edge of Diamond 4B and right edge of Diamond 5B.
Diamond 10D
With D, work same as 6C, picking up sts across left edge of Diamond 6C and right edge of Diamond 7 C.
Diamond 11D
Work same as Diamond 10D, picking up sts across left edge of Diamond 7C and right edge of Diamond 8C.
Diamond 12D
Work same as Diamond 10D, picking up sts across left edge of Diamond 8C and right edge of Diamond 9C.
Diamond 13E
With E, work same as 6C, picking up sts across left edge of Diamond 10D and right edge of Diamond 11D.
Diamond 14E
Work same as Diamond 13E, picking up sts across left edge of Diamond 11D and right edge of Diamond 12D.
Center Panel:
Diamond 1D
With D, cast on 19 sts.
Beg with Row 1, work same as Diamond 1 of Lower Panel.
Diamond 2E
Joining Row (RS): With RS facing and E, cast on 10 sts, pick up and k9 sts across right edge of Diamond 1D – 19 sts at the end of this row.
Beg with Row 1, work same as Diamond 1 of Lower Panel.
Diamond 3E
Joining Row (RS): With RS facing and E, pick up and k9 sts across left edge of Diamond 1D, cast on 10 sts – 19 sts at the end of this row.
Beg with Row 1, work same as Diamond 1 of Lower Panel.
Diamond 4D
With D, work same as Diamond 2E, picking up sts across left edge of Diamond 2E.
Diamond 5D
Joining Row (RS): With RS facing and D, pick up and k9 sts across left edge of Diamond 2E, cast on 1 st, pick up and k9 sts across right edge of Diamond 3E – 19 sts at the end of this row.
Beg with Row 1, work same as Diamond 1 of Lower Panel.
Diamond 6D
With D, work same as Diamond 3E, picking up sts across left edge of Diamond 3E.
Diamond 7E
With E, work same as Diamond 5D, picking up sts across left edge of Diamond 4D and right edge of Diamond 5D.
Diamond 8E
With E, work same as Diamond 5D, picking up sts across left edge of Diamond 5D and right edge of Diamond 6D.
Diamond 9D
With D, work same as Diamond 5D, picking up sts across left edge of Diamond 7E and right edge of Diamond 8E.
Finishing:
Arrange Panels as shown in Assembly Diagram and sew together.
Weave in ends.
Assembly Diagram
Abbreviations:
beg = begin(ning)(s)
k = knit
k3tog = knit 3 together
pm = place marker
rem = remain(ing)(s)
rep = repeat
RS = right side
st(s) = stitch(es)
WS = wrong side
Read NextCozy Colors Garter Stitch Blanket
Your Recently Viewed Projects
Thanks for your comment. Don't forget to share!
Pamela
Oct 28, 2020
This shows Lion Brand Amazing. That yarn looks too thin. Is this the correct yarn to buy?
Lisa
Oct 30, 2020
Yes, that is the correct yarn for the gauge and needle size, it was discontinued a while ago, so you can substitute with any worsted weight that achieves gauge.
3cats2love
Jul 31, 2017
This afghan has a striking pattern. To me the pattern seems complex and there is a lot involved in the construction of the sections and seaming them together. That said, all that work results in a standout appearance, so if you have the time, yarn, and ability you'd end up with a really great piece.
knittiger7 5266497
Jun 22, 2015
Corrections for this pattern can be found at http//www.lionbrand.com/patterns/L10348.html. These corrections should also be made to this site
pinemeade 6730503
May 22, 2014
Diamond 1B says to knit to 1 stitch before the marker then knit three stitches together. What do you do with the marker? This doesn't make sense to me.
knittiger7 5266497
Jun 21, 2015
This is exactly where I'm stuck. I agree that it doesn't make sense. Did you figure it out?
Lisa
Sep 04, 2017
You do what you normally do with a marker, you slip it until you are told to remove it. Not sure why such a basic instruction can cause confusion, the marker is the place holder for subsequent rows.
JANET
Sep 07, 2017
I read it as the 1st before marker and 2 sts after marker are the 3 to be knit together, so remove the marker until you have knit 3 tog, then replace it, as these are decrease rows, and you are going to repeat these 2 rows- hope this helps
percy1me2 2421782
Apr 19, 2014
Looks like a great stach buster. T'would be nice in a printable format though D
pattiroth 2269942
Apr 23, 2013
It is one of the most beautiful afghans I have seen. I have replaced this yarn for noro, yarn it works out to be about the same gauge. Budget-wise great. I would love to make this afghan, but with the amount of yarn, and the price per skein I would have to save for a while. It indeed is the millionaire's afghan: lives up to it's name. Drop dead gorgeous, too.
Report Inappropriate Comment
Are you sure you would like to report this comment? It will be flagged for our moderators to take action.
Thank you for taking the time to improve the content on our site.