Noel Knit Cape Pattern
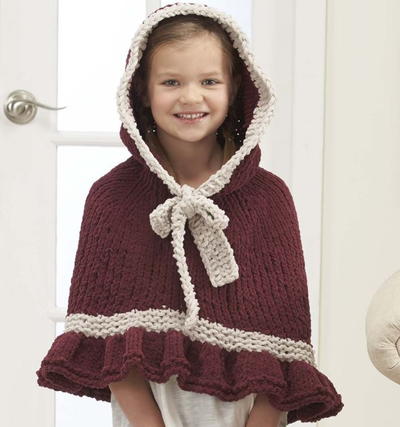
This lovely knitted capelet for girls is great for pictures with Santa or walks to Grandma's house.

Your little one is sure to look gorgeous in this Noel Knit Cape Pattern. This knitted capelet looks positively like something out of a fairy tale, making it perfect for Halloween or Christmas alike. The hood is even lined with a lovely white garter stitch border, adding a bit of contrast to the deep marsala color of the body of the capelet. This knit cape pattern also comes in three versions to fit children of any size. If the adorable ribbon in the front doesn't persuade you, your child or grandchild begging you for it will!

Knitting Needle Size10.5 or 6.5 mm, Circular Knitting Needles, Double-Pointed Knitting Needles (DPNs)
Yarn Weight(5) Bulky/Chunky (12-15 stitches for 4 inches)
Gauge9 sts x 14 rows = 4" (10.2cm) in St st
Finished SizeChilds 2 (4, 6): Chest Circumference: 28½ (30, 33)" [72 (76, 84)cm]; Length: 14½ (16, 17½)" [37 (41, 44)cm]
Materials List
-
Willow Yarns™ Caterpillar (100% Polyester; 100g/98yd)
-731427-0008 Rose (all sizes 3 balls): A
-731427-0002 Cocoon (all sizes 1 ball): B - US size 10½ (6.5mm) 40" circular needle or size needed to obtain gauge
- US size 10½ (6.5mm) dpn or straight needles or size needed to obtain gauge
- Crochet Hook
- 5 Stitch markers, 4 of color Y and 1 of color Z
- Yarn needle
- Smooth Scrap Yarn
Instructions
Stitch Guide
-
w&t (wrap and turn): Wyib, sl next st p-wise, bring yarn to front, sl st back to left-hand needle p-wise, bring yarn to back, turn work.
-
puk2tog: Pick wrap up and onto left-hand needle then k the wrap tog with the formerly wrapped st.
-
pup2tog: Pick wrap up and onto left-hand needle then p the wrap tog with the formerly wrapped st.
-
kfbf: K in the front and back and front again of the next st—2 sts inc’d.
-
PCO (provisional cast on): With scrap yarn and crochet hook, ch a few more sts than are required for CO, insert knitting needle into the bumps on back side of ch equal the number of sts for CO, work from these bumps as sts. In the finishing stage, pick up 1 arm of each st in the first row of knitting, then carefully pull the crocheted ch apart to release the active k sts.
Pattern Notes
-
Cape is worked from the hood down. The hood is worked flat and the work is joined in the rnd at the shoulders.
-
Short row shaping is used to create the asymmetrical hemline.
-
The bow trim around hood is k separately and sewn on.
Hood
With circular needle, A, and scrap yarn, PCO 18 (20, 22) sts.
Row 1 (RS): K.
Row 2 and all WS Rows: P.
Row 3: K6 (7, 8), (m1, k2) 4 times, k4 (5, 6)—22 (24, 26) sts.
Row 5: K6 (7, 8), (m1, k3) 4 times, k4 (5, 6)—26 (28, 30) sts.
Row 7: K6 (7, 8), (m1, k4) 4 times, k4 (5, 6)—30 (32, 34) sts.
Row 9: K.
Row 10: P
Rep Rows 9-10 fifteen (15, 16) more times.
Row 11: K12, w&t.
Row 12, 14, and 16: P.
Row 13: K8, w&t.
Row 15: K4, w&t.
Row 17: (K to wrapped st, puk2tog) 3 times, k to end.
Row 18: P12, w&t.
Row 19, 21, and 23: K to end.
Row 20: P8, w&t.
Row 22: P4, w&t.
Row 24: (P to wrapped st, pup2tog) 3 times, p to end.
Shoulders
Set-Up Rnd: K4, m0 (1, 1) k1, pmY, k1, m0 (0, 1), k3 (4, 5), m1 (0, 1), k1, pmY, k1, m0 (1, 1), k8, m0 (1, 1), k1, pmY, k1, m1 (0, 1), k3 (4, 5), m0 (0, 1), k1, pmY, k1, m0 (1, 1), k4—32 (36, 42) sts.
Join to work in rnd, marking start of rnd with mZ. Use magic lp method until sts are inc’d to a number comfortable around needle.
Next Rnd: K.
Next Rnd: (K to last st before m, m1, k1, sl m, k1, m1) 4 times, k to end—40 (44, 50) sts.
Rep these 2 rnds 3 more times—64 (68, 74) sts.
K next 10 (13, 16) rnds, removing each mY
Hemline Shaping
Row 1: K to 2 sts before mZ, w&t.
Row 2: P to 2 sts before mZ, w&t.
Row 3: K to 2 sts before w&t of previous RS row, w&t.
Row 4: P to 2 sts before w&t of previous WS row, w&t.
Rep Rows 3-4 six (7, 7) more times.
Next Row: K to 3 sts before w&t of previous RS row, w&t.
Next Row: P to 3 sts before w&t of previous WS row, w&t.
Rep these 2 rows 3 (3, 4) more times.
Next Row: K2, pmY. Cut yarn.
Striped Band
With B, work in rnd from mY (new start of rnd).
Rnd 1: Sl 1, (K to wrapped st, puk2tog) to st before mZ, k1, remove mZ, (k to wrapped st, puk2tog) to last 2 sts, k2.
Rnd 2: K1, p to end.
Rnd 3, 5, and 7: K.
Rnd 4 and 6: P.
Ruffle
Rnd 1: Remove mY, k1, pmY, sl1, cut yarn, with A, k to end.
Rnd 2: K1, kfbf to end—190 (202, 220) sts. K next 7 rnds.
Rnd 10: Remove mY, Sl 1, pmY, p to mY.
Rnd 11: K to mY.
BO p-wise
Bow Band
With dpn and B, CO5.
Row 1: K.
Row 2: Wyif sl 1, k3, wyif sl 1.
Rep these 2 rows until work measures 58" (147c m).
BO all sts.
Finishing
Remove scrap yarn from hood PCO sts and place first 9 (10, 11) sts on 1 dpn and second 9 (10, 11) sts on second dpn. Hold dpn parallel and close gap using Kitchener st and A.
Whipstitch Bow Band to WS side of hood with even tails for bow on either side at neckline. Tie ends into bow.
Weave in ends.
Abbreviations
- BO
- bind off
- ch
- chain
- CO
- cast off
- lp
- loop
- m1
- make one stitch
- mY / pmY
- marker Y / place marker Y
- mZ / pmZ
- marker Z / place marker Z
- wyib
- with yarn in back