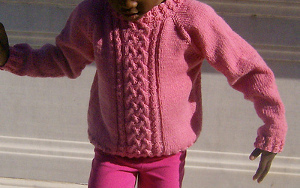
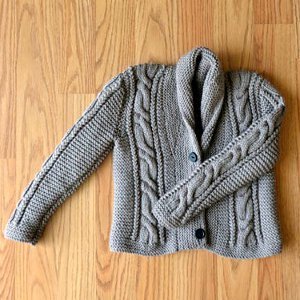
Sweet Treat Cardigan

Dress your little one up in something extra special with the Sweat Treat Cardigan pattern. Featuring an adorable cable pattern for extra warmth, this knit cardigan pattern is a wonderful way to keep your child warm. The cable pattern is just enough of a diversion to make this pattern interesting for experienced knitters. Beginners will appreciate the small scale of this sweater. Pair this cable knit cardigan with a dress or a pair of trousers to give your child a sophisticated look.

Knitting Needle Size6 or 4 mm, 8 or 5 mm
Yarn Weight(4) Medium Weight/Worsted Weight and Aran (16-20 stitches to 4 inches)
Materials
- RED HEART® Super Tweed®: 2 (2, 3, 3) balls 7901 Fire.
- Susan Bates® Knitting Needles: 5mm [US 8] and 4mm [US 6] straight needles (for sweater),
- Cable needle
- stitch markers
- yarn needle
- four ¾-1” (19-25mm) buttons
GAUGE: 21 sts = 4” (10 cm) in pattern with larger needles. CHECK YOUR GAUGE. Use any size needles to obtain the gauge.
INSTRUCTIONS
Directions are for size 4. Changes for sizes 6, 8 and 10 are in parentheses
Sweater
Finished Chest: 27 (28, 30, 31)” (68.5 (71, 76, 78.5) cm)
Finished Length: 13½ (15, 17, 19)” (34.5 (38, 43, 48.5) cm)
Special Stitches
2/2 RC (2 over 2 Right Cross) = Slip next 2 stitches to cable needle and hold in back, k2, then k2 from cable needle.
2/1 LPC (2 over 1 Left Purl Cross) = Slip next 2 stitches to cable needle and hold in front, p1, then k2 from cable needle.
2/1 RPC (2 over 1 Right Purl Cross) = Slip next 1 stitch to cable needle and hold in back, k2, then p1 from cable needle.
M1 = Make 1 (Increase) – Lift strand between needles to left-hand needle and work strand through the back loop, twisting it to prevent a hole, [knit or purl as indicated by pattern st].
ssk = Slip next 2 stitches, one at a time as if to knit, to right needle, insert point of left needle through front of sts, knit these sts together through back loop.
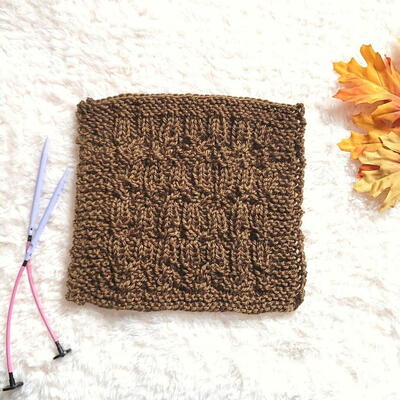
Pattern Stitch
Cable Pattern (over 8 sts)
Row 1 (right side): P2, 2/2 RC, p2.
Row 2: K2, p4, k2.
Row 3: P1, 2/1 RPC, 2/1 LPC, p1.
Row 4: K1, p2, k2, p2, k1.
Row 5: 2/1 RPC, p2, 2/1 LPC.
Row 6: P2, k4, p2.
Row 7: K2, p4, k2.
Row 8: P2, k4, p2.
Rows 9–12: Repeat last 2 rows 2 more times.
Row 13: 2/1 LPC, p2, 2/1 RPC.
Row 14: K1, p2, k2, p2, k1.
Row 15: P1, 2/1 LPC, 2/1 RPC, p1.
Row 16: K2, p4, k2.
SWEATER
BACK
Ribbing
With smaller straight needles, cast on 69 (69, 78, 78) sts.
Row 1 (wrong side): P2, k2, p1, k2, p4, k2, [p1, k2] 2 (3) times, p4, [k2, p1] 7 (8) times, k2, p4, [k2, p1] 2 (3) times, k2, p4, k2, p1, k2, p2.
Row 2: K2, p2, k1, p2, k4, p2, [k1, p2] 2 (3) times, k4, [p2, k1] 7 (8) times, p2, k4, [p2, k1] 2 (3) times, p2, k4, p2, k1, p2, k2.
Row 3: Repeat Row 1.
Row 4: K2, p2, k1, p2, 2/2 RC, p2, [k1, p2] 2 (3) times, 2/2 RC, [p2, k1] 7 (8) times, p2, 2/2 RC, [p2, k1] 2 (3) times, p2, 2/2 RC, p2, k1, p2, k2.
Rows 5–12 (12, 16, 16): Repeat last 4 rows 2 (2, 3, 3) more times.
Body
Change to larger straight needles.
Size 4 Only – Set Up Row (wrong side): K2, k2tog, k1, place marker, k2, p4, k2, place marker, k4, place marker, k2, p4, k2, place marker, k4, [M1, k5] 3 times, k2, place marker, k2, p4, k2, place marker, k4, place marker, k2, p4, k2, place marker, k1, k2tog, k2—70 sts.
Size 6 Only – Set Up Row (wrong side): K2, k2tog, k1, place marker, k2, p4, k2, place marker, k2, M1, k2, place marker, k2, p4, k2, place marker, k1, M1, [k4, M1] 4 times, k2, place marker, k2, p4, k2, place marker, k2, M1, k2, place marker, k2, p4, k2, place marker, k1, k2tog, k2—74 sts.
Size 8 Only – Set Up Row (wrong side): K2, k2tog, k1, place marker, k2, p4, k2, place marker, k7, place marker, k2, p4, k2, place marker, k7, M1, k8, M1, k7, place marker, k2, p4, k2, place marker, k7, place marker, k2, p4, k2, place marker, k1, k2tog, k2—78 sts.
Size 10 Only – Set Up Row (wrong side): K2, k2tog, k1, place marker, k2, p4, k2, place marker, k3, M1, k4, place marker, k2, p4, k2, place marker, k3, M1, [k5, M1] 3 times, k4, place marker, k2, p4, k2, place marker, k3, M1, k4, place marker, k2, p4, k2, place marker, k1, k2tog, k2—82 sts.
Begin Charted Pattern – All Sizes
Row 1 (right side): [Purl to marker, slip marker, work Row 1 of Cable pattern, slip marker] 4 times, purl to end of row.
Row 2: [Knit to marker, slip marker, work Row 2 of Cable pattern, slip marker] 4 times, knit to end of row.
Row 3: [Purl to marker, slip marker, work next row of Cable pattern slip marker] 4 times, purl to end of row.
Row 4: [Knit to marker, slip marker, work next row of Cable pattern, slip marker] 4 times, knit to end of row.
Rows 5–16: Repeat last 2 rows 6 more times, working next row of Cable pattern in each row until all 16 rows of Cable pattern have been worked.
Repeat Rows 1–16 until piece measures about 13½ (15, 17, 19)” (34.5 (38, 43, 48.5) cm) from beginning.
Bind off.
LEFT FRONT
Ribbing
With smaller straight needles, cast on 31 (31, 34, 34) sts.
Row 1 (wrong side): P3, k2, p1, k2, p4, [k2, p1] 2 (3) times, k2, p4, k2, p1, k2, p2.
Row 2: K2, p2, k1, p2, k4, p2, [k1, p2] 2 (3) times, k4, p2, k1, p2, k3.
Row 3: Repeat Row 1.
Row 4: K2, p2, k1, p2, 2/2 RC, p2, [k1, p2] 2 (3) times, 2/2 RC, p2, k1, p2, k3.
Rows 5–12 (12, 16, 16): Repeat last 4 rows 2 (2, 3, 3) more times.
Body
Change to larger straight needles.
Size 4 Only – Set Up Row (wrong side): P3, k3, place marker, k2, p4, k2, place marker, k4, place marker, k2, p4, k2, place marker, k5—31 sts.
Size 6 Only – Set Up Row (wrong side): P3, k3, place marker, k2, p4, k2, place marker, k1, M1, k2, M1, k1, place marker, k2, p4, k2, place marker, k5—33 sts.
Size 8 Only – Set Up Row (wrong side): P3, k3, place marker, k2, p4, k2, place marker, k7, place marker, k2, p4, k2, place marker, k5—34 sts.
Size 10 Only – Set Up Row (wrong side): P3, k3, place marker, k2, p4, k2, place marker, k3, M1, k4, place marker, k2, p4, k2, place marker, k5—35 sts.
Begin Charted Pattern – All Sizes
Row 1 (right side): [Purl to marker, slip marker, work Row 1 of Cable pattern, slip marker] twice, p3, k3.
Row 2: P3, k3, slip marker, work Row 2 of Cable pattern, slip marker, knit to marker, slip marker, work Row 2 of Cable pattern, slip marker, k5.
Row 3: [Purl to marker, slip marker, work next row of Cable pattern, slip marker] twice, p3, k3.
Row 4: P3, k3, slip marker, work next row of Cable pattern, slip marker, knit to marker, slip marker, work same row of Cable pattern, slip marker, k5.
Rows 5–16: Repeat last 2 rows 6 more times, working next row of Cable pattern in each row until all 16 rows of Cable pattern have been worked.
Repeat Rows 1–16 until piece measures about 10½ (12, 14, 16)” (26.5 (30.5, 35.5, 40.5) cm) from beginning, end with a wrong side row.
Shape Neck
Row 1 (right side): [Purl to marker, slip marker, work next row of Cable pattern, slip marker] twice, p3, k2tog, k1—30 (32, 33, 34) sts.
Row 2: P2, k3, slip marker, work next row of Cable pattern, slip marker, knit to marker, slip marker, work same row of Cable pattern, slip marker, k5.
Row 3: [Purl to marker, slip marker, work next row of Cable pattern, slip marker] twice, p2, k2tog, k1—29 (31, 32, 33) sts.
Row 4: P2, k2, slip marker, work next row of Cable pattern, slip marker, knit to marker, slip marker, work same row of Cable pattern, slip marker, k5.
Row 5: [Purl to marker, slip marker, work next row of Cable pattern, slip marker] twice, p1, k2tog, k1—28 (30, 31, 32) sts.
Row 6: P2, k1, slip marker, work next row of Cable pattern, slip marker, knit to marker, slip marker, work same row of Cable pattern, slip marker, k5.
Row 7: [Purl to marker, slip marker, work next row of Cable pattern, slip marker] twice, p1, k2.
Repeat last 2 rows until piece measures same as back.
Bind off.
RIGHT FRONT
Ribbing
With smaller straight needles, cast on 31 (31, 34, 34) sts.
Row 1 (wrong side): P2, k2, p1, k2, p4, k2, [p1, k2] 2 (3) times, p4, k2, p1, k2, p3.
Row 2: K3, p2, k1, p2, k4, p2, [k1, p2] 2 (3) times, k4, p2, k1, p2, k2.
Row 3: Repeat Row 1.
Row 4: K3, p2, k1, p2, 2/2 RC, p2, [k1, p2] 2 (3) times, 2/2 RC, p2, k1, p2, k2.
Rows 5–12 (12, 16, 16): Repeat last 4 rows 2 (2, 3, 3) more times.
Body
Change to larger straight needles.
Size 4 Only – Set Up Row (wrong side): K5, place marker, k2, p4, k2, place marker, k4, place marker, k2, p4, k2, place marker, k3, p3—31 sts.
Size 6 Only – Set Up Row (wrong side): K5, place marker, k2, p4, k2, place marker, k1, M1, k2, M1, k1, place marker, k2, p4, k2, place marker, k3, p3—33 sts.
Size 8 Only – Set Up Row (wrong side): K5, place marker, k2, p4, k2, place marker, k7, place marker, k2, p4, k2, place marker, k3, p3—34 sts.
Size 10 Only – Set Up Row (wrong side): K5, place marker, k2, p4, k2, place marker, k4, M1, k3, place marker, k2, p4, k2, place marker, k3, p3—35 sts.
Begin Charted Pattern – All Sizes
Row 1 (right side): K3, p3, slip marker, work Row 1 of Cable pattern, slip marker, purl to marker, slip marker, work Row 1 of Cable pattern, slip marker, p5.
Row 2: [Knit to marker, slip marker, work Row 2 of Cable pattern, slip marker] twice, k3, p3.
Row 3: K3, p3, slip marker, work next row of Cable pattern, slip marker, purl to marker, slip marker, work same row of Cable pattern, slip marker, p5.
Row 4: [Knit to marker, slip marker, work next row of Cable pattern, slip marker] 3 times, k3, p3.
Rows 5–16: Repeat last 2 rows 6 more times, working next row of Cable pattern in each row until all 16 rows of Cable pattern have been worked.
Repeat Rows 1–16 until piece measures about 10½ (12, 14, 16)” (26.5 (30.5, 35.5, 40.5) cm) from beginning, end with a wrong side row.
Shape Neck
Row 1 (right side): K1, ssk, p3, slip marker, work next row of Cable pattern, slip marker, purl to marker, slip marker, work same row of Cable pattern, slip marker, p5—30 (32, 33, 34) sts.
Row 2: [Knit to marker, slip marker, work Row 2 of Cable pattern, slip marker] twice, k3, p2.
Row 3: K1, ssk, p2, slip marker, work next row of Cable pattern, slip marker, purl to marker, slip marker, work same row of Cable pattern, slip marker, p5—29 (31, 32, 33) sts.
Row 4: [Knit to marker, slip marker, work next row of Cable pattern, slip marker] twice, k2, p2.
Row 5: K1, ssk, p1, slip marker, work next row of Cable pattern, slip marker, purl to marker, slip marker, work same row of Cable pattern, slip marker, p5—28 (30, 31, 32) sts.
Row 6: [Knit to marker, slip marker, work next row of Cable pattern, slip marker] twice, k1, p2.
Row 7: K2, p1, slip marker, work next row of Cable pattern, slip marker, purl to marker, slip marker, work same row of Cable pattern, slip marker, p5.
Repeat last 2 rows until piece measures same as back. Bind off.
SLEEVES (make 2)
Ribbing
With smaller straight needles, cast on 46 (46, 50, 50) sts.
Beginning with a right side (purl) row, work in Reverse Stockinette st (purl on right side, knit on wrong side) for 7 rows.
Row 1: P2, *k2, p2; repeat from * to end of row.
Row 2: K2, *p2, k2; repeat from * to end of row.
Rows 3–6: Repeat last 2 rows 2 more times.
Body
Change to larger straight needles.
Work in Reverse Stockinette st until piece measures 4½ (5, 5½, 6)” (11.5 (12.5, 14, 15) cm) from beginning of ribbing. Bind off.
FINISHING
Sew shoulder seams.
Left Front Band
With right side facing and smaller needles, beginning at left front neck edge, pick up and k60 (68, 76, 84) sts evenly spaced across left front edge.
Row 1 (wrong side): P3, k2, *p2, k2; repeat from * to last 3 sts, p3.
Row 2: K3, p2, *k2, p2; repeat from * to last 3 sts, k3.
Repeat last 2 rows until band measures about 3 (3, 3½, 3½)” (7.5 (7.5, 9, 9) cm), end with a right side row.
Bind off in pattern on wrong side.
Right Front Band
With right side facing and smaller needles, beginning at lower front corner, pick up and k60 (68, 76, 84) sts evenly spaced across right front edge to beginning of neck edge.
Row 1 (wrong side): P3, k2, *p2, k2; repeat from * to last 3 sts, p3.
Row 2: K3, p2, *k2, p2; repeat from * to last 3 sts, k3.
Row 3 (Buttonhole Row): P3, k2tog, yo (for buttonhole), [p2, k2] twice, p2, k2tog, yo (for buttonhole), *p2, k2; repeat from * to last 3 sts, p3.
Row 4: K3, p2, *k2, p2; repeat from * to last 3 sts, k3.
Row 5: P3, k2, *p2, k2; repeat from * to last 3 sts, p3.
Repeat last 2 rows until band measures about 2½ (2½, 3, 3)” (6.5 (6.5, 7.5, 7.5) cm), end with a right side row.
Repeat Buttonhole Row.
Repeat Rows 4 and 5 until band measures about 3 (3, 3½, 3½)” (7.5 (7.5, 9, 9) cm), end with a right side row.
Bind off in pattern on wrong side.
Neck Band
With right side facing and smaller straight needles, beginning at right front neck, pick up and knit sts evenly spaced across top of right front band, all the way across neck edge, then across top of left front band.
Work in Reverse Stockinette st until band measures about 1½” (4 cm), end with a right side row.
Bind off loosely on wrong side.
Sew sleeves to sweater body. Sew side and sleeve seams. Sew buttons to left front band, opposite buttonholes. Weave in ends.
Notes:
For more adorable kid's knits like this, check out these 15 Beginning Knitting Patterns: Free Knitting Patterns and Tutorials to Teach your Kids to Knit!
Your Recently Viewed Projects
Thanks for your comment. Don't forget to share!
The Designing Peng uin
May 21, 2016
I knit this in the size 8 -- and love it -- going to knit it again in a different colour in a size 10 -- this design is delightful and seems to have been meant for the little girl for whom I knit it
quanahs 5032097
Mar 23, 2016
Clicking the print button found near the top of the page right under the name of the pattern will send a copy to your printer. Hope that helps. I too want to knit this little sweater. It has so many wonderful details and I love the matching leg warmers.
kraftygayle
Aug 27, 2015
I would like a printable version please. I want the pattern next to me on the couch.
Lisa
Nov 20, 2018
right click on your mouse, this will open a new window, in the new window scroll down to print, click on print, this will take you to print preview, in print preview, uncheck print "all" and use the page counter to type in exactly which pages you wish to print and click on print.
antoinettegatt 309 1709
Apr 11, 2014
I did this cardigan but with longer sleeves. I made the front panels a little wider because the neck was too tight. It came out quite good.
Report Inappropriate Comment
Are you sure you would like to report this comment? It will be flagged for our moderators to take action.
Thank you for taking the time to improve the content on our site.