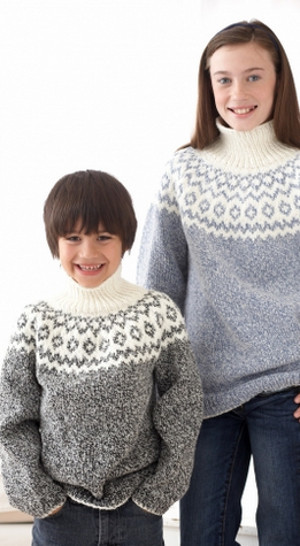
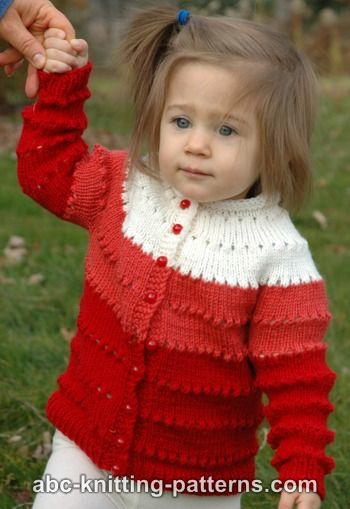
Child's Snowflake Cardigan
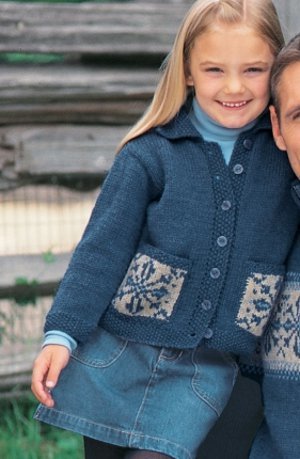
Perfect for season-long winter wear, the Child's Snowflake Cardigan is a cold weather must. This darling knit cardigan pattern features two front pockets with a decorative Fair Isle snowflake motif. Seed stitch edging and a fold-over collar gives this mini cardi a polished finish. With multiple sizing options for growing boys and girls, there's no reason why your child can't don this charming winter cardigan.

Knitting Needle Size6 or 4 mm, 7 or 4.5 mm
Yarn Weight(4) Medium Weight/Worsted Weight and Aran (16-20 stitches to 4 inches)
Gauge20 stitches, 26 rows, 4 inches. stockinette stitch
Materials:
- Classic Wool Worsted (100 g/3.5 oz;192 m/210 yds)
Sizes 4 yrs 6 yrs 8 yrs 10 yrs
Main Color (MC) New Denim (77115) - 3 3 4 4 balls
Contrast A Natural Mix (00229) - 1 1 1 1 balls
Contrast B - 1 1 1 1 balls - Sizes 4 mm (U.S. 6) and 4 ½ mm (U.S. 7) knitting needles or size needed to obtain tension
- 1 st holder and 7 buttons
GAUGE
20 sts and 26 rows = 4 ins [10 cm] with larger needles in stocking st.
MEASUREMENTS
Chest Measurments
4 yrs 23 ins [58.5 cm]
6 yrs 25½ ins [65 cm]
8 yrs 27½ ins [70 cm]
10 yrs 29 ins [73.5 cm]
Bust Measurments
4 yrs 28 ins [71 cm]
6 yrs 30 ins [76 cm]
8 yrs 32 ins [81.5 cm]
10 yrs 34 ins [86.5 cm]
ABBREVIATIONS
Beg = beginning
rem = remain(ing)
rep = repeat
RS = right side
st(s) = stitch(es)
INSTRUCTIONS
Child's Snowflake Cardigan Charts
The instructions are written for smallest size. If changes are necessary for larger sizes the instructions will be written thus ( ).
Note: When working from chart, carry yarn not in use loosely across WS of work but never over more than 5 sts. When it must pass over more than 5 sts, weave it over and under color in use on next st or at center point of sts it passes over. The colors are never twisted around one another.
BACK
With MC and smaller needles, cast on 71 (75-81-85) sts.
1st row: (RS). K1. *P1. K1. Rep from * to end of row.
Rep last row for seed st pat until work from beg measures 1¼ (1¼-1½-1½) ins [3 (3-4-4) cm], ending with RS facing for next row.
Change to larger needles and proceed in stocking st until work from beg measures 10¼ (11¼-12½-13½) ins [26 (28.5-32-34.5) cm], ending with RS facing for next row.
Shape armholes: Cast off 8 (8-9-10) sts beg next 2 rows. 55 (59-63-65) sts.
Cont even until armhole measures 5¼ (5¾-6½-7½) ins [13 (14.5-16.5- 19) cm], ending with RS facing for next row.
Shape shoulders: Cast off 7 (7-8-8) sts beg next 2 rows, then cast off 7 (8-8- 8) sts beg following 2 rows. Leave rem 27 (29-31-33) sts on a st holder.
LEFT FRONT
**With MC and smaller needles, cast on 39 (41-43-45) sts.
Work 1¼ (1¼-1½-1½) ins [3 (3-4- 4) cm] in seed st pat as given for Back, ending with RS facing for next row.**
Change to larger needles and proceed as follows:
Next row: Knit to last 7 sts. Seed st pat across last 7 sts.
Next row: Seed st pat across first 7 sts. Purl to end of row.
Rep last 2 rows until work from beg measures 10¼ (11¼-12½-13½) ins [26 (28.5-32-34.5) cm], ending with RS facing for next row.
Shape armhole: Cast off 8 (8-9-10) sts beg next row. 31 (33-34-35) sts.
Cont even (keeping 7 sts at front edge in seed st pat) until armhole measures 3¼ (3¾-4¼-5¼) ins [8.5 (9.5-11- 13) cm], ending with WS facing for next row.
Shape neck: Next row: Cast off 9 (10-10-10) sts. Place a marker on 4th st along cast off edge. Purl to end of row. Dec 1 st at neck edge on next 8 (8-8- 9) rows. 14 (15-16-16) sts.
Cont even until armhole measures same length as Back to beg of shoulder shaping, ending with RS facing for next row.
Shape shoulder: Cast off 7 (7-8-8) sts beg next row.
Work 1 row even. Cast off rem 7 (8-8-8) sts. Place markers for 7 buttons along front edge, having bottom button 1 inch [2.5 cm] above cast on edge, top button ½ inch [1 cm] below neck edge and rem 5 buttons spaced evenly between.
RIGHT FRONT
Note: Work buttonholes on Right Front to correspond to markers on Left Front as follows:
Next row: (RS). K1. P1. K1. Cast off 2 sts. K1. P1. Knit to end of row.
Next row: Work in pat, casting on 2 sts over cast off sts. Work from ** to ** as given for Left Front (working buttonhole as noted above).
Change to larger needles and proceed as follows:
Next row: Seed st pat across first 7 sts. Knit to end of row.
Next row: Purl to last 7 sts. Seed st pat across last 7 sts.
Rep last 2 rows until work from beg measures 10¼ (11¼-12½-13½) ins [26 (28.5-32-34.5) cm] (working buttonholes as before), ending with WS facing for next row.
Shape armhole: Cast off 8 (8-9-10) sts beg next row. 31 (33-34-35) sts.
Cont even (keeping 7 sts at front edge in seed st pat and working buttonholes as before) until armhole measures 3¼ (3¾-4¼-5¼) ins [8.5 (9.5-11- 13) cm], ending with RS facing for next row.
Shape neck: Next row: Cast off 9 (10-10-10) sts. Place a marker on 4th st along cast off edge. Knit to end of row.
Work 1 row even.
Dec 1 st at neck edge on next 8 (8-8- 9) rows. 14 (15-16-16) sts.
Cont even until armhole measures same length as Back to beg of shoulder shaping, ending with WS facing for next row.
Shape shoulder: Cast off 7 (7-8-8) sts beg next row.
Work 1 row even. Cast off rem 7 (8-8-8) sts.
SLEEVES
With MC and smaller needles cast on 39 (41-43-45) sts.
Work 1¼ (1¼- 1½-1½) ins [3 (3-4-4) cm] in seed st pat as given for Back, ending with RS facing for next row.
Change to larger needles and proceed in stocking st, inc 1 st each end of needle on 9th (9th-13th-5th) row, then every following 8th (8th-6th- 6th) row until there are 49 (53-61- 71) sts.
Cont even until work from beg measures 10 (11-13-15) ins [25.5 (28-33-38) cm], ending with RS facing for next row. Place markers at each end of last row.
Work a further 10 (10-10-12) rows even.
Shape top: Cast off 9 (10-12-14) sts beg next 4 rows. Cast off rem 13 (13- 13-15) sts.
POCKETS (make 2)
With MC and smaller needles, cast on 25 (25-27-27) sts.
Work 2 rows in seed st pat as given for Back.
Change to larger needles and work Chart in stocking st to end of chart reading knit rows from right to left and purl rows from left to right.
Change to smaller needles and proceed as follows:
Next row: (WS). With MC, purl.
Work 4 rows in seed st pat. Cast off in pat.
Pocket Side Edging: With RS of Pocket facing, MC and smaller needles, pick up and knit 24 sts along side edge of Pocket. Cast off knitways (WS).
FINISHING
Pin garment pieces to measurements and cover with a damp cloth, leaving cloth to dry.
Collar: Sew shoulder seams. With RS of work facing, MC and smaller needles, pick up and knit 17 (18-19- 19) sts up right front neck edge from marker to shoulder. K27 (29-31-33) from Back st holder, dec 2 sts evenly across. Pick up and knit 17 (18-19- 19) sts from shoulder to marker on left front neck edge. 59 (63-67-69) sts.
Work 3¼ (3¼-3½-3¾) ins [8.5 (8.5- 9-9.5) cm] in seed st pat as given for Back. Cast off in pat.
Sew in sleeves placing rows above markers along cast off edges of Fronts and Back to form square armholes. Sew side and sleeve seams. Sew on pockets in position as illustrated. Sew buttons to correspond to buttonholes.
Your Recently Viewed Projects
Thanks for your comment. Don't forget to share!
lallen113 5796875
Aug 25, 2020
I am making this sweater in the size 10 for my granddaughter. I am doing the sleeves now and they just seem large in the width to me. I am knitting according to scale and the rest of the sweater does not look too big. Wondering if this is how the sleeves are supposed to be?
Lisa
Sep 05, 2020
Sleeves can seem large until they are sewn up after finishing, if you think your are too large, use the chart measurements for the sleeves to measure yours and check. Sleeves do need to widen at about midway to accommodate the movement of the elbow when wearing the sweater.
Tricia108
May 14, 2018
This is a lovely cardigan for a little girl and perfect for winter. I like that it has a chart for the snowflake pattern. The good thing about doing a sweater for children is that you can try new techniques and takes less time to knit up. Thank you for the pattern.
sunflowers
Aug 13, 2017
Would love to see this in an adult size. Where can it be found?
KathrynAllison
Aug 14, 2017
Hello sunflowers, there is not an exact version of this sweater available for adults, but this link provides similar patterns designed by the same company: http://www.yarnspirations.com/catalogsearch/result/index/?cat=&p=1&q=snowflake. Hope this helps! -Editors of AllFreeKnitting
Hannah
Apr 28, 2017
This snowflake cardigan looks fashionable and classy. I like the snowflake pockets. And it being a button up made it look so casual. This will look good with white and blue combination too!
margar 1321899
Nov 12, 2015
This pattern does not include the snowflake chart that is referenced. I love it and in process of knitting, but I need the chart to complete.
bjdodd
Aug 30, 2016
Please click on the link under the word,"Instructions" Child's Snowflake Cardigan Charts colored in green. Thanks
stephaniejacobson 0498969
Sep 02, 2014
I really want to make this sweater but didn't see any instructions on the left front for marking the button holes. Did I miss them?
Lisa
Nov 13, 2014
The buttonhole instructions are on the right front instructions, but if you need them to be on the left for a boy, just reverse them. Hope this helps, happy knitting.
jeannemort54 27476 75
Jun 28, 2017
Wouldn't the front be backwards then? And where does it give instructions on any front for marking? Please advise me.
Lisa
Nov 23, 2017
Button holes are reversed for male and female and the instructions to place the markers for buttons are in the shape shoulder instructions of the pattern.
Report Inappropriate Comment
Are you sure you would like to report this comment? It will be flagged for our moderators to take action.
Thank you for taking the time to improve the content on our site.