How to Knit the Magic Loop Method
Doing magic loop knitting is great for knitters who want to take their circular knitting skills to the next level!

The magic loop method is the newest and most innovative ways to knit in the round. If you've ever knit with circular knitting needles or DPNs, the magic loop method will be a breeze, and might actually feel like magic! In this video, you'll learn just how truly magical it can be to knit in the round.
This is a super fun and inventive way for you to switch up the way you are knitting in the round. Plus, this is great for people who are just learning how to knit in the round because you are still using the same motions and technique as knitting flat! If you're knitting something like the sleeves of a knitted sweater, the magic loop method will come in handy because it's very easy to increase the number of stitches in your circle without switching our your needles. You can also use the magic loop method to knit very tiny tubes for things like seamless gloves
Watch and Learn
Materials
- Yarn
- Circular knitting needle
Instructions
Step 1
Cast on the number stitches as your pattern calls for.
Step 2
Join your stitches into a round making sure not to add any twists into that cast on.

Step 3
Evenly distribute your stitches on the two ends of your circular knitting needle.

Step 4
Bring your working yarn to the back of your work by putting it in between your needles. This is the equivalent of your working yarn being in the front when knitting flat.

Step 5
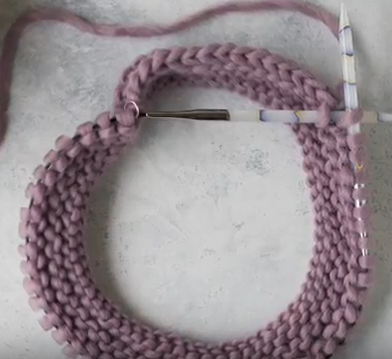
Take the back needle and pull it out of the stitches, leaving these live stitches to just be on the cable part of the needle.

Step 6
Bend the cable of your circular needle back and start working on the stitches that are on your other needle.

Step 7
Once you have finished the stitches that are on that half of your round, pull the cable for your bare needle through and have the half of the stitches distributed evenly between the two needles again. Then repeat with the other half of the stitches.

Step 8
Turn your work and repeat steps 4-7.
Read NextHow to Knit the Woven Plaid Stitch
Your Recently Viewed Projects
Thanks for your comment. Don't forget to share!
Majid
Jun 04, 2019
When making the first stitch after turning the needles, the previous stitch gets smaller because it is on wire and not the needle, that's why I personally, after turning the needles, make the first stitch little a bit more loose
lindahammett54 629 2115
May 18, 2017
How does one start from the very beginning to use DPNs like in making a hat? Every pattern that I have seen for this method says that it is easy, but I do not even know where to start.I do not know how to even send this message. Hope it gets to you.
Majid
Jun 04, 2019
Could you explain more clearly what's wrong with this page or video instruction
Report Inappropriate Comment
Are you sure you would like to report this comment? It will be flagged for our moderators to take action.
Thank you for taking the time to improve the content on our site.