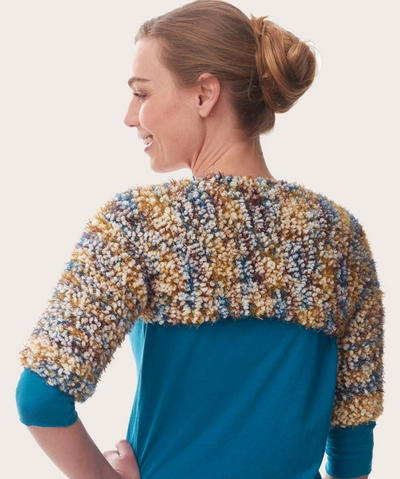
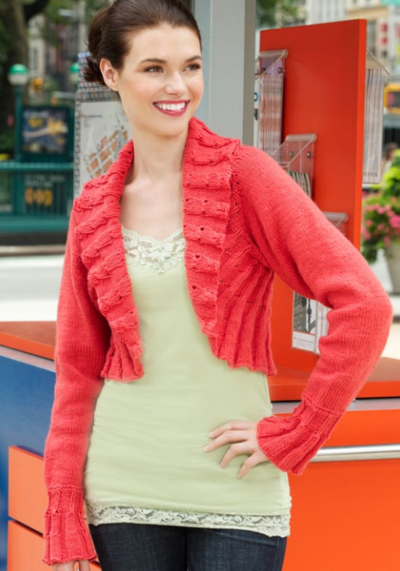
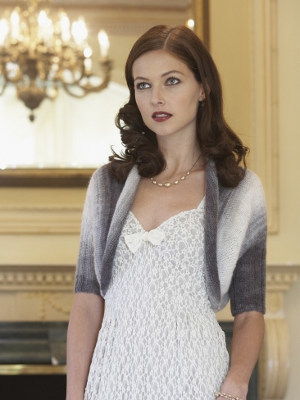
Juliet's Little Shrug

Every girl deserves to have that special shrug that goes along with everything. Juliet's Little Shrug, complete with girly ruffles, is just the pattern you've been searching for! Wear it with jeans or a dress - it'll look great either way! This is a free shrug knitting pattern that you'll love to make over and over again!

Knitting Needle Size6 or 4 mm, 8 or 5 mm
Yarn Weight(4) Medium Weight/Worsted Weight and Aran (16-20 stitches to 4 inches)
Directions are for size Small. Changes for sizes Medium, Large, 1X, 2X and 3X are in parentheses.
To Fit Bust/Chest: 32 (36, 40, 44, 48, 52)”
Finished Chest: 35 (39, 43, 47, 51, 55)”
Finished Length: 14 (14½, 15, 16½, 17½, 18½)”, not including neckband and not including ruffle
MATERIALS:
- RED HEART® Soft™: 3 (3, 4, 5, 5, 6) balls 3729 Grape A.
- RED HEART® Boutique™ Sashay: 1 (1, 1, 2, 2, 2) balls 1943 Tango B.
- Knitting needles: 5mm [US 8], 4mm [US 6].
- Stitch holders
- stitch markers (optional)
- Yarn needle.
GAUGE: 17 sts = 4”; 23 rows = 4”. CHECK YOUR GAUGE. Use any size needles to obtain the gauge.
Special Stitches
M1 = Make 1 (Increase) – Lift strand between needles to left-hand needle and knit strand through the back loop, twisting it to prevent a hole.
ssk = slip next two stitches knitwise to right needle, insert point of left needle through front of sts, knit these sts together through back loop.
Special Technique
3-Needle Bind-Off = Hold needles of stitches to be seamed parallel and with Right Sides together, with 3rd needle knit together first stitch from each needle, *knit together next stitch from each needle, pass 2nd stitch over first stitch and off right needle; repeat from * until all stitches have been knit from the 2 parallel needles and only one stitch remains on the right needle. Fasten off.
PATTERN STITCH
Seed Stitch (multiple of 2 sts)
Row 1 (Right Side): *K1, p1; repeat from * across.
Row 2: *P1, k1; repeat from * across.
Repeat Rows 2 and 3 for Seed st.
NOTES
1. Shrug is worked in once piece, from lower edge up to armholes. Piece is then divided for armholes, and back and fronts worked separately to shoulders. Sleeves are orked separately.
2. Four edge stitches are worked in Seed stitch. You may wish to place markers to separate these stitches from the Stockinette stitch middle section.
SHRUG INSTRUCTIONS
Body
With larger needles and A, cast on 148 (168, 184, 200, 216, 236) sts.
Row 1 (Right Side): [K1, p1] 2 times, knit to last 4 sts, [k1, p1] 2 times.
Row 2: [P1, k1] 2 times, purl to last 4 sts, [p1, k1] 2 times. Keeping first and last 4 sts in Seed st, work even in St st (knit on Right Side, purl on Wrong Side) until piece measures about 6 (6, 6, 7, 7, 8)” from beginning, end with a Wrong Side row.
Divide for Fronts and Back
Next Row (Right Side): [K1, p1] 2 times, k33 (38, 42, 46, 50, 55) sts, slip these first 37 (42, 46, 50, 54, 59) sts onto a holder for right front, bind off next 4 (6, 7, 8, 9, 11) sts for armhole, knit across next 70 (78, 85, 92, 99, 107) sts, slip last 37 (42, 46, 50, 54, 59) sts onto a holder for left front, TURN.
Next Row (Wrong Side): Bind off 4 (6, 7, 8, 9, 11) sts for armhole, purl across remaining 66 (72, 78, 84, 90, 96) sts for back.
Back
Working over back sts only.
Shape Armholes
Next Row (Right Side): K1, k2tog, knit to last 3 sts, ssk, k1—64 (70, 76, 82, 88, 94) sts.
Next Row: Purl.
Repeat last 2 rows 3 (5, 6, 7, 8, 10) more times—58 (60, 64, 68, 72, 74) sts.
Work even in St st until piece measures about 14 (14½, 15, 16½, 17½, 18½)” from beginning, end with a Wrong Side row.
Shape Neck
Next Row (Right Side): K15 (16, 17, 18, 19, 20) sts for right shoulder, bind off next 28 (28, 30, 32, 34, 34) sts for neck, knit to end of row for left shoulder. Cut yarn and place sts onto a holder.
Right Front
With Wrong Side facing, return right front sts to needle—37 (42, 46, 50, 54, 59) sts.
Shape Armhole
Next Row (Wrong Side): Bind off 4 (6, 7, 8, 9, 11) sts, purl to last 4 sts, [p1, k1] 2 times—33 (36, 39, 42, 45, 48) sts.
Next Row (Right Side): [K1, p1] 2 times, knit to last 3 sts, ssk, k1—32 (35, 38, 41, 44, 47) sts.
Next Row (Wrong Side): Purl to last 4 sts, [p1, k1] 2 times.
Repeat last 2 rows 3 (5, 6, 7, 8, 10) more times—29 (30, 32, 34, 36, 37) sts.
Keeping 4 sts at front edge in Seed st, work even in St st until piece measures about 11½ (12, 12½, 13, 13½, 14½)” from beginning, end with a Wrong Side row.
Shape Neck
Next Row (Right Side): Bind off 7 (7, 8, 6, 7, 7) sts, knit to end of row—22 (23, 24, 28, 29, 30) sts.
Next Row: Purl.
Next Row: Bind off 2 sts, knit to end of row—20 (21, 22, 26, 27, 28) sts.
Next Row: Purl.
Repeat last 2 rows 0 (0, 0, 1, 1, 1) more time(s)—20 (21, 22, 24, 25, 26) sts.
Next Row (Right Side): K1, k2tog, knit to end of row—19 (20, 21, 23, 24, 25) sts.
Next Row: Purl.
Repeat last 2 rows 4 (4, 4, 5, 5, 5) times—15 (16, 17, 18,19, 20) sts.
Work even in St st until piece measures about 14 (14½, 15, 16½, 17½, 18½)” from beginning.
Left Front
With Right Side facing, return right front sts to needle—37 (42, 46, 50, 54, 59) sts.
Shape Armhole
Next Row (Right Side): Bind off 4 (6, 7, 8, 9, 11) sts, knit to last 4 sts, [k1, p1] 2 times—33 (36, 39, 42, 45, 48) sts.
Next Row (Wrong Side): [P1, k1] 2 times, purl to end of row.
Next Row (Right Side): K1, ssk, knit to last 4 sts, [k1, p1] 2 times——32 (35, 38, 41, 44, 47) sts.
Repeat last 2 rows 3 (5, 6, 7, 8, 10) more times—29 (30, 32, 34, 36, 37) sts.
Keeping 4 sts at front edge in Seed st, work in St st (knit on Right Side, purl on Wrong Side) until piece measures about 11½ (12, 12½, 13, 13½, 14½)” from beginning, end with a Right Side row.
Shape Neck
Next Row (Wrong Side): Bind off 7 (7, 8, 6, 7, 7) sts, purl to end of row—22 (23, 24, 28, 29, 30) sts.
Next Row: Knit.
Next Row: Bind off 2 sts, purl to end of row—20 (21, 22, 26, 27, 28) sts.
Next Row: Knit.
Repeat last 2 rows 0 (0, 0, 1, 1, 1) more time(s)—20 (21, 22, 24, 25, 26) sts.
Next Row: P1, p2tog, purl to end of row—19 (20, 21, 23, 24, 25) sts.
Next Row: Knit.
Repeat last 2 rows 4 (4, 4, 5, 5, 5) times—15 (16, 17, 18, 19, 20) sts.
Work even in St st until piece measures about 14 (14½, 15, 16½, 17½, 18½)” from beginning. Using 3-needle bindoff, seam shoulders.
Sleeve (Make 2)
With larger needles and A, cast on 48 (48, 50, 52, 60, 64) sts.
Work even in Seed st for about 1”, end with a Wrong Side row.
Shape Sleeve
Increase Row (Right Side): K1, M1, knit to last st, M1, k1—50 (50, 52, 54, 62, 66) sts.
Next Row: Purl.
Repeat last 2 rows 7 (11, 10, 14, 12, 17) more times—64 (72, 72, 82, 86, 100) sts.
Repeat Increase Row every other Right Side row 2 (0, 2, 0, 2, 0) times—68 (72, 76, 82, 90, 100) sts.
Work even in St st until piece measures about 5 (5, 6, 6, 7, 7)”, end with a Wrong Side row.
Shape Cap
Next Row (Right Side): Bind off 4 (6, 7, 8, 9, 11) sts, knit to end of row—64 (66, 69, 74, 81, 89) sts.
Next Row: Bind off 4 (6, 7, 8, 9, 11) sts, purl to end of row—60 (60, 62, 66, 72, 78) sts.
Decrease Row (Right Side): K1, k2tog, knit to last 3 sts, ssk, k1—58 (58, 60, 64, 70, 76) sts.
Next Row: Purl.
Repeat last 2 rows 10 (14, 14, 14, 16, 15) more times—38 (30, 32, 36, 38, 46) sts.
Repeat Decrease Row—36 (28, 30, 34, 36, 44) sts.
Next Row (Wrong Side): P1, p2tog, purl to last 3 sts, p2tog through back loops, p1—34 (26, 28, 32, 34, 42) sts.
Repeat last 2 rows 3 (0, 0, 1, 1, 2) more time(s)—22 (26, 26, 28, 28, 30, 34) sts.
Repeat Decrease Row—20 (24, 26, 26, 28, 32) sts.
Next Row (Wrong Side): Bind off 2 (3, 3, 3, 3, 4) sts, purl to end of row—18 (21, 23, 23, 25, 28) sts.
Next Row (Right Side): Bind off 2 (3, 3, 3, 3, 4) sts, knit to end of row—16 (18, 20, 20, 22, 24) sts.
Repeat last 2 rows 2 more times—12 (12, 14, 14, 16, 16) sts. Bind off.
FINISHING
Neckband
With Right Side facing, smaller needles and A, pick up and k7 (7, 8, 6, 7, 7) sts across bound-off edge of right front, pick up and k 2 (2, 2, 4, 4, 4) sts across right side bind-off, pick up and k11 (11, 11, 14, 14, 14) sts across right neck,
pick up and k28 (28, 30, 32, 34, 34) sts across back neck,
pick up and k11 (11, 11, 14, 14, 14) sts across left neck,
pick up and k 2 (2, 2, 4, 4, 4) sts across left side bind-off,
pick up and k7 (7, 8, 6, 7, 7) sts across bound-off edge of left front—68 (68, 72, 80, 84, 84) sts.
Work even in Seed st for about 1”.
Bin off in pattern.
Sew sleeve seams, sew in sleeves.
Ruffle
With Wrong Side facing, larger needles and B, pick up and k74 (84, 92, 100, 108, 118) sts.
Next Row: Knit loosely.
Bind off very loosely.
Weave in ends.
Your Recently Viewed Projects
Thanks for your comment. Don't forget to share!
Linda
Jan 14, 2017
Juliet's little shrug is gorgeous for young women and girls. An elegant project for gift giving. I like it's ruffled trim around the lower edge.
lizrichardson 6801 370
Apr 15, 2016
I note Isurdam has asked the same question about the ruffle. I just can not fathom out how to do it. In response to Isurdam you basically repeated what was said in the pattern and not offered any further advise on our confusion. The Red Heart website does not offer any further advise on how to do it. Could you explain it further please.
jamiekonshak 35244 94
Nov 07, 2014
Is the stitch count right for all of the increases? Have tried this twice and the count seems to be off.
Editor JD
Nov 07, 2014
Hi jamiekonshak 3524494, We just reviewed the pattern and everything seems correct. We suggest checking out the original pattern on the Red Heart website. Search by "Juliet's Love Shrug." Hope this helps! -Editors of AllFreeKnitting
lsurdam 9929382
Mar 06, 2014
I would like to have more information on the attachment of the ruffle. How to knit it to the shrug is not clear to me. Thank you.
Lisa
Oct 11, 2014
The ruffle just looks difficult, there's no attaching ( great, less sewing) if you look at the very last few lines of the pattern, it explains how many stitches to pick up and to knit just the one row and cast off. This can be a little fussy, if you don't like picking up stitches, like me, but it will all work out in the end.
brenda
Jun 02, 2012
Love the patterns that you print but wish you would quote materials & needles needed in both UK and US for us otherwise it puts lots of us off knitting them and you give so many lovely patterns
pattiroth 2269942
Apr 07, 2012
This is a really cute pattern: I am going to make this using one of the boutique redheart yarns, to give it even more personal look, just a couple modifications, so darn cute!
Report Inappropriate Comment
Are you sure you would like to report this comment? It will be flagged for our moderators to take action.
Thank you for taking the time to improve the content on our site.