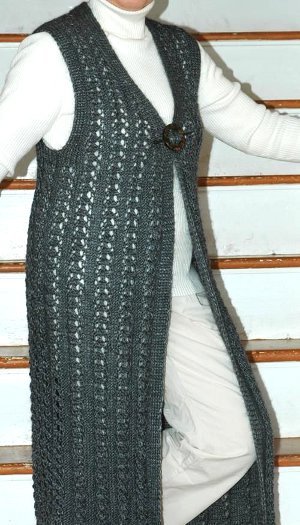
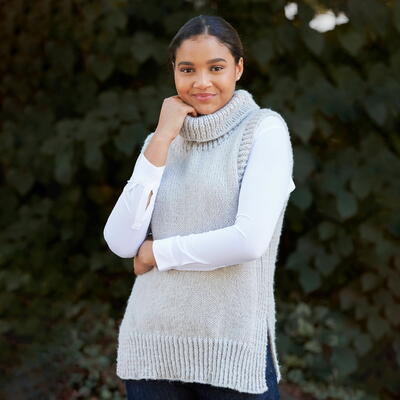
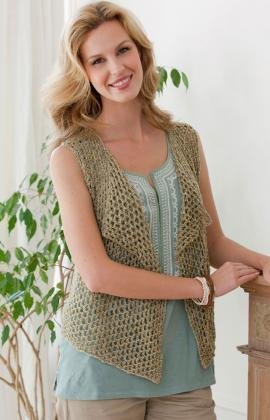
Glam Stripes Vest

You don't have to be a professional to produce some pretty amazing knits. The gorgeous Glam Stripes Vest is proof of that. Simplicity at its best, this knit vest pattern makes it easy for beginner knitters to learn how to knit a vest while creating something simply beautiful. The Glam Stripes Vest is a knit for all seasons, so there's no need to shove it in the back of the closet once winter is over. The extremely comfortable fit is sure to make this the one knit vest you'll just love to keep revisiting.

Knitting Needle Size6 or 4 mm, 7 or 4.5 mm
Yarn Weight(3) Light/DK (21-24 stitches to 4 inches)
Gauge23 sts and 31 rows = 4" [10 cm] with larger needles in stocking st.
Finished SizeTo Fit Bust Measurement: Extra-Small/Medium 28-38" [71-96.5 cm]; Large/2 Extra-Large 40-48" [101.5-122 cm]; 3/5 Extra-Large 52-62" [132-157.5 cm]. Finished Bust: Extra-Small/Medium 46" [117 cm]; Large/2 Extra-Large 52" [132 cm]; 3/5 Extra-Large 65" [165 c
Materials List
- Patons® Glam Stripes™ (2.1 oz/60 g; 239 yds/261 m) Grey (09044) - 7(XS/M); 9(L/2XL); 12 balls(3/5XL)
- Sizes U.S. 6 (4 mm) and U.S. 7 (4.5 mm) knitting needles or size needed to obtain gauge
- 5 stitch markers
Instructions
Notes
-
The instructions are written for smallest size. If changes are necessary sizes the instructions will be written thus ( ). Numbers for each size are shown in the same color throughout the pattern. When only one number is given in black, it applies to all sizes.
-
Garment is worked in one piece.
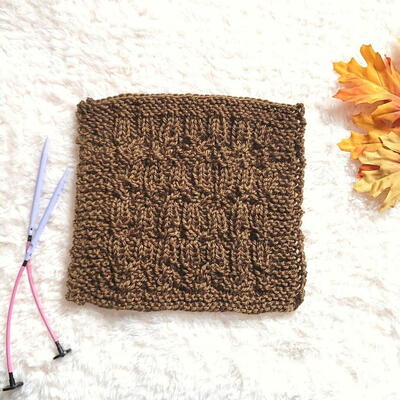
Body
With smaller needles, cast on 115 (133 - 171) sts.
**1st row: (RS). K1. *P1. K1. Rep from * to end of row. (Place marker on this edge for outer edge).
2nd row: K1. *K1. P1. Rep from * to last 2 sts. K2. Rep last 2 rows (K1. P1) ribbing for 4½" [11.5 cm], ending on a 2nd row.** Place markers at each end of last row.
Change to larger needles and proceed in pat as follows:
1st row: (RS). Sl1. Knit to end of row.
2nd row: Purl to last 18 sts. (K1. P1) 9 times.
3rd row: As 1st row.
4th rows: Knit to last 18 sts. (K1. P1) 9 times.
These 4 rows form Ridges Pat and front edge border.
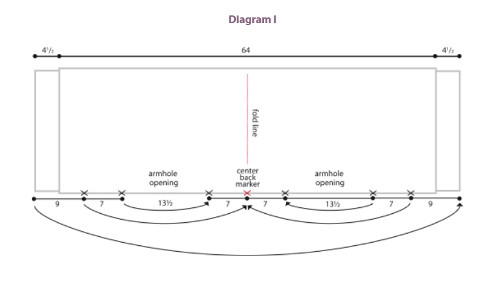
Cont in pat until work from markers measure approx 64" [162.5 cm], ending on a 2nd row of pat. Place 2nd set of markers at each end of last row.
Change to smaller needles and work from ** to **. Cast off in ribbing.
Finishing
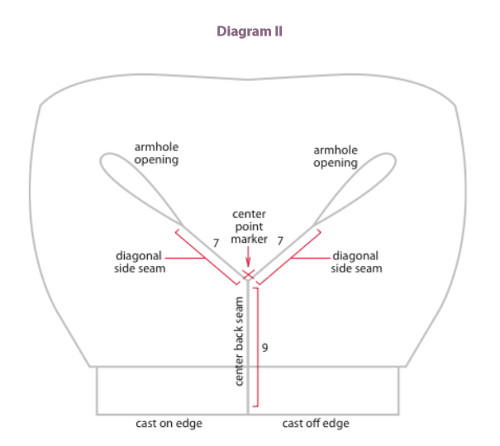
Fold piece in half and place a marker to indicate center point of outer edge. Place 2 sets of markers along outer edge 9" [23 cm] up from cast on and cast off edges. Place another set of markers 7" [18 cm] up from first set. (See Diagram l below).
-
Center back seam: Sew outer edge tog to first set of markers.
-
Diagonal side seams: Place center point marker at top of center back seam. Sew seam to 2nd set of markers on each side (see Diagram ll below) leaving openings for armholes.
Read NextShipwreck Beach Vest
Your Recently Viewed Projects
Thanks for your comment. Don't forget to share!
katedijkers 907265 2
May 01, 2016
I am sewing this lovely vest together, but the back is not level with the front. It looks strange and feels uncomfortable. The dimensions are accurate - what am I doing wrong?
Lisa
May 09, 2015
I like it, I want to make it, but the amounts seem excessive. I looked up the yarn and it is in fact 261 yards per ball and the smallest size requires 7, that's 1,821 yards for a vest! I've made extra large sweaters that didn't need this much yarn.
Report Inappropriate Comment
Are you sure you would like to report this comment? It will be flagged for our moderators to take action.
Thank you for taking the time to improve the content on our site.