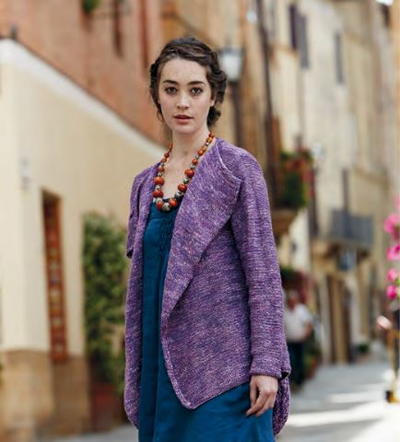
Fresh Spring Cardigan
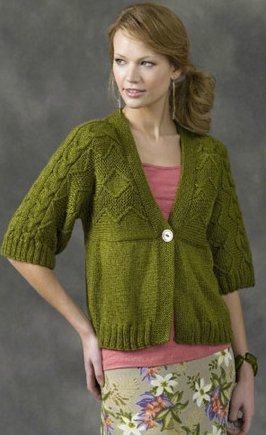
Every gal needs that perfect go-to cardigan that's light enough for spring. This gorgeous Fresh Spring Cardigan features 3/4 length sleeves, a bright color and stylish relaxed fit. With a zig-zag design and cables, this pattern is recommended for an experienced knitter.

Knitting Needle Size7 or 4.5 mm, 8 or 5 mm
Yarn Weight(4) Medium Weight/Worsted Weight and Aran (16-20 stitches to 4 inches)
If you love the Fresh Spring Cardigan, be sure to check out St. Patrick's Day Crafts: 40 Cable Knit Patterns!
MATERIALS
- 15 (18, 21, 24, 27) Naturally Caron Counry
- One pair size US 7 (4.5 mm), or size to guage
- Cable needle (cn)
- Stitch markers
- Stitch holders
- One Button - 1" diameter
- Row Counter
- Extra needle, size US 7 or 8 (4.5 or 5 mm), for 3- Needle Bind off
SIZES
Small (Medium, Large, 1X, 2X)
FINISHED MEASUREMENTS
Bust 36 (40, 44, 48, 52)"/91.5 (101.5, 112, 122, 132) cm (buttoned)
Length 19 (20, 20 3/4, 21 3/4, 22 3/4)"/48 (51, 53, 55, 58) cm
GAUGE
In Stockinette stitch, 20 sts and 28 rows = 4"/10 cm
12-stitch Cable Panel measures 2"/5 cm wide
28-stitch Zig-Zag Panel measures 5 1/2"/14 cm wide
SPECIAL TECHNIQUES
Short Row Shaping
Work the number of sts indicated in the instructions, wrp-t; return to starting point in pattern.
Continue to work progressively shorter rows as indicated in the instructions.
Work wraps together with wrapped sts as follows: Insert right-hand needle into wrap at base of wrapped st from
below, then bring right-hand needle up and into st on left-hand needle ready to work the st; knit wrap and st
together—this prevents a hole from forming where Short Row ended.
Hint: If it's difficult to work wrap and st together as given above, slip wrapped st to right-hand needle, insert left-hand needle into wrap (from bottom to top), place wrap on left-hand needle, return wrapped st to left-hand needle and knit wrap and wrapped st together.
Wrap and Turn (wrp-t)
(RS) Yarn forward (to the purl position), slip next st to right-hand needle, yarn back (to the knit position), return slipped (wrapped st) to left-hand needle; turn, leaving remaining sts unworked.
(WS) Yarn back (to the knit position), slip next st to right-hand needle, yarn forward (to the purl position), return slipped (wrapped) st to left-hand needle; turn, leaving remaining sts unworked.
3-Needle Bind Off (Joining 2 pieces together as you bind off.)
Place the stitches of the pieces to be joined on separate needles, (or each end of a circular needle), held one behind the other with right-sides facing each other, in left hand; with a third needle, (the same size or 1 size largerthan used for knitting the pieces), k2tog [1 from the front needle, 1 from the back needle—1 stitch on right-hand needle], *K2tog [2 stitches on right-hand needle], bind off 1 stitch in usual manner; repeat from * to end.
ABBREVIATIONS
C4B: Slip 2 sts to cn, hold to back, k2, k2 from cn.
C4F: Slip 2 sts to cn, hold to front, k2, k2 from cn.
RT (right twist): K2tog, do not drop sts from left-hand needle; knit first st again, drop both sts from left-hand needle.
LT (left twist): Slip next 2 sts, one at a time knitwise to right-hand needle, return sts to left-hand needle in turned position; knit second st through the back loop (tbl), do not drop from left-hand needle, k2tog-tbl, drop both sts from left-hand needle.
STITCHES USED
Garter stitch: Knit all sts every row.
Stockinette stitch (St st): Knit on RS, purl on WS.
2 x 2 Rib (multiple of 4 sts + 2 )
Row 1: (WS) P2, * k2, p2; repeat from * across.
Row 2: Knit the knit sts and purl the purl sts as they face you.
Repeat Row 2 for 2 x 2 rib
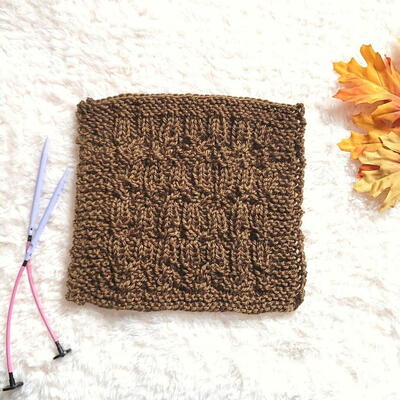
Zig-Zag Pattern (panel of 28 sts) (also see Chart)
Row 1 and all WS rows: Purl.
Row 2: K4, RT, p6, RT, LT, p6, LT, k4.
Row 4: K3, RT, p6, RT, k2, LT, p6, LT, k3.
Row 6: K2, RT, p6, RT, k4, LT, p6, LT, k2.
Row 8: K1, RT, p6, RT, k6, LT, p6, LT, k1.
Row 10: RT, p6, RT, k8, LT, p6, LT.
Row 12: LT, p6, LT, k8, RT, p6, RT.
Row 14: K1, LT, p6, LT, k6, RT, p6, RT, k1.
Row 16: K2, LT, p6, LT, k4, RT, p6, RT, k2.
Row 18: K3, LT, p6, LT, k2, RT, p6, RT, k3.
Row 20: K4, LT, p6, LT, RT, p6, RT, k4.
Repeat Rows 1 – 20 for Zig-Zag patt.
Cable (panel of 12 sts)
Row 1 and all WS rows: K2, p8, k2.
Rows 2, 4 and 8: P2, k8, p2.
Row 6: P2, C4B, C4F, p2.
Row 10: Repeat Row 2.
Repeat Rows 1 – 10 for Cable.
NOTES
- Sleeve/Yokes are worked from lower edge of Sleeve to center Back, then joined at center Back with 3-Needle Bind Off.
- Body is picked up across lower edge of Yoke sections and worked down.
- Front neck is shaped using Short-rows (see Special Techniques).
-
HELPFUL: Place markers between Cable and Zig-Zag patterns.
INSTRUCTIONS
LEFT SLEEVE
Cast on 90 (94, 98, 102, 106) sts.
(WS) Begin 2 x 2 rib; work even until piece measures 2" from beg, end with a RS.
Establish Pattern
Row 1 (WS): P3 (5, 6, 8, 9) – keep in St st; beginning Row 1 of patterns, work Zig-Zag patt over 28 sts, Cable over 12 sts; p4 (4, 6, 6, 8) – keep in St st; work Cable over 12 sts, Zig-Zag pattern over 28 sts; p3 (5, 6, 8, 9) – keep in St st. Continue as est; repeat Rows 1 – 20 of Zig-Zag patt and Rows 1 – 10 of Cable, work remaining sts in St st. Work even until piece measures 10" from beg, end with a WS.
YOKE
Continuing in patt, cast on 5 sts at beg of next 2 rows—100 (104, 108, 112, 116) sts. Working new sts in St st, work even until piece measures 15 1/2 (16 1/2, 17 1/2, 18 1/2, 19 1/2)" from beg, end with a WS row; place a marker between center 2 sts for Back neck/shoulder—50 (52, 54, 56, 58) sts each side of marker for Back and Front.
Dividing Row for Neck
(RS) Work across to neck marker for Back; place rem 50 (52, 54, 56, 58) sts on holder for left Front.
Left Back Yoke
Shape Neck: (WS)Cont in patt, at neck edge, dec 1 st every row twice—48 (50, 52, 54, 56) sts remain. Keeping 1 st each edge in St st, work even in patt until piece measures 19 (20, 21, 22, 23)" from beg, end with a RS row.
Place remaining sts on a holder for center Back.
Left Front Yoke
With RS facing, return 50 (52, 54, 56, 58) sts from left Front holder to needle; join yarn ready to work a RS row. Cont in patt as est for remainder of Front, work even for 3 rows.
Short-row Shaping
Row 4 (WS): Work across to last 8 sts; wrp-t—42 (44, 46, 48, 50) sts remain in work.
Row 5 and all RS rows: Work even in patt.
Row 6: Work across to last 16 sts, wrp-t—34 (36, 38, 40, 42) sts remain in work.
Row 8: Work across to last 24 sts, wrp-t—26 (28, 30, 32, 34) sts remain in work.
Row 10: Work across to last 28 sts, wrp-t—22 (24, 26, 28, 30) sts remain in work.
Row 12: Work across to last 32 sts, wrp-t—18 (20, 22, 24, 26) sts remain in work.
Row 14: Work across to last 36 sts, wrp-t—14 (16, 18, 20, 22) sts remain in work.
Row 16: Work across to last 40 sts, wrp-t—10 (12, 14, 16, 18) sts remain in work.
Row 18: Work across all sts, working wraps together with wrapped sts—50 (52, 54, 56, 58) sts.
Place sts on a holder for left Front neck.
RIGHT SLEEVE
Cast on and work as for Left Sleeve until piece measures 15 1/2 (16 1/2, 17 1/2, 18 1/2, 19 1/2)" from beg, end with a WS row.
Dividing Row for Neck
(RS) Work across to neck marker for right Front; place rem 50 (52, 54, 56, 58) sts on holder for Back.
Right Front Yoke
(WS) Work even for 3 rows, end with a WS row.
Short-row Shaping.
Row 5 (RS): Work across to last 8 sts; wrp-t—42 (44, 46, 48, 50) sts remain in work.
Row 6 and all WS rows: Work even in patt.
Rows 7 – 18: Rep Rows 6 – 17 of left Front.
Row 19: Work across all sts, working wraps together with wrapped sts—50 (52, 54, 56, 58) sts.
Place sts on a holder for left Front neck.
Right Back Yoke
With RS facing, return 50 (52, 54, 56, 58) sts from Back holder to needle; join yarn ready to work a RS row. Cont in patt as est for remainder of Back.
Shape Neck: (RS) At neck edge, dec 1 st every row twice—48 (50, 52, 54, 56) sts remain. Keeping 1 st each edge in St st, work even in patt until piece measures 19 (20, 21, 22, 23)" from beg, end with a WS row. Place remaining sts on a holder for center Back.
Center Back Seam: Join pieces using 3-Needle Bind Off (see Special Techniques).
LOWER BODY
Back
With RS facing, pick up and knit 96 (108, 116, 128, 136) sts evenly spaced across lower edge of Back Yoke.
(WS) Begin St st; work even for 1 row.
Shape Back
(RS) K20, [(M1, k1) twice, M1], k52 (64, 72, 84, 92); repeat [ to ] once, knit to end—102 (114, 122, 134, 142) sts.
(WS) Continuing in St st, work even until piece measures 7 1/2 (8, 8 1/2, 9, 9 1/2)" from pick-up row, end with a RS row.
(WS) Change to 2 x 2 rib; work even for 2".
Bind off all sts in rib.
Right Front
With RS facing, pick up and knit 44 (48, 56, 60, 64) sts evenly spaced across lower edge of right Front.
(WS) Begin St st; work even for 1 row.
Shape Front
(RS) K20, [(M1, k1) twice, M1], k10; repeat [ to ] once; k10 (14, 22, 26, 30)—50 (54, 62, 66, 70) sts.
(WS) Cont in St st,work even until piece measures 7 1/2 (8, 8 1/2, 9, 9 1/2)" from pick-up row, end with a RS row.
(WS) Change to 2 x 2 rib; work even for 2".
Bind off all sts in rib.
Left Front
With RS facing, pick up and knit 44 (48, 56, 60, 64) sts evenly spaced across lower edge of left Front.
(WS) Begin St st; work even for 1 row.
Shape Front
(RS) K10 (14, 22, 26, 30), [(M1, k1) twice, M1], k10; repeat [ to ] once, k20—50 (54, 62, 66, 70) sts.
(WS) Cont in St st,work even until piece measures 7 1/2 (8, 8 1/2, 9, 9 1/2)" from pick-up row, end with a RS row.
(WS) Change to 2 x 2 rib; work even for 2".
Bind off all sts in rib.
FINISHING
Join Sleeve and side seams.
Neckband
With RS facing, beginning at neck edge, k50 (52, 54, 56, 58) sts from right Front neck holder, pick up and knit 6 sts across shoulder area (Front and Back) to Back neck, 38 sts evenly spaced across Back neck, 6 sts across shoulder area, (Back and Front) to left Front holder, k50 (52, 54, 56, 58) from holder—144 (148, 152, 156, 160) sts.
(WS) Begin Garter st; work even for 13 rows.
Bind off all sts loosely.
Button and Buttonhole Bands (both alike)
With the RS facing, beginning at (neck edge on left Front /lower center Front edge on right Front), pick up and knit 47 (49, 53, 55, 57) sts evenly spaced along edge (to lower edge on left Front/to beginning of neck shaping on right Front. (WS) Begin Garter st; work even for 13 rows.
Bind off all sts loosely.
Left Front: Carefully weave Neck band and button band together at neck edge; sew button over seam.
Right Front: Weave bands of right Front together, leaving a space for the buttonhole in center of the seam.
Using yarn needle, weave in all ends.
Your Recently Viewed Projects
Thanks for your comment. Don't forget to share!
Lisa
Apr 25, 2023
The recommended yarn for this pattern is actually called Naturally Caron country yarn and was discontinued about 12-15 years ago, when yarnspirations bought out the Caron yarn company.
nativelady
Jun 30, 2013
I made this for myself and receive compliments every time that I wear it. The wrapped stitches were the 1st that I have done and were a challenge but worth the trip.
DianeBensalemPA
Feb 28, 2013
I can't wait to get started. This is beautiful and I know that at my age 60+ it is a style that will go with jeans and dress pants.
marydavehastings 1 589527
Mar 03, 2013
I thought the same thing..its great for any aged lady....will make a few once out of rehab!!love finding new thing like this!!!
kdhughes46 7521915
Feb 08, 2013
I love it,but I'm not an advanced knitter. Can the pattern be adjusted without the cables & zigzag? Of course the ribbing &purling are no problem. Please?
campbellmjs
May 05, 2012
There is a big population out there that would wear this. Think of all age groups and individuals who are more interested in classic lines, not trendy like the many styles that look like the knitter ran out of yarn.
phertyl 6939251
Apr 27, 2012
I wish your patterns were more stylish and trendy like Ravelry and Interweave. I mean - seriously - who would wear that???!!!
lindacanfly
Apr 10, 2013
I would wear it, and both of my daughters that are in their 30's said they would love to have this sweater....we all have different tastes of course. I appreciate the patterns that AllFreeKnitting offers, and have used many of them for myself and for gifts.
Report Inappropriate Comment
Are you sure you would like to report this comment? It will be flagged for our moderators to take action.
Thank you for taking the time to improve the content on our site.