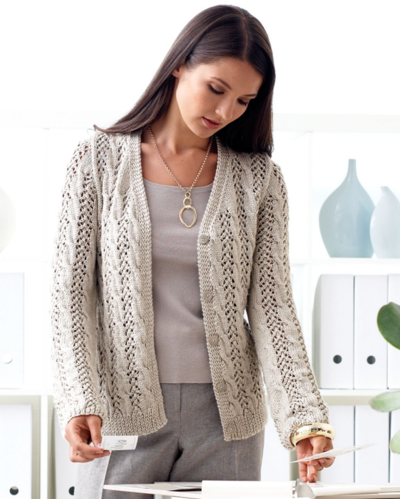
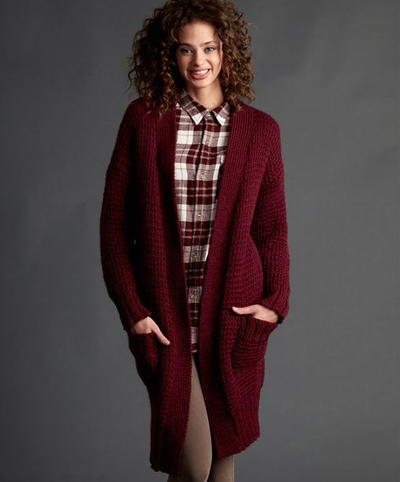
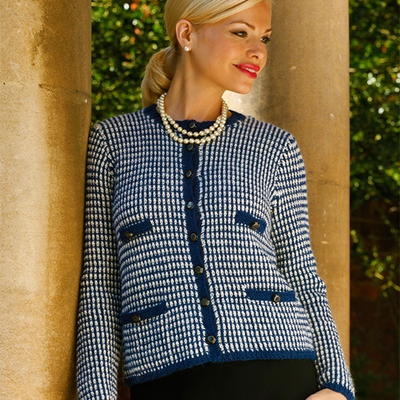
Royal English Tea Cardigan
Learn how to knit a cardigan that would look right at home at a proper English tea.

The Royal English Tea Cardigan will make you feel like a queen. The navy and white color scheme is incredibly sophisticated and the perfectly placed pockets add a special touch to this free knit cardigan pattern. You won't be able to resist this beautiful knitting pattern, because you can wear it for so many different occasions. Top off this exquisite knit sweater with a strand or two of pearls and you are all set for a royal event. The lightweight yarn ensures you won't overheat, but the long sleeves provide extra coverage for chilly indoor environments. Work up this memorable knitted cardigan and you won't be disappointed.

Knitting Needle Size3 or 3.25 mm, 7 or 4.5 mm
Yarn Weight(3) Light/DK (21-24 stitches to 4 inches)
Gauge24 sts and 29½ rows to 10 cm (4 in) over patt on 4½ mm needles.
Finished SizeTo fit bust 81 86 91 97 102 107 cm 32 34 36 38 40 42 in Actual underarm size, approx 91 95 102 105 112 116 cm 36 37½ 40 41½ 44 45½ in Length from shoulder, approx 50 51 52 53 54 56 cm 19¾ 20¼ 20¾ 21 21½ 22 in Sleeve length 44 44 44 44 44 44 cm 17½ 17½ 17½
Materials List
- Artesano 100% Alpaca DK Dark Uruguay 6 6 7 7 7 8 50g Balls
- Light Cream 556 6 6 7 50g Balls
- Pair needles each nos 4½ mm and 3¼ mm (UK 7 and 10 , USA 7 and 3)
- 12 buttons
Cardigan
Pocket Linings (2 alike)
Using 4½ mm needles and D, cast on 23 sts. Beg K row, work in stocking stitch for 10 cm (4 in), ending after a P row and inc 4 sts evenly across last row. Slip these 27 sts on a spare needle and leave.
Back
Using 4½ mm needles and D, cast on 109 (115; 121; 127; 133; 139) sts.
1st Row – K1, (P1, K1) to end.
2nd Row – K2, (P1, K1) to last st, K1.
3rd Row – As 1st.
Break D.
Change to patt
NB:- Carry colour not in use loosely up side of work, joining in L and D as required on the first 4 rows.
1st Row (RS) – In L, K2, (P1, K1) to last st, K1.
2nd Row – In D, P1, (sl1 purlways, P1) to end.
3rd Row – In D, K1, (P1, K1) to end.
4th Row – In L, P2, (sl1 purlways, P1) to last st, P1.
These 4 rows form patt. **
Cont in patt until back measures 33 cm (13 in) measured through centre of work, ending after a WS row.
Shape Armholes
NB:- Helpful Hint: When a slip stitch falls on edge st, this stitch should be purled.
Keeping patt correct, cast off 7 (8; 8; 9; 10; 10) sts at beg of next 2 rows. Dec 1 st at each end of next 5 (5; 5; 7; 7; 7) rows, then on every foll alt row until 79 (83; 87; 89; 93; 97) sts rem.
Cont straight until back measures 50 (51; 52; 53; 54; 56) cm, 19¾ (20¼; 20¾; 21; 21½; 22) in from beg, ending after a WS row.
Right Front
Commencing with 53 (55; 59; 61; 65; 67) sts, work as back to **.
Cont in patt until front measures rows 11 cm (4½ in) from beg, ending after a WS row.
Place pocket lining
Next Row – Patt 16 (17; 19; 20; 22; 23), * slip next 27 sts on a stitch holder, and in place of these, patt across a group of lining sts, patt to end.
Cont straight in patt until front measures same as back to armhole shaping, ending at side edge.
Shape Armhole
Cast off 7 (8; 8; 9; 10; 10) sts at beg of next row. Dec 1 st at armhole edge on next 5 (5; 5; 7; 7; 7) rows, then on every foll alt row until 38 (39; 42; 42; 45; 46) sts rem.
Cont straight until front measures 44 (46; 47; 47; 47; 48) cm, 17½ (18; 18½; 18½; 18½; 19) in from beg, ending at front edge.
Shape Neck
Cast off 9 (9; 10; 10; 11; 12) sts at beg of next row. Dec 1 st at neck edge on next 3 rows, then on every foll alt row until 23 (24; 25; 26; 27; 28) sts rem. Cont straight until front measures same as back to shoulder shaping, ending at armhole edge.
Shape Shoulder
Cast off 8 (8; 8; 9; 9; 9) sts at beg of next and foll alt row. Work 1 row.
Cast off rem 7 (8; 9; 8; 9; 10) sts.
Left Front
Work to match right front but noting that pocket will be –
Patt 10 (11; 13; 14; 16; 17), work as right pocket row from * to end.
Sleeves
Commencing with 45 (47; 49; 49; 51; 53) sts, work as back to **. Cont in patt shaping sleeve by inc 1 st at each end of next row, then on every foll 6th (6th; 6th; 4th; 4th; 4th) row until there are 51 (69; 79; 63; 71; 85) sts, then on every foll 8th (8th; 8th; 6th; 6th; 6th) row until there are 75 (81; 85; 91; 95; 101) sts, taking extra sts into patt. Work straight until sleeve measures 44 cm (17½ in) at centre, ending after a WS row.
Shape Top
Cast off 7 (8; 8; 9; 10; 10) sts at beg of next 2 rows. Dec 1 st at each end of next row, then on every foll 4th row until 51 (55; 59; 63; 65; 71) sts rem, then on every foll alt row until 33 (35; 37; 41; 41; 45) sts rem, finally dec 1 st at each end of every row until 23 (25; 27; 31; 31; 35) sts rem. Cast off.
Upper Pocket Tabs (2 alike)
Using 3¼ mm needles and D, cast on 18 sts.
Work 6 rows in g st. Cast off loosely knitways.
-
Pocket Tops
With RS facing for 1st row, slip a group of pocket sts onto a 3¼mm needle. Join in D and work 7 rows in g st.
Cast off knitways.
Neckband
First join shoulders. Using 3¼ mm needles and D, RS facing, K up 25 (25; 26; 28; 32; 33) sts evenly round right front neck, K across sts of back, finally K up 25 (25; 26; 28; 32; 33) sts evenly round left front neck.
83 (85; 89; 93; 103; 107) sts. Work 6 rows in rib as on back.
Cast off evenly in rib.
Right Border
Using 3¼ mm needles and D, RS facing, K up 109 (112; 114; 114; 114; 117) sts evenly along right front edge.
1st and 2nd Rows – K.
3rd Row – K3, * cast off 2 sts, K12 (13; 13; 13; 13; 13) – including st on left needle after cast-off; rep from * 6 times more, cast off 2 sts, rib to end.
4th Row – K casting on 2 sts neatly in each place where sts were cast off.
5th and 6th Rows – K. Cast off evenly knitways.
Left Border
Omitting buttonholes work as right border.
To Make Up
Press work lightly following pressing instructions on the ball band. Sew down pocket linings on WS and tops on RS. Join side and sleeve seams. Sew in sleeves. Sew upper pocket tabs in place as in photograph. Sew on buttons to left front border, and remaining 4 on pocket tops and tabs as in photograph. Press seams.
Abbreviations
- K
- knit
- P
- purl
- st(st)
- stitch(es)
- patt
- pattern
- g st
- garter stitch
- inc
- increase, increasing
- dec
- decrease, decreasing
- sl
- slip
- beg
- beginning
- alt
- alternate
Read NextCabled Mustard Knit Cardigan Pattern
Your Recently Viewed Projects
Thanks for your comment. Don't forget to share!
Susan S
Aug 07, 2018
This will be a super soft and warm sweater because it's made of alpaca yarn. That alone would make it special - but it's also a classic pattern that will look fresh for many years. Truly an investment and a statement piece.
caroljaapp 1190524
Oct 11, 2017
Hi, I am actually this jacket at the moment in blue shades having already knitted it in mink and cream. I also noted the lack of shoulder shaping on the back, but as I an experienced knitter I added my own as I thought that the instruction had just been missed. I also knitted the pocket tops in 1x1 rib and also knitted front bands in 1x1 rib which I then stitched on as it gives a better appearance. Well worth the knit as it is a very classic looking jacket.
Tricia108
Jul 16, 2017
I like the basic pattern but am confused by the instructions at the end. Do you keep the stitches on a stitch holder and then join the pieces? I have done that before but the complete instructions are missing. I would not rate this pattern as easy either. Experience in making cardigans are needed first just to join the pieces. The other all effect is nice but there are missing details.
doloresvanjelles 2 742603
Jul 09, 2017
Where is the instructions for the back shoulders, please. Very frustrating! Dolores
3cats2love
Jul 10, 2017
Hi Dolores, try to picture the back as a straight piece going up with curved places on both sides for the armholes. There is no shoulder shaping for the back. The front pieces come up with shaping for the armholes and then the neck and shoulders. In other words, all the shaping is done on the front pieces.
judycrooks8 404529 1
Mar 15, 2017
I'm a bit puzzled as to where the rest of the pattern for the back is. I have reached the end of instructions but there is nothing telling me about shoulder shaping. The amount of sts I have left will make around the the neck way too big. What should I do?
Gracie
Mar 23, 2017
Are the shoulder shaping instructions for both the front and the back? I have not made this, but that is how I would read this pattern. It is a beautiful and elegant looking cardigan, but I would not rate the pattern as "Easy." I would call this an intermediate level pattern.
Sari
Aug 23, 2017
please let me know how to fit fronts onto back with only so few stitches left..Love pattern worked diligently and would like to finish properly.
quanahs 5032097
Apr 27, 2016
Beautiful knit jacket with Chanel styling, it looks far more complicated than the pattern. Perhaps that is due to the elegant plackets on the pockets and the pretty button and hem bands. The classic styling is bound to make this a wardrobe staple for years to come
Report Inappropriate Comment
Are you sure you would like to report this comment? It will be flagged for our moderators to take action.
Thank you for taking the time to improve the content on our site.